


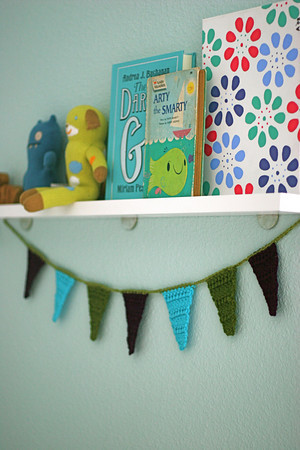
Pennant Garlands are everywhere and we still can’t get enough. This weekend, I tried one with yarn! It was really fun to make and pretty quick. Oh, and you can make this in bed, a total plus for crochet in general. I think these would be A-dorable on the mantle for Christmas strung from stocking to stocking.
Directions after the jump:
Key:
I used an I/9 hook but anything from G-K would work.
Tips:
Unless otherwise noted, pick up both loops of each stitch
Keep gauge loose for ease of crochet and so that the piece will lay flat
Pennant:
Row 1: Ch 4, 3 DC in first Ch stitch (This should look like 4 DC in one loop – a tiny triangle)
Row 2: Ch 3, turn, 1 DC each in next 4 stitches (including the first stitch right at the bottom of your chain & the last stitch, which will be tighter. You can pick up just the top loop on the last DC)
Row 3: Ch 3, turn, 1 DC each in next 5 stitches
Row 4: Ch 3, turn, 1 DC each in next 6 stitches
Row 5: Ch 3, turn, 1 DC each in next 7 stitches
Row 6: Ch 3, turn, 1 DC each in next 8 stitches
Row 7: Ch 3, turn, 1 DC each in next 9 stitches (You can continue with more rows if you would prefer larger triangles)
Pull yarn through one last time to tie off and cut leaving a 1-2 inch tail
Crochet desired number of pennants (there are 7 here)

Connecting Garland:
1. With garland color, Ch 25 (or more stitches for added length at end)
2. Pick up top row of a pennant (with the pennant tail facing right)

3. 1 SC in each (10) stitch across top of pennant (make sure your first stitch is directly under the tail knot)
4. Ch 5 (or more, if you want more space between pennants)
5. Repeat step 2-4 for each pennant
6. After attaching last pennant, Ch 25 (or more for added length.)
Clean up:
Weave hook through top row of pennant (as shown below) and pick up tail on hook. Pull tail through piece.
Weave hook down side towards bottom point, pick up bottom tail and pull throw piece.

i love the colors you chose!! this makes me want to learn to crochet. can i ask what you would say your "expert" level is to do this project? is it a beginner project? i really would like to crochet in bed.
This is absolutely a beginner project. With that said, this is my first crochet pattern so if anything is unclear please don't hesitate to ask!
Jacinda, Are you giving right or left-handed directions? Are you ambidexterous?
These are right-handed directions. If you are left-handed and considering taking up crochet, I highly recommend learning right-handed. It's pretty easy, you just move the yarn more than the hook. : )
What a great idea! I've never seen this type of decoration in a crochet pattern. I'll have to pass this on to my friends 🙂
Another wonderful idea!
Hi Jacinda! Just testing this out tonight and I have one question about the pattern. On each row you are increasing on each side. One side with the ch 3 and the other with an extra dc. Are you saying to do that final double crochet into the chain space at the end of the row? I think that is what you are saying (and it's how I have done my one practice pennant tonight & it looks pretty good) but I wanted to be sure. It's hard to tell from your photos, but my edge is a little jagggedy/not perfect and I wanted to be sure I wasn't doing anything wrong before I get too far.
Heather- that sounds right. You might just have to pull it into shape a bit when you finish each triangle. Send us a pic of your finished product!!
Awesome! Thanks for the quick answer too. The further I went the better it looked…think I just needed to get the hang of it. I'll definitely send a pic too. Thanks again!
I finally posted about my finished pennant garland! Thanks for the awesome pattern!
http://passthecereal.blogspot.com/2010/11/tcbwell-baby-steps-version.html
[…] aren’t more actually. Above my desk, I hung my crochet pennant bunting (tutorial via prudentbaby here) and I hung my scalloped felt bunting next to the […]