


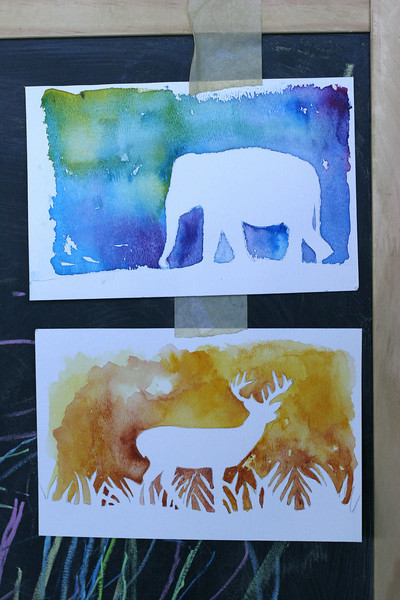
I took the girls to the zoo this weekend and I had some fun FINALLY experimenting with my zoom lens. It was cool to take some photos of something other than the kids for once. So, I came home with some cool animal shots and I was trying to think of something to do with them here on Prudent Baby. Here is a DIY for these little watercolor silhouettes that I made.
FULL DIY and FREE animal images for download after the jump.
What you need:
• Print outs of Animals or any subject with an interesting silhouette. With a bouquet of flowers you could do something beautiful like this.
• Watercolor paper
• Watercolor paints (2-3 colors will do)
• Brush
• Xacto blade or small scissors
• Masking tape
1. Print out your image to fit comfortably on your watercolor paper with room around.

2. Cut out your animal with as much detail as possible (but don’t go crazy, note I skipped the hair on the elephant’s back. )

3. Position your cut-out and trace with your pencil. Try to keep your pencil line light.
Give your subject a surface to stand on so he doesn’t float.


4. Tape your watercolor paper down to a piece of cardboard or art board all the way around the very edge.

5. Use your brush to wet the entire background around your animal. I didn’t go all the way to the edge and tried to leave a few small spots dry. Tip: you can tint the water lightly with watercolor paint so that you can see where you have missed.


4. Load your brush up with wet paint and touch your brush to the paper. The paint will spread but only on the wet areas. Add more paint. Move the board around to help the paint spread. Use your brush to cheat your paint into smaller details.


Tip: Try to continue the tone “behind: the animal. For example: If the left side of the trunk is purple, continue on the right side of the trunk with purple.

5. Step back and squint. Can you see your animal clearly? Is the background too bright? Too busy? If so, brush over the entire background with a wet brush to mute and blend the background.

6. Let your painting dry completely before removing tape carefully.


Images for download…


These are cool! I bought some watercolors a while back, but never knew why! Now I do!
These are beautiful! I want to see more of your mad watercolor skills!
Love the deer!
Really fun!
I think Ill do it again, But next time ill cut out the silhouettes after painting and put a clean sheet of white under it.
I was having too much fun swirling colors, and my lines aren't as clean as I would like.
We're using this idea to make some art for our living room wall. I've been playing with watercolors all afternoon and have almost finished the 5th "painting." Once they're dry, we're going to do a high-quality scan of each and paste silhouettes of different kinds of trees onto our scans, then print them out and frame them! Cheating, yes, but little easier than cutting and tracing all the tree branches, I think…
regina that sounds like such a fun and fabulous afternoon, painting and decorating. i can't wait to see you artwork, if you don't send us a picture i will cry.
so beautiful! you could also make it easier for kiddos by tracing the outline of the animal (or coloring him all in) with white crayon. then even if the paint touched, it wouldn't show up!
hmmm… can we combine two projects? this one and the decorated step stool?!
(i dont know much about the mod podge… would that work?)
I love this! I mentioned it on my link love today. Don't think I could get the watercolor to turn out quite this nice…
Wow! Beautiful! I am loving this idea!
meraviglia!
Wow. Rally beautiful & simple. I think I’ll try it. hanks for the idea!
[…] are everywhere. They are a nice and easy way to decorate, but over at Prudent Baby they have taken it up a notch or two. I love the use of watercolors. If you aren’t good […]
[…] finally, I’ve really been wanting to paint more. There just something so nice about how easy it is to pack up some watercolors, a couple brushes, […]
I just did this with my kids 9 and 4. I did trace the outlines with white crayon to make it easier for them. Wow they turned out beautiful! I know what we will be making for their grandparents for Christmas- one of a kind art work.
Thanks!
[…] Levi could help me make his year. I came up with a watercolor heart banner that was inspired by these watercolor animal silhouettes. We will definitely have to make the animal silhouettes in the future…a little more boyish. […]
I love this idea! I’m making eleven different ones, each with different animals and colors, for Christmas presents. Thanks for sharing this amazing project!
Such a cool idea. Have been using this as inspiration to make some wedding invitations (we live in Africa).
love this!! sooo relaxing to do!
Hello there! This is my first comment here so I just wanted to give
a quick shout out and tell you I really enjoy reading
your articles. Can you suggest any other blogs/websites/forums that go over
the same topics? Thank you!
I’m the Editorial Assistant for Fun Family Crafts and I wanted to let you know that we have featured your project! You can see it here:
http://funfamilycrafts.com/watercolor-silhouettes/
If you have other kid-friendly crafts, we’d love it if you would submit them. If you would like to display a featured button on your site, you can grab one from the right side bar of your post above. Thanks for a wonderful project idea!
[…] DIY: Watercolor Silhouette | Pretty Prudent. […]
Love this! I can’t paint (at all) but I’d love to & I think even I could manage this silhouette paintings! Thanks for the instructions – this is super cute.
[…] love reading Prudent Baby because she always shows you simple ways to make big impact, amazing projects. Like this above […]
[…] Watercolor Silhouettes – Prudent Baby. These look so gorgeous, and you could use so many different silhouettes. […]
[…] I had taken care of the fiber medium long ago, I turned to paint for this gift. I followed this tutorial for creating a watercolor elephant silhouette. Using an exacto knife, I cut around a photo of an […]
[…] questa qui – realizzare qualcuno di questi lavoretti: silouette di animali su legno o con acquerelli e queste cornici troppo carine, fatte riciclando le scatole delle scarpe – fare un bel libro […]
[…] Water color silhouettes via Pretty Prudent […]
[…] Stencil Watercolor. […]
This will be the art project tomorrow at the nursing home where I volunteer ~ love it !!
[…] 3. Watercolor Silhouettes – Create beautiful silhouettes of elephants or other animals with watercolors. It’s a perfect way to remember a special trip to the zoo, a wild animal park, or other animal encounter. […]
[…] veure font original […]
And as a biracial man, he can bear witness to one more aspect of
the debate.
Sizes do vary even in the very same brand so please verify
the measurements thank you.
[…] Remember: The colours you choose to emphasize and/or blend in the background will make as strong of a statement about your painting as the blank silhouettes themselves. For some ideas of how it should look, please see more simple versions here. […]
[…] Remember: The colours you choose to emphasize and/or blend in the background will make as strong of a statement about your painting as the blank silhouettes themselves. For some ideas of how it should look, please see more simple examples of watercolour silohouette paintings here. […]
I don’t get what happened after step 3, how do you keep the watercolor from going over to the elephant? How does the water colors stay outside of the elephant pattern?