


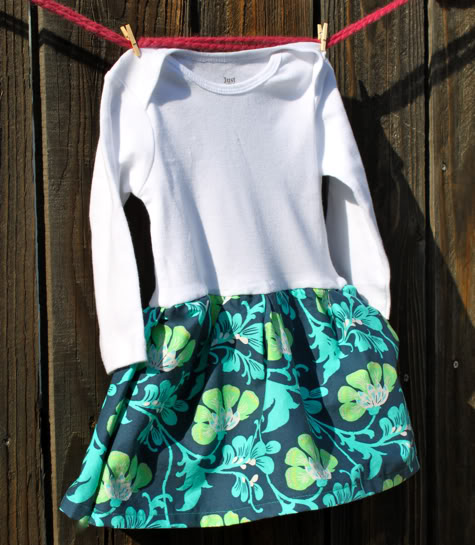
Hello, when you read this DIY you will be like “That’s it, I’m buying a sewing machine.” SO SIMPLE. It’s a onesie with a skirt around it, cute AND comfy:

Find out how to make this 10 Minute Onesie Dress (with finished seams through no work of your own!) after the jump…
10 Minute Onesie Dress
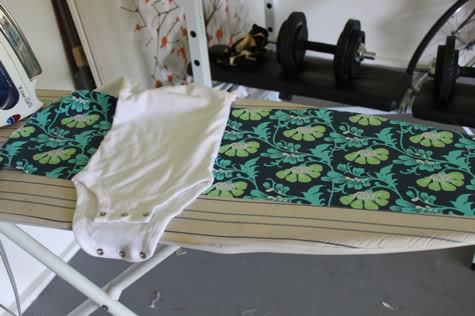
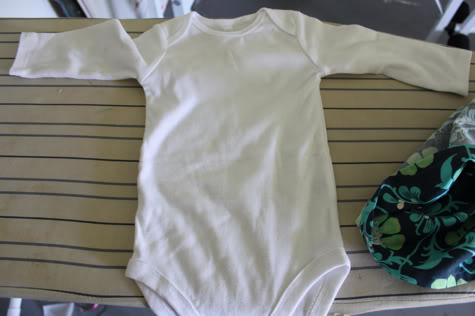
1. Acquire one onesie and 1/4 yard of cute cotton fabric (mine from City Craft, isn’t it pretty? get it online here: Amy Butler Sweet Jasmine in Navy). Pre-wash and iron:
2. Fold one long edge under 1/4″ and iron, then another 1/4″ and iron and stitch in place to create your hem. jacinda also suggested you could use a cute tea towel and it would already have a hem, so you could skip this part and have like a seven-minute onesie dress.
3. Sew a basting stitch along the other long side:
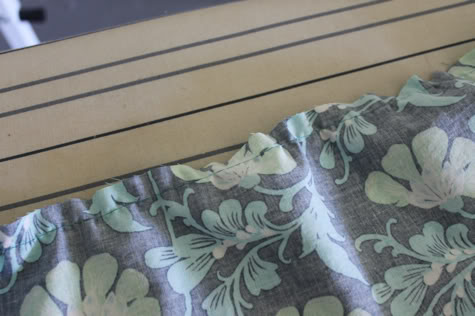
3. Pull the bobbin thread to gather it until it is twice the width of your onesie (when it’s slightly stretched out). For my size large gerber onesies i made mine 18″:
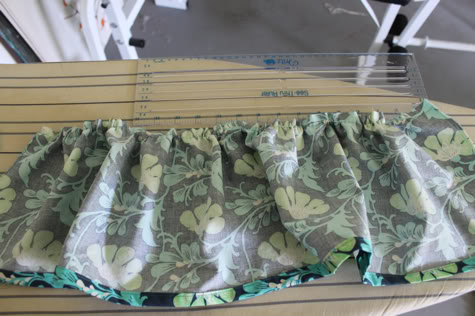
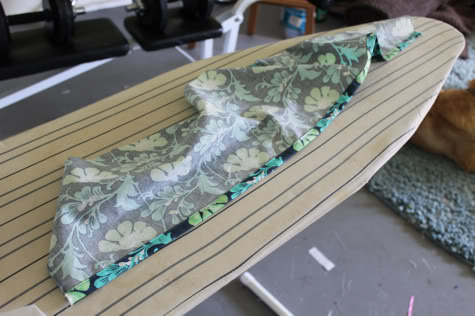
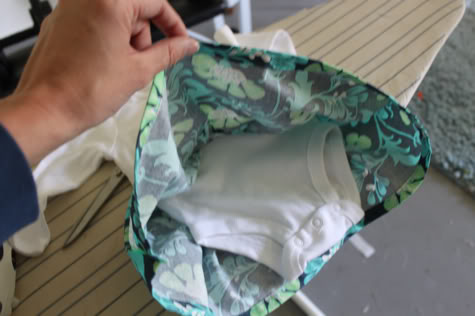
4. Fold it in half right sides facing:
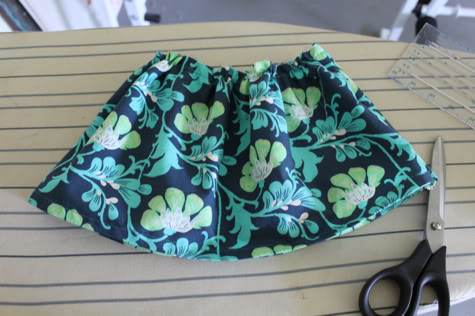
Sew together and finish the edges by serging, sewing with a zig zag or overlock stitch or cutting with pinking shears:
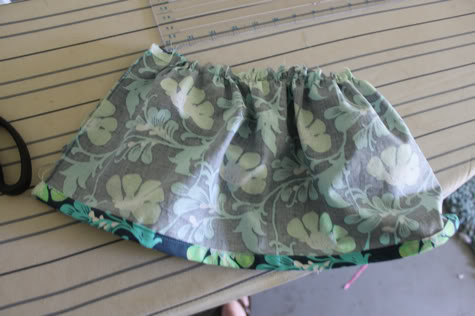
Turn your skirt inside out to admire:
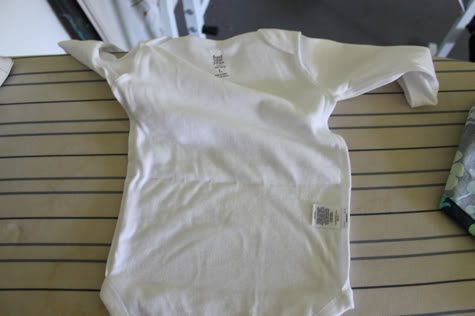
5. Now take your onesie and draw a line at the waist across the front and back with a washable or air-erasable marker:
Turn it inside out and do the same thing on the inside:
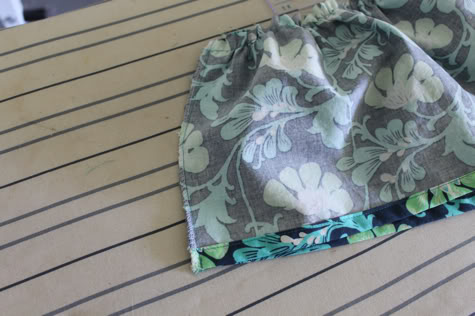
Now turn your skirt inside out and arrange the seam to one side:
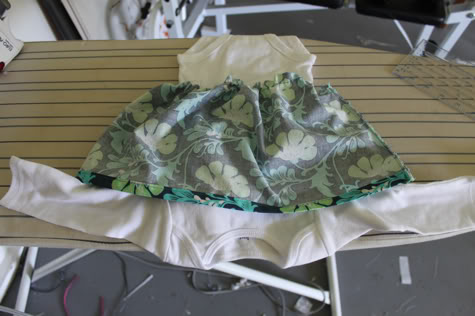
With your onesie right-side out, slip it headfirst through the skirt with the front facing up, like so:
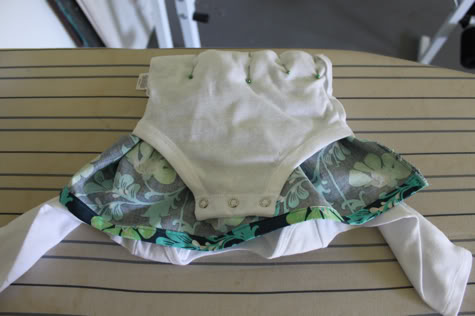
Unbutton the bottom of the onesie and flip it over the skirt. Line up the edge of the skirt with the lines you drew and pin through all the layers so you’ve trapped your skirt edge in onesie fabric:
Sew all the way around with a 5/8″ seam. So mine is a little messy, who cares?
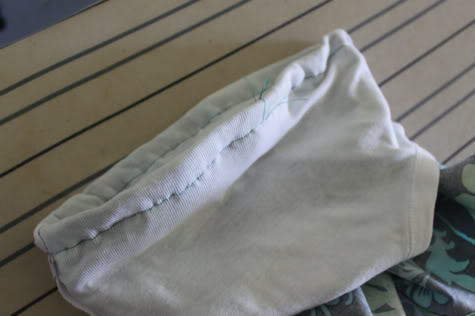
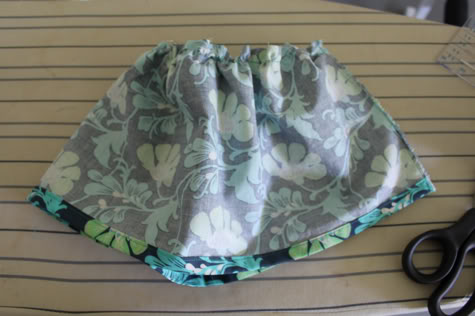
Flip it all around! DONE! And your unfinished skirt edge is encased in onesie softness so as not to bother baby:
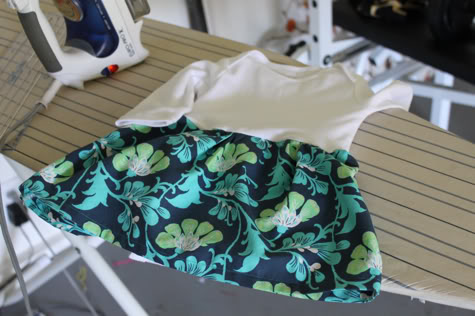
See, onesie goodness:
Yay! What do you think? Do you want a sewing machine now? I swear you can do this, so easy. You could also applique or embroider something cute to the chest for matchy fun.
That's very cute. Too bad my girls are too big for onesies now. 🙁
As soon as I read your comment, I thought “leotard” ….
I am going to make this cute dress from a onsie for my nine month grand-daughter, and a matching one using a leotard for her five year old big sis … My older grandaughter has gotten into skirts recently and her mom would like the modesty of the leotard covering her panties.
And, I might even make one for Grammie …. I can’t find a skirted bathing suit in a price I’d like to pay … Hmmm, would it be too cutsie if my swimdress matched the girls?
sew the skirt to a cheap pair of shorts. instant modest skorts.
I did this for my girls, clear up to grade school, with tank tops. They made the cutest summer dresses! So easy to sew, care for, and the girls loved picking out tank tops and matching fabrics..
Just use a tank top or t-shirt. Makes cute jumpers. My problem is that my 10 yo grand has become a “Tomboy” – only jeans and T-shirts!!
That’s too clever!! Would also be super cute to sew a couple rows of matching ruffle to the seat of the onsie!
So, make one and sew it on a T-shirt! Instant Dress!
You could always do something similar to make a large ruffle and sew it into the bottom of a solid shirt and put matching bike shorts under it? I remember my mom doing something similar when I was little
This can be done for older girls using a tee shirt. Of course you will need more fabric in width and length. They look really cute too !
Definitely! Super cute idea! Thanks!
ok, that's darling and easy.
also, i have no kids, but i can see doing a version of this to turn T's into tunic tops….wheels are turnin'!
This is really cute. Bookmarked.
Melissa – there are always foster children, Childrens Homes, Kids in countries like Africa that could use little outfits – do some research. Your skills are needed.
Love, love, love – I want to make them for babies I don't even know!!!
love it I think this could be my first real sewing project
i'm all over this. ordered some new fabric that will be perfect for this!!
thanks!
Loves so cute. And easy but I bet it would take me like two hours. That thing where you scrunched it looks confusing!
This is the blog I was searching for!! Happy to discover you 😉 And Super DIY dress!
This is such a great idea! Would be really cute with some ric-rac too!
If I only I had a little girl!!! This is adorable and simple and all around fabulous. I may just have to break out the sewing machine and try this out.
I LOVE this! I am so making these for my friend's baby girl. Thank yoU!
SO cute! I can't wait to make one for all the girl babies in my life!
niiiice! perfect for spring! Thanks!
you guys are killing me with the adorable dresses! if you were making one with a tiny newborn or 0-3 onesie would you suggest trimming the width of the skirt? seems like it could be bunchy if all that fabric was gathered to that small size?
I think the usual for gathers is 1 1/2 times the circumference of the onesie.
I love your site and I am devouring it! But I have A LOT to learn still…
How do you do a basting stitch?
hi stephanie! a basting stitch is just a regular straight stitch set to the widest width your machine will go, usually about 5!
yes anu definitely trim it down! you don't even have to ruffle it very much if you want a straighter skirt!
I LOVE IT!
Children's Place still sells onesies up to 3T (check online) so there are some really cute possibilities for older girls! So cute!
Thank You Thank You Thank You! So excited to try this for my baby girl. Your tutorials are so easy to follow and always look cute. You are a gift to novices everywhere.
Thank you for this great tutorial! I made one of these today. It looked so cute on my little girl!
So freaking doing this. Too cute and thankfully I still have one little one left in onesies. Also, thanks for the pillowcase dress tutorials. I shall be making several, putting all this yardage I have to good use. You rock!
Just finished making this and love it! So easy, thank you so much for the idea!
I love this. I finally bought a sewing machine (on Craigslist) and I can't wait to get started! I think this will be my first project. Do you think it would work if you cut the bottom out of the onesie at the end? My daughter is long in the body, and I often can't do them up at the crotch anymore, but this would allow me to re-use them as a dress!
lisakisch – yes it would work, but you want to finish the cut edge so it doesn't fray away! i recommend cutting the onesie, folding the edge over some fusible tape and ironing it, then continuing with the DIY as written!
I love this and I made it…except this 10 min project took me about 3 hours! I'm new to sewing, but you make me want to do more! I came close to giving up, I'm no natural at this, but this is the most fun I've had in awhile. Thanks!
Oh, yes I also made a matching burp cloth from your other DIY Burp Cloth tutorial. I don't know how to post a pic, but here's a link:
"Recycle Reduce Reuse" Onesie Dress
Finally getting ready to make this dress for my daughter….but how many inches wide and long is 1/4 of fabric?
a 1/4 yard is 9" by 44/45" (whatever the width of the bolt of fabric). have fun!
These are so super easy! I made similar things when my daughter was little. Now that she is older, we don't do onesies anymore, but it works great with a tank top or t-shirt. Here is one I made for her for her 2nd birthday: http://picasaweb.google.com/SusanBerthold/CraftProjects#5347761255656712850. Love your blog and can't wait to make a few more things based off the ideas you have here!
Thank you so much for this tutorial! This was the first dress I have ever made for my little girl who is almost 6 months old. Love it! 🙂
Thanks for the tutorial! The hem alone took me 10 minutes, but other than that it was an easy, super-cute project 🙂
Done. Just created my own. NOTE TO SELF: Do not sew pins inside dress =)
Alright, here's mine:
http://www.flickr.com/photos/anulewicz/4779066454/in/set-72157623415086986/
I just made one for my great niece! So darn cute and easy!
Sigh… Gee I wish I had a girl!!!!
If You have bigger girls a long t-shirt with a pretty Bandanna split in half for skirt might work.I know my Granddaughter all ways has me buy
her cute ones but just puts in drawer,I think I'll raid the drawer next time I'm over there.
Bandanna's are about 18-20 inches sq.They
make a nice gift if you only have little bit of special fabric left.
Super cute! Now I just need to have a girl…
This is awesome. And you could use up some fat quarters if you cut them in half and seamed them together!
The only thing I would recommend is a zigzag stitch when attacking the skirt so you don't pop the seams when you are trying to get it on the Baby. Otherwise super cute.
Just made one of these! Added some rickrack trim to the bottom which just makes my life happy. It definitely took me longer than 10 minutes though.. but I like to realllllyyyy take my time so I don't mess things up.
Maybe a silly question, but… I just made one and it is TOO CUTE! I'm wondering though why you fold the snap part of the onesie over. I did so without thinking about it and now the onesie is shorter. I made it for a friend so I can't try it on anyone, but I'm curious if anyone else ran into this or chose not to fold the onesie bottom over prior to sewing. Thanks for any advice! Great tutorial.
I’ve made several of these without folding the onesie bottom over. I just put a “hem” in the top of the skirt, finished the edge with lace, and/or used a serger to create an embroidered finished edge before sewing it on the onesie. You just slip it on the onesie just like it will be when finished then see it on. I’ve also made them by encasing elastic in the waist to create a skirt then handstitched enough on the sides and middle of the belly area to hold it in place. As the baby gets older the skirt piece can be removed, add some lace or a ruffle to make it longer then reuse on a larger sized onesie.
I just made one and realized the shorter onesie means it probably won't fit until Easter – and I used bunny fabric with that in mind. 😉
I also had real trouble ruffling the fabric. Oh, an am I supposed to pull that stitching that made the ruffle out? I sorta didn't sew it into the fold, so there's this little extra stitching that doesn't look so hot. Oh well, second time every sewing anything – so I still think I did ok!
I am going to try this for my 3 year old cousin who wears a size 5T with a t-shirt or tank top since it's getting warmer. Could anyone help me out on measurements for that? How many inches would the waist need to be (with the ruffle)? And how long in inches? I made your pillowcase dress for my baby cosuin coming at the end of the month and it was adorable! I can't wait to see her in it! 🙂
lindsey – jacinda made one just like that and did a tute: 5 Minute T Shirt Tunic
http://amelieobscura.blogspot.com/2011/04/my-first-onesie-dress.html
I loved making it!!!
LOVE this tutorial! Thank you for some fun sewing today! 🙂
http://happyallenfamily.blogspot.com/2011/04/super-quick-sewing-project-or-i-didnt.html
This dress is so fabulous! I made once with lots of pink tulle instead of fabric for a cute little ballerina on the way. My friend is having her baby shower soon and I can't wait to see her reaction! Thank you so much!
I also made a dress for myself out of a yard of fabric and an upcycled a shirt that has a bleach stain at the bottom for a cute summer dress using the same concept, it was super easy!
GET ME A ONESIE!! I can't wait to go make these for my niece! My sister is craftier than me so I have to beat her to it on this one. I'm a little confused about what you did to attach it, with the flipped seam thing, but I'll figure out something.
I just turned my sewing machine on today for the very first time EVER, and I made this dress. Because this was also my first sewing project, it took longer than 10 minutes to make (I had to read my sewing machine manual, etc), but still was very easy and fast. I did have some problems with the thread breaking when trying to gather it after the basting stitch, but it turned out very cute and wearable! I can't wait to put it on my 6 month old! Thanks for the inspiration. This is definitely just the beginning!!
Hi,
My name is Barbara and I am the creator and owner of http://www.onez4u.com I make Onesie dresses in sizes from newborn to 24 month. Although your dress is simple, it is not going to last as long as you would like. We have spent a lot of time designing and have come up with a very special way to make that dress stand up to the stretching and washing baby clothes go through.
Hi,
Was reading through the comments and have to put in my 2-cent.
Just think that it’s really rude to be ADVERTISING for your product on someone else’s blog without their permission.
Her post was for the purpose of teaching a simple craft to help others, and does not deserve the criticism you made, on how the dress will not last!?!
Please don’t do this again.
I have purchased few newborn clothes from mymiraclebaby – those were very gorgeous and beneficial to use. I liked them so much and wanted to refer to other's as well. They have huge collection for other products like – Baby Clothing, newborn clothes, newborn baby boy and baby girl clothes and more. You can also use this coupon code: COUPON05 for availing $5 discount on your purchase of $30 or more.
I have bought newborn clothing for my son. It's very fabulous. I like this so much and want to recommend to other's as well. You can buy and avail $5 off on all your purchases. If you use this coupon code: COUPON05. I had been relying on http://www.mymiraclebaby.com earlier and they too offered good stuff.
I did a 3T version with a tank top. First time to ever sew clothes and it was very rewarding to see it on my daughter!
http://www.facebook.com/photo.php?fbid=541680586236&set;=a.541451205916.2030920.63500311&type;=1&theater;
Love this ! Thank you for posting, you just made my daughters Minnie Mouse costume so easy for me to make ! 🙂
[…] http://prudentbaby.com/2010/03/baby-kid/10-minute-onesie-dress-easiest-dress-ever-2/ (tutorial) […]
[…] you’re wondering how I made these onesie dresses, it was pretty simple. Here is a link to the blog I stole the idea from Like this:LikeBe the first to like this post. Tagged […]
So happy to find your cute blog! I’m also now following you on FB! I just adore this cute little onesie dress. I will be making these for my cute little granddaughter!
I look forward to many new ideas! thanks!!
did mine as a separate skirt with elastic then made shorts to match as well – material had blue and purple hearts so visofixed a heart on onsie and painted a border around. so two onsies – one with blue heart one with purple heart and a skirt and a pair shorts all in a couple of hours!Thanks !
[…] a great resource. I also looked at this one from Prudent Baby. It’s called the 10 minute onsie dress. This tutorial was the main inspiraption for the dress. It’s from Make it and Love […]
Great tutorial! This definitely took my more like two hours to do, but I’m now inspired to try more after my first successful sewing project Thanks!
I like this. If your child is too old for onsie; try t-shirts. It works as well.
I am about to have a go at making one for my little lady 🙂 I am so excited. Thankyou for sharing the tutorial xxx
[…] tutorial came from here. The motivation came from Skylar’s hip dysplasia. (What’s hip dysplasia? .. […]
Think I could make this work for a blousy bottomed boy outfit? I have a few baby t shirts that are a little long on my 7 month old. Plus, I don’t like using plain tees because they ride up constantly. Could I make the skirt, sew it to the bottom of the tees and close up the bottom to make leg holes? Is that crazy?
Thanks for any input!
here are my first attempts:
http://instagr.am/p/MEVRtDraLU/
and
http://instagr.am/p/MCic7pLaN0/
[…] found this tutorial on Prudent Baby, another fantastic sewing resource. Just as the tutorial states, this project comes together in […]
I made this last night after my little one went to bed and when I tried to get it on her this morning I found that attaching the skirt made the onesie too small to go over her head, it seemed to kill the stretch. I might try it again with the next size up onesie, but am wondering if I did something wrong?? Someone commented to use a zig zag stitch instead, but am I missing anything else? It was pretty disappointing to make something that looks so cute that doesn’t fit anymore!
I thought about that too and decided to add elastic to the fabric. Before you attach skirt position the elastic on the wrong side of the fabric, just under the finished edge, and sew it on, pulling tight to stretch it as you go.
I had the same problem. How long should the elastic be?
If you make a waist casing for the skirt using the onesie, then arent you effectively shortening the onesie at the waist by a good couple of inches? I think that would make the onesie too tight at the crotch.
Yes, so definitely use a larger size then you need.
That’s because the skirt portion is not designed to stretch with the onsie! The skirt need to be made with a stretch material so it has the room to go around their little tummies!
Or if using a woven than you must make the skirt large around the waist, stretch the onsies at the point you want the skirt to be, and ease it all together and stretch as you sew, using a zig zag stitch. I made quite a few of these, but my first one didn’t fit because the stretch was no longer there around the middle.
Also, attach the skirt to the right side of the onsie without making a sandwich fold. That way you retain the length also.
If you do it as thus blog suggests, there is no longer any stretch to fit AROUND the baby.
What a great little dress! I shared your tutorial on my blog post Baby Stuff – Best Onesie Makeovers on Pinterest here:
http://freshjuniper.blogspot.com/2012/08/baby-stuff-best-onesie-makeovers-on.html
Thanks for teaching something wonderful!
I made 2 and they are adorable! thx
[…] followed THIS tutorial and just modified it a little bit since I used a shirt instead of a […]
TOOO CUTE! I have a 2 week old, and I realized the other day that she has no dresses in her wardrobe (that’s probably because mommy doesn’t either). sSe does have a TON of onsies of all sizes though. I cant wait to make up a handful of these for her to have a cute comfy outfit she can wear out and about and also roll around in at home. Thanks for the super easy idea!
Super cute! My SIL is due in April with a baby girl and I CANNOT wait to make her one of these!!! Thanks for sharing!
Love this!!! My babies aren’t in onsies anymore, but I used this concept to make my 6 yr old a dress with a shirt and Christmas material. Thank you!!!!
The really great thing is: You don’t have to throw (or give) away your old (and often so cute) onesies – I just made a nice dress for my girl (she’s turning 3 soon) by cutting the part with the buttons off (it didn’t fit any longer in the length, but she’s quite slim – so the “shirt”-part still fits) and sewing a skirt following your example at the lower part. I’m so glad, I found this idea at your page. Thank you so much for it – I’m happy having found a way using the onesies I grew fond of 😉 !
[…] dying to use, that ended up to be the perfect size and shape and sewed them together. Head over to http://prudentbaby.com/2010/03/baby-kid/10-minute-onesie-dress-easiest-dress-ever-2/ to check out the great instructions to make your little one an adorable Cute girly on a sunny, […]
I was wondering if some one could explain a bit differently than Teresa did last august about adding elastic so you still have the stretch at the waist. It is not clear to me the way she explained it. Thanks in advance
Tylstenie
Add elastic to the waist of the skirt before attaching to the onsie! Than stretch both together at the same time as you sew, using a zig zag stitch
Do not use the sandwich method as shown…just attach the skirt to the outside of the onsie, being careful not to catch the under fabric of the onsie, since it likes to roll and crease when stretched.
[…] used Prudent Baby’s tutorial and all in all it took me about 15 minutes. That’s ironing and everything! Also, if […]
This would be cute with a girls shirt too .
awesome idea!!!!!!!!
I love this! But quick question: Do you do anything to allow a little “give” in the onesie? Her head, shoulders, and arms still need to fit through to get the dress on. Have you ever had a problem with that? What could be done for that?
Dessie….see my above comments to address your question.
INSTANTLY INCREASE YOUR SALES
…by plugging your products and services into TripleClicks.
– We take you global! Reach millions of potential customers worldwide on one of the fastest growing, international e-commerce sites on the Web.
– We put the marketing muscle of over 100,000 SFI affiliates to work for you, promoting and selling your products and services in over 20,000 cities in over 190 countries!
– Simply sign up, submit your products and services, and get ready to take orders! It’s quick, simple, and there’s no risk because you pay nothing unless we get you sales.
For complete details: http://www.tripleclicks.com/13109583/ECA
[…] worry about creating the neckline or sleeves. The babies’ dress is based on this tutorial 10-Minute Onesie Dress by Pretty Prudent. However, since I had two coordinating fabrics I wanted to incorporate into each […]
[…] to Pretty Prudent HERE for this […]
I made this for a cute little friend we will meet for Thanksgiving. Thanks for the post!
[…] Baby Dress | Onesie Dress | T-Shirt Tunic | Super Simple Wrap […]
I love this dress!! I just made my third one. This time my daughter is older so I made it with just a $5 old navy white t-shirt. Turned out super cute!! Thank you so much for sharing!!
Thank you for this! We are having a grandaughter born in july, and this will add to the things I can sew up for her. I really like that you don’t cut the bottom off, I hate waste….love it!
When you pull the bobbin thread, how do you keep it from loosening again if you haven’t sewn down the ends? Newbie here. 🙂 Mine just loosened and came out of one of the ends, so I had to rip it out and start over with the edges already sewn together.
When you are gathering your material, a tip to make it easier is to make two rows of long machine stitch, about 1/4″ or 1cm apart, and pull them both at the same time. This will give you a more even gather, and the edge of the material will stay more even. You then sew between these rows when attaching it to the garment, and remove both ‘gathering rows’ afterward. To stop the thread from one end pulling through when you are pulling the thread’s to gather the material, attach a pin at right angle at one one end of the stitching and wind the loose threads around it so as you pull the thread, it is secured temporarily by being wrapped around the pin. Remember to remove it when you start to sew so you don’t break your needle on it!
Thank you for this! We are having a grandaughter born in july, and this will add to the things I can sew up for her. I really like that you don’t cut the bottom off, I hate waste….love it!
Your instructions were spot on and this turned out so cute! I whipped this up in no time for a baby shower this weekend. I wish I knew how to post a picture of it on here for you. Now I want to go buy more onesies and make more just because it was so fun!