


Y’all know how much I love bias tape. I’ve been showing you projects with pre-made bias tape, but we all know it’s so much cuter when you make your own. It seems a little complicated, but do it once and you’ll be hooked. Let’s learn how to make bias tape.

Bias tape is great for two things: stabilizing curves and finishing edges. There are two major steps to making bias tape: Cutting Bias Strips and Ironing it into Bias Tape. Let me show you both step for how to make bias tape…
I’ll give instructions on How to Make Single Fold Bias Tape and Double Fold Bias Tape (and the secrets for doing each step faster than you thought possible) after the jump…
How to Make Bias Tape
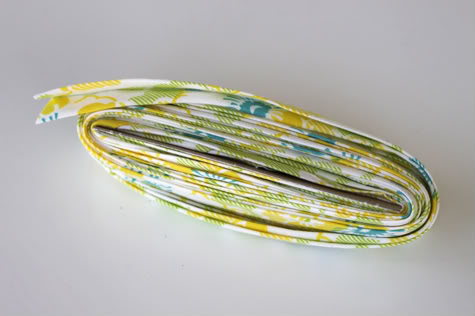
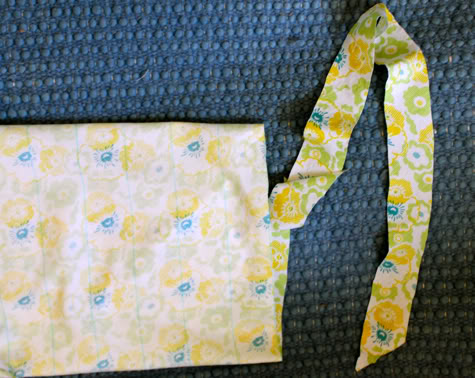
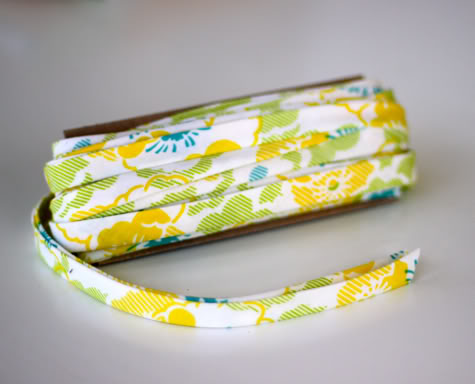
First we will cut, then we will iron. For this bias tape I used 1/2 yard of Heather Bailey’s Nicey Jane Wash Day Ticking in Dandelion. So I made about 11 yards of 1/2″ double fold bias tape for $4.25. Total deal.
Step 1: Cutting Your Bias Strips
Bias tape is cut “on the bias” meaning diagonal to the selvedges of the fabric. You have to do it this way for it to work. The fabric stretches differently when you pull it against the grain. Test it out by pulling your fabric at the selvedges and then on the diagonal (from opposite corners) so you see what I mean.
First let’s figure out how wide our strips should be. If you are making single fold bias tape, you want your strips to be twice the width of your final tape minus 1/8″ (so for 1/2″ single fold bias tape, you need 7/8″ wide strips). For double fold bias tape you want your strips four times the width of your final tape minus 1/8″. So for the 1/2″ double fold bias tape I’m making here, you need strips 1 and 7/8″ wide.
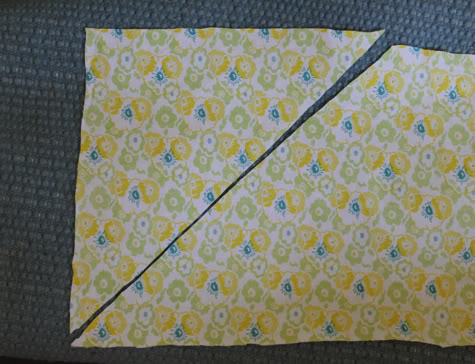
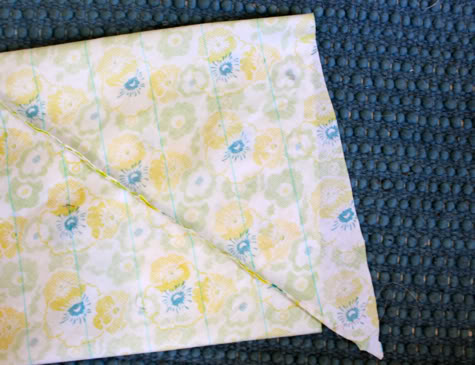
Start with 1/2 yard of fabric. Fold one short edge of your fabric into a right triangle, then cut that triangle off:
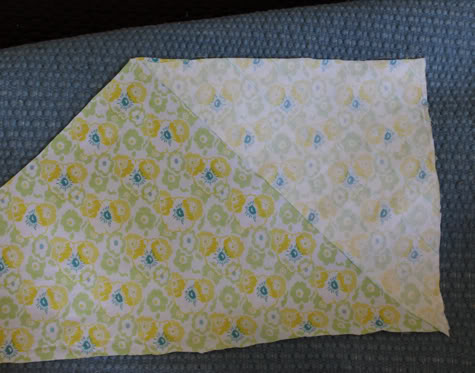
Lay it right sides facing straight edges aligned on the other side of the fabric:
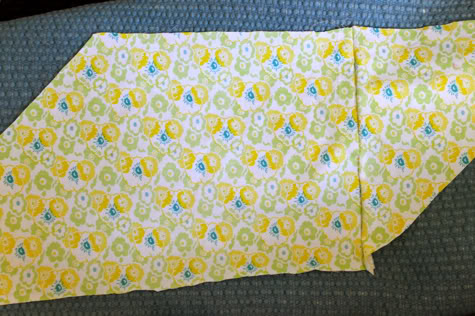
Sew it in place, so now you have a parallelogram:
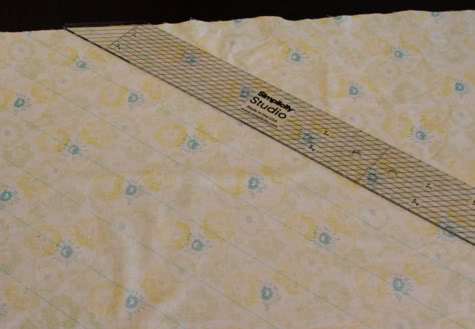
We need to draw diagonal lines across it parallel to the cut edges. The lines need to be evenly spaced at the width we want our strips to be. So for my 1/2″ double fold bias tape, I need to draw lines on the bias 1 and 7/8″ apart across the whole 1/2 yard. I picked up a handy bias tape ruler that makes this part a breeze:
Now the usual next step is to cut all of these pieces and sew them together at right angles one at a time, which takes forever. We are going to do it backwards and save ourselves some time. So, take your fabric and twist it, bringing the right sides of the long edges together. Line up the end of strip One with the start of strip Two, so they are off set, like this:
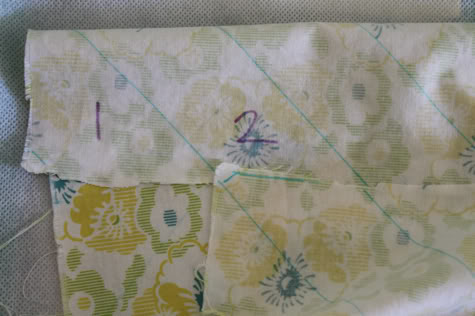
It is going to feel like you are doing something wrong – that it is just not possible for this all to line up – but you are doing it right. The fabric is going to spiral as you line it up. Now sew the right sides together with 1/4″ seam allowance. It will look all funky and twisted like this:
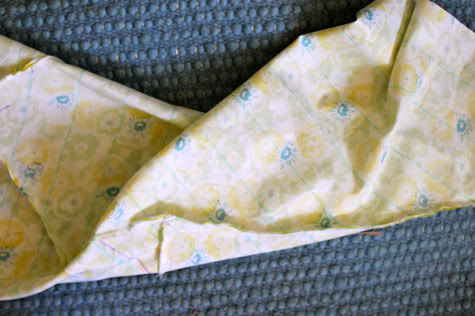
Flatten it out at one side, so it looks like this:
Now cut along your drawn line, it will be in a spiral:
Keep cutting until it’s all cut into one long strip:
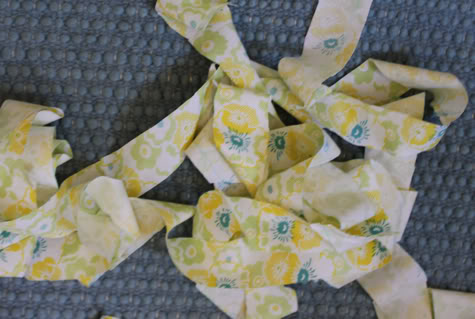
Wasn’t that a million times quicker then sewing a bunch of strips together? Now go ahead and iron all the seams open:
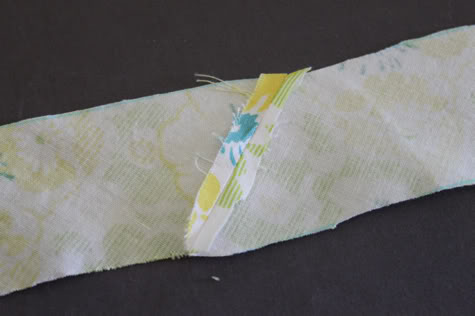
All righty, we have created our bias strips. Halfway there!
Step 2: Ironing your Bias Tape.
So you need to iron each side into the center. Go ahead and try doing that by hand. No, I’m kidding, don’t. Just trust me it’s a pain.
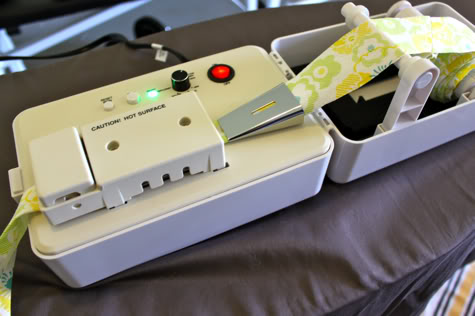
You can get a simple Bias Tape Maker doo dad![]() to feed your fabric through. You gently push one end of the strip through it, and iron as it comes out the other end. This works decently but requires a steady hand. This is how I used to do it:
to feed your fabric through. You gently push one end of the strip through it, and iron as it comes out the other end. This works decently but requires a steady hand. This is how I used to do it:
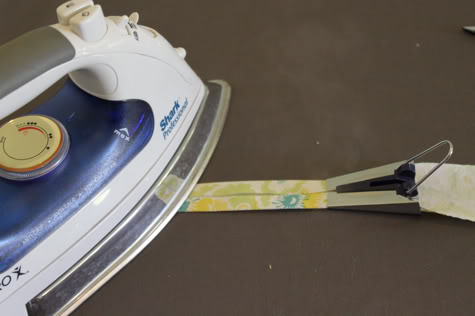
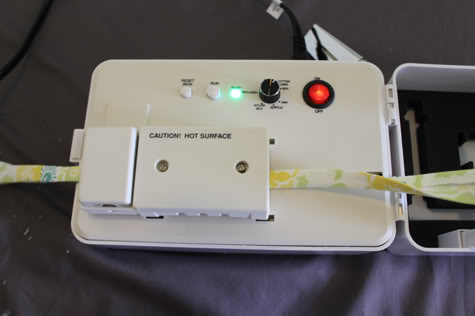
But then a magical new product was invented, and I got one. It’s the Simplicity Bias Tape Maker and it does the work for you (it’s only $68 on amazon right now – pays for itself after just a few projects/quilts). You can get a bunch of different tips for it to make any size bias tape you want. So I feed my strip through here, and it does the nice even ironing for me:
For a video of the machine in action visit this post: Bias Tape Maker Video What What!
Now you have created single fold bias tape!
If you want double fold bias tape, simply fold it in half with the raw edges to the center and iron it again. I ran it through my Bias Tape Maker![]() one more time:
one more time:
Done!
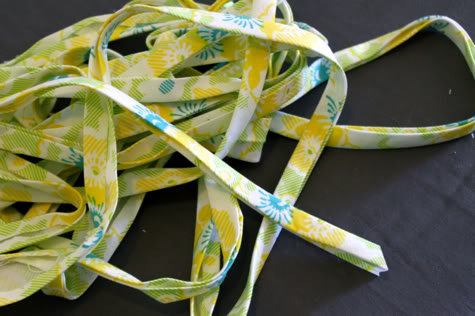
You did it! You learned how to make bias tape! Now wrap it around a piece of cardboard until you need to use it! Hold it in your hand and feel its homemade goodness. Sigh with satisfaction.
Now that you’ve learned how to make bias tape, head over to this post and learn How to Sew with Bias Tape, or go to our search box on the top right and search “bias tape” for more project ideas! Next, try learning How to Sew Piping!
ohhhh so THAT'S how you make it!!! i never knew!! i kept seeing that it was needed for certain things and i never had the chance to go out and buy it but i guess you just make it!! LOVE the fabric you used!!
Thanks so much for this tutorial! I've always thought it looked like entirely too much hassle, what with the sewing every strip together, but this makes it look quite manageable! 🙂
Great tutorial! Thanks for taking the fear out of it!
I'm in the process of making a baby quilt – I will definitely give this a try when I get to the binding!
The twisted fabric method is genius! Bias tape in Nicey Jane! What's better than that!?!
Thanks for the tutorial! I recently fell in love with bias tape myself by hated making it. I don't have the money for the bigger machine, but I might try the little gadget to make it. I'm so excited!!
I love making my own bias tape! Thanks for a great tutorial that I can share with my crafty friends!
I've just been thinking about how to do this! Your a genius 🙂
And after reading again, the cost savings is what really struck me. Awesome. "Prudent" one might even say.
Super cute! Still looks like a lot of work though!
You are such a doll! I've tried the parallelogram method before, but had mixed results…my strip came out a little wonky. I'll try your way. And I love gadgets too, so maybe I'll ask for a bias tape maker for my bday!
LOVE the parallelogram idea!!!!! I made yards and yards of bias tape when making a civil war gown and I wish I had known this way of doing it! And I LOVE the machine too!! Might have to look into getting one!
aw man I need one of those machines!!
This is absolutely fabulous! I had read about this cutting technique, but your photos have made it so much easier to understand. I'll be giving it a try shortly! Thanks so much for this great tutorial!
this tutorial is great ! I was literally just about to go out and buy a bias tape maker, when I read this. I love your technic for saving time on sewing and cutting. I am trying it as soon as I get back from the store ! thanks !
I love using bias tape but hate sewing all the bits together, this method is pure genius, thank you!
Wow! I have to try this! And you sold me on the bias tape machine. I've been wondering if I really need it & I do! I need that ruler too. I have cut my strips & then sewn them together & almost everytime I mess up. I think your method is pretty fool proof in that area. I can't wait to try this.
That is so awesome! JoAnn's online carries these for $99 but the homepage often has a code for 50% off one item to make it $50. Just a little cheaper than Amazon. 🙂
Oh wow I wish I owned that bias tape machine! Great how-to guide, thanks for sharing 🙂
Making bias tape ROCKS!!! Your tutorial is even better than a previous one I have used!
Amazing!
what a fantastic tutorial and I just LOVE that machine – fantastic !!! Thanks so much for sharing x
that bias tape maker machine is super cool, and i like how it looks like a little 70's computer. getting one.
will this trick work with straight binding?
beth – i havent tried it but i think it would, if you just eliminated the triangle-cutting and sewing into a parallelogram step.
oh my, i have made bias tape for years but that twisted tube concept?!? BRILLIANT!!! i don't think i ever would have thought of it! thanks for a lovely tutorial ;n)
Amazing I make my own & it takes me ages thats is great I will be over to Amazon now 🙂
Just tried this today for the first time. Great tutorial! Sooo easy!
Just finished making some today — thanks so much for the tutorial. Sewing the ends together before cutting the strips was such a timesaver!
http://astitchinlime.wordpress.com/2010/07/04/bias-tape/
Excited to use the tape for a project soon 🙂
– Jana Kim
Saving this page!! Thanks so much for the great tutorial!!
I've tried this method twice now and my rows don't line up. This last time I did it, the first row matched, but the rest were off by about 1/2 inch. Any ideas on how to fix this?
oh my goodness – i NEVER comment on blog posts but having just done this tutorial and reveling in the yards of bias tape that i have now to use over and over, I had to thank you so much for this. My dread of making bias tape is finally over. I have still to get the tape maker machine but this is a great first step. Thank you thank you thank you.
I'm still a bit new to sewing, and I don't think I would have been able to get so far without the help of the internet and people like you willing to take the time to share your knowledge. I struggled with bias tape for quite a while, and I just KNEW there had to be a better way then buying it or sewing scraps together! THANK YOU SO MUCH for sharing this idea. I couldn't have done it without you!
Thank you, this makes it easy!
owh i loveeee the machine…! it totally makes the ironing super easy
I've taken up sewing again, since I now have grandchildren. My 4 yr old granddaughter, Ellie, loves to help me sew. She pushes the foot pedal, and is quite good at following my directions. "Slow down, and nowwww….stop!" I love this tute, and will instruct her in making bias tape. She'll be an expert in no time! Thanks so much for the help.
Wee Granny Cathy
Great tutorial.
I have one of these simple bias tape makers but I never quite manage to put the fabric in it… is there a trick?
I am stuck on this step — the first one! Can you help. "Fold one short edge of your fabric into a right triangle, then cut that triangle off:" I can't figure out how you have your fabric folded. Do you just mean to cut off a triangle from the short side (no folding required)? Does it matter how big the triangle is? Maybe I need to go back to 10th grade geometry!!
I’m with you. I thought I cut the triangle off my fabric right but apparently didn’t. Now have to start over. Help.
wow, i was so intimidated by that spiral thing! totally worked out amazing though! thanks for the tutorial!
ps: made it by hand, and will be investing in that miracle machine STAT.
Krista, that was confusing to me at first, too. Yes, she means to cut a triangle off the short side. The point of folding it first is just a help in finding the diagonal.
I finally "get" this. I made my first *almost* right strip of bias binding Went a bit squiffy at the end). So impressed with my self and you for making a great tutorial :D.
I thought I'd proved Jamie wrong – that it IS impossible for the lines to match up in the spiral – but alas, it was my own inability to draw straight lines (ack!) – I even used one of those fancy clear rulers. Any tips? Seriously, my 2 yr old daughter seems to be more accurate… (is there a tute on drawing lines for bias tape or shall i just return to kindergarten?!)
i seriously have been sewing for nearly 40 years
and finally with your tutorial i know how to do this
THANK YOU!
Eureka! My second attempt was extremely successful! One question: to make the double fold, do you first iron it in half by hand & then run it through the machine – or do you only run it through the machine? If so, do you still use the 1" tip? Thank you! -Karen
k – awesome! first run it through the machine to make it into single fold, then fold it in half and run it through again without using a tip
Thank you for the great tutorial with pics. I have the bias maker machine and LOVE it. But I never knew a good way to cut bias tape that wasn't wasteful and time consuming. This will make my life so much easier.
@ Jamie ~ To make double fold, I leave the tip and run it thru using just one side of the tip. It acts as a guide and makes it fold perfectly without me having to help it at all.
I'm thinking of buying the bias tape machine but after reading some reviews about the tips not working for 1/2 inch double fold I'm wondering if there are a certain brand of tips to buy, or if some people just don't know how to follow product instructions.lol What tips do you use? I'm mainly interested in making lots of 1/2" double folded tape. Thanks so much! I love your tutorial!
This is SO GREAT! Thank you!! I am an amateur seamstress learning how to do a lot for the first time via the internet. It has been a great experience so far, thanks to videos and tutorials like this one. Yours is the first post to show how to actually cut AND make the strips. Awesome! Thanks so much! 😀
I just tried this and it wouldn't work for me, when i join end of strip 1 and beginning of strip two and i sew along THAT edge when i go to cut the line isn't connecting on either side of the seam because the seam cuts through the drawn line so low down. When i looked at your 8th photo it is the same, the first few lines (looking from the right to left) are ok but the further alone the further apart the connected lines are, what do you do when it comes to cutting it? guess and go between?
** 9th photo
I truly wish I could hug your necks for this tutorial! Piecing bias strips was always the bane of my home decor existence! This is something I will use again and again. Thank you!
Thank you for this tutorial! I used it today.
Thanks for sharing!!!
[…] of making the piping is not shown step-by-step because there’s a tutorial for that…Making Bias Tape by Prudent […]
You don’t need to use a bias tape maker. Check this out: http://creativelittledaisy.typepad.com/creative_little_daisy/2007/11/diy-version-of.html
Oh my goodness this was tedious, but so happy I can use the fabric I WANT instead of what’s available!!! 🙂 Thanks for the tutorial!!
this idea looks great, but it did not work for me! I don’t know what I did wrong, but maybe it was because my idea of a half yard is different from that of the sewing world. I used a piece of fabric 18″ x 18″. Plus I have a yard stick and a pen, not all of the fancy gadgets that you have. Wish it worked for me, I will use the cut and sew method.
ah yes, that is known as a fat quarter and would be very difficult to make bias tape with using this method…
Yea, a half yard of fabric is 18″ x 45″ or 60″. Like what you would buy at a fabric store. Which is a good amount of fabric for making bias tape. 18″ x 18″ of fabric is more like a fat quarter, not enough for making bias tape, sorry. You don’t need all the “fancy gadgets”. They just make it a lot easier. I only have regular sewing/quilting rulers, frixion pens. For sure I don’t have the machine. So it can be done. An iron is really essential though. Try again.
I don’t understand the twist thing. I have my parallelogram and lines drawn. How do you twist it? Do I just start twirling it around and around or do I fold it? Your pic looks like you somehow managed a square edge. I don’t get it…
You want to offset by one strip-length, so that they *don’t* match up. It’s the same effect as when you accidentally button your blouse wrong. Like this:
1..2..3..4..5..6..7
1..2..3..4..5..6..7
You’ll end up with one strip-length of over-hang at each end.
Blah! It took off the leading spaces I put in. How about this:
1..2..3..4..5..6..7
…1..2..3..4..5..6..7
ok, I get now! with that part! Thanks!
[…] you could cute your t-shirt up with homemade bias tape, here’s how you make your own bias tape: How to Make Bias Tape. Also, I used 1/4″ double fold bias tape, but this will definitely be an easier project with […]
THANK YOU for the great tutorial!!! I am new to sewing and depend a lot on information I find online. I choose to iron my seams open before cutting and luckily it worked for me!
[…] way too much money to buy it. Thinking there must be some better way, I googled. And, I found this post, by Prudent Baby, which explains how to make a whole bunch of bias tape relatively painlessly. I […]
[…] are about as good as Ikea’s, clear as mud! Off to Google. I came to this helpful tutorial which also brought me to a tutorial about how to sew with bias tape. As I started to read though […]
[…] I would get back to tackling how to make bias tape. I was so confused as I was following the tutorial posted by Prudent Baby, the pictures were not enough. I needed to see someone do it. So I found […]
[…] tape I made the other Sunday when I wanted to test this tutorial, which is the same technique as this tutorial but with much better pictures for my non-visual brain. It’s great. I also always use this […]
I recently volunteered to make pillow case dresses for children. I kept running out of bias tape! Thank you so much for your tutorial. Your right, it does get easier each time you make it. I am in bias tape heaven.
Oh! I love your sneaky cheater way of cutting it!
It would be helpful if you’d use a contrasting thread. tx PP
Amazing what a little inflation will do. It’s now $499 on Amazon. Yeah! Not doing that although it seems like a nifty machine.
I do not get the ywist match up either. Sorry. Do you have less zoomed in photos or a video?
I do not get the twist match up either. Sorry. Do you have less zoomed in photos or a video?
[…] it would have been a series of gray or black squares. Not the look I wanted. So, I used this continuous strip method of making bias cut strips. In a cotton fabric, I would have then pressed the tape into double […]
I’ve had this bookmarked what seems like forever and today and finally made some bias tape this way. I used to make it by sewing all those strips together separately. Stupid and slow, yes, I know. I managed to get 11 meters of bias tape out of one vintage pillowcase! I feel like I’m invincible now. Today bias tape, tomorrow, the world!
awesome! you are invincible.
Genius! Thank you soooo much for taking the time to share your secrets!
[…] some baby cardigans. I used this tutorial and included pattern for the kimono, and a version of this for the bias tape. Cutting the pieces and putting together the wool part was quick and easy, but I […]
I am in the process of doing your tutorial and have a couple of questions
The twisty part to line up the long ends I am having a hard time figuring this step out, I tired to line up in the way I thought the instructions stated but it did not come out exactly right.
the other question is the cutting part you say to cut on the drawn lines and when I do it does not spiral it just cuts out each strip without the continous strip what am I doing wrong?
That is AWESOME!! I bought a bias tape maker several years ago, but haven’t even opened it. Until today! Thanks for sharing your wisdom and experience!
Thanks for a wonderful tutorial. I made a wonderful batch of bias tape and it didn’t take forever! This is the best tutorial I have seen on making double fold biased tape!
[…] I like a challenge, I also decided to do some piping around the seams. Although I’d seen tutorials to make bias tape, I opted to buy some of this quilt binding from JoAnn’s, which seemed like […]
[…] next tutorial I was going to try was the one from Prudent Baby. It is very similiar but used a half a yard (~45 cm for the metric crowd) of fabric selvedge to […]
OMG! I just did the first half of this tuorial for a continuous strip for piping! I can’t belive I did it! EASY! Although it did seem like I did something wrong when I sewed the whole pieces together. THANKS!
So started making my bias tape via your ‘time saver’ method, which is brilliant, however I came across what seems (by observing the same issue in your photos also)like an issue that you have but must solve somehow: Once the seam is sewn in joining the ‘strips’ together the lines no longer match up as they are now offset by the width of said seam. I notice in your photo that by strip number 3 (of your 7th picture in the tutorial) your lines also no longer line up. What do you do to solve this???? Other than trying to eyeball the width as I start getting close on my cut to seam and thus the ‘joining’ line I don’t see a solution!
[…] find some good bias tape making tutorials go here or […]
Jaime, great post!!! Thank you!!!
For people confused by the whole twisty thing, there’s another blog post (not mine; no affiliation) that explains it with diagrams. At first glance it was confusing, but if you look at them very carefully and you’ll see what is going on with the twisty thing:
http://buzzville.typepad.com/buzzville/2006/03/cutting_continu.html
If it still doesn’t make sense, try it on a piece of paper first as suggested.
Neither post explains this, but when you match up the cutting lines to sew the long seam, you have to allow for your seam allowance: you have to match the lines where the seam allowance will be and NOT on the cut edge of your fabric. Matching the lines on the cut edge of the fabric is how you get the wonkiness described by Rindy in the comment above mine.
Also, no need to press open a gazillion little seams after cutting — press the one long seam open before cutting. Who cares if you iron in a crease or two? It’s not like that’s the very last time your bias tape will ever see an iron, not by a long shot! So press that long seam open before you cut and save yourself the trouble of pressing open a mess of little seams. 🙂
It occurred to me after posting that the ironing tip I offered would only be practical with wider lengths of fabric — I can’t imagine trying to iron the long seam before cutting on something only a foot wide!!! I actually think it’s easier for me to just cut strips and sew them manually when the width is that narrow, but maybe that’s just me.M
Sorry for posting twice, but I didn’t want anyone to try the ironing tip on a relatively narrow tube of fabric and then get all discouraged thinking it worked for me… because it didn’t! 😀
Wonderful work! That is the kind of info that are supposed to be shared across the web.
Shame on the search engines for now not positioning this publish higher!
Come on over and consult with my web site . Thank you =)
I love your tutorial and have had it bookmarked for a long time! I use the Simplicity bias tape maker for quilt binding. I also had trouble with the marked lines not lining up. Now I iron down the quarter inch seam allowance along one marked edge. Then I place the other marked edge on top of it and start matching the lines and pinning at every line junction. Now everything lines up great. Keep up the good work!!
can you make a video please i still don’t get the twist thing
Thanks for the post-it’s been 40 years plus since I’ve made bias tape-
Really nice update for me!!! 🙂 Elaine
I love this idea! i just tried to make bias tape using this method and ran into a bit of trouble… i’m hoping that you can help me. The first couple of strips turned out pretty well, but as i circled further when i was cutting, the lines were very off. I looked at the instructions again and in the 9th picture above – the one after “Flatten it out at one side, so it looks like this:” – i see that your lines aren’t lining up all the time either. I’m wondering what you did about this to line them up? how did you cut those sections to still make the tape the correct size? any help or direction would be very much appreciated. -Liz
Haven’t tried making bias tape yet, but I have a project that I’m starting that calls for it. Looking into buying a bias tape maker, but the one you show here got some pretty bad reviews… just wondering how long you’ve had it and how its held up?
I’ve had it a long time and it has held up well. Teh hard part about making the bias tape is really the cutting and sewing, but I love the maker to save time on the ironing.
[…] I would get back to tackling how to make bias tape. I was so confused as I was following the tutorial posted by Prudent Baby, the pictures were not enough. I needed to see someone do it. So I found […]
[…] are about as good as Ikea’s, clear as mud! Off to Google. I came to this helpful tutorial which also brought me to a tutorial about how to sew with bias tape. As I started to read though […]
[…] https://www.prettyprudent.com/2010/05/hot-mess/tips/how-to-make-bias-tape-2/ […]
Spent 5 hours trying to make bias tape with this tutorial, and despite following the directions to the letter I still don’t have any bias tape to show for my efforts. Instead, I have a pile of fabric strips and an intense hatred of making my own bias tape. Will be heading to the store tomorrow to return the bias tape tools I bought and buying pre-made bias tape! 0/10, would not recommend this tutorial.
LOL after following the link to Amazon for the bias tape maker I had to come back to see when this post was made. 2010…. it’s now 2022 and that $68 Simplicity bias tape maker now sells for $299.95! Thank you inflation!