


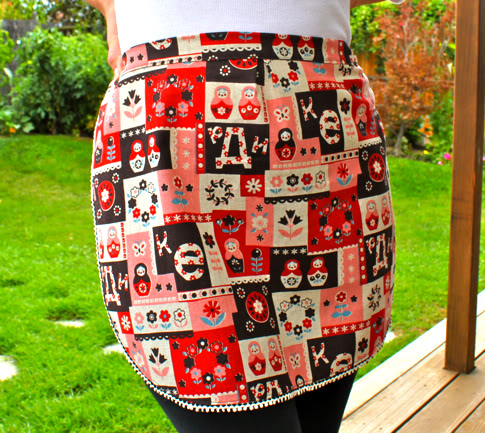
Make an apron out of a fat quarter in no time flat! Start making some now for christmas gifts, or do like me and just keep it for yourself.
We give so many fat quarters away I thought I’d whip up a quick project for you. All you need is one fat quarter, some cute trim, and twenty minutes.
If you don’t know what it is, a fat quarter is 1/4 yard of fabric cut into a fat rectangle 18″X22″ instead of a normal 1/4 yard which is cut long and skinny at 9″X44″.
So grab one from your stash and get the full Fat Quarter Apron Tutorial after the jump…
And remember, leave a comment on this or any post this week and you could win that awesome fat quarter up on the left to make your own apron!
How to Make a Fat Quarter Apron
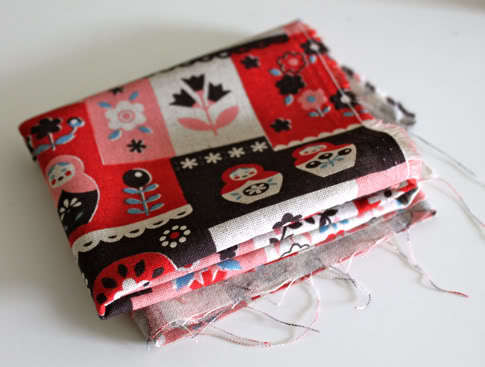
1. Pre-wash and iron your fat quarter. I used an awesome matryoshka fat quarter by Kokka from Fabricworm, and some trim, but you don’t have too. If using trim you need one piece 1.5 yards long, and two pieces 3/4 of a yard long.
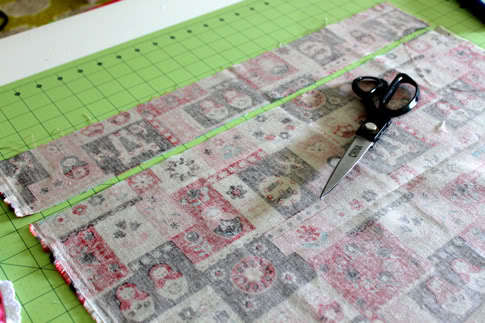
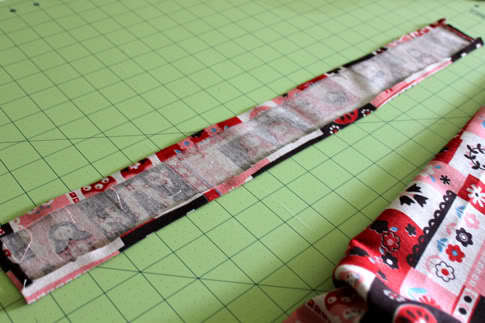
2. Cut a 4″ wide strip off one long side of your fat quarter like so:
3. Iron each short end of the strip 1/4″ to the wrong side. Then iron each long side 1/4″ to the wrong side:
So you’ve got a long piece that looks like this:
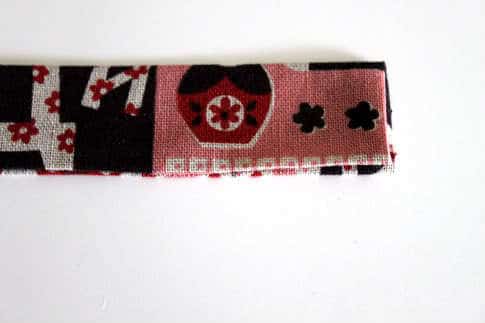
Now fold it in half along the length with wrong sides facing and iron:
Set it aside.
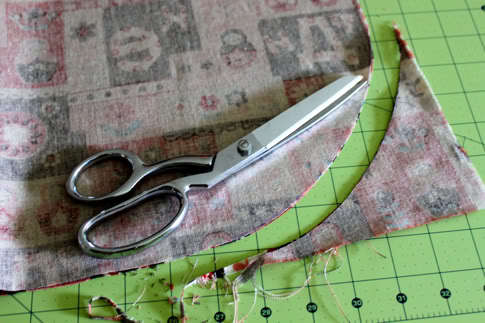
4. Now take your remaining fat quarter and lay it so the long side is on the bottom, wrong side up. Use something round (i used a lampshade but a plate works well) to trace a rounded corner:
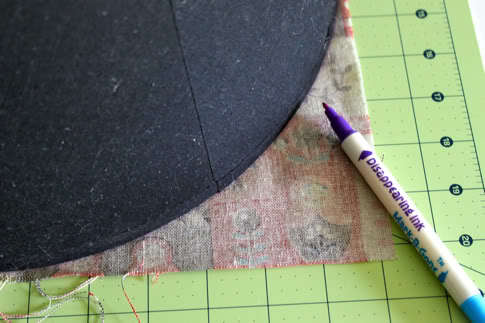
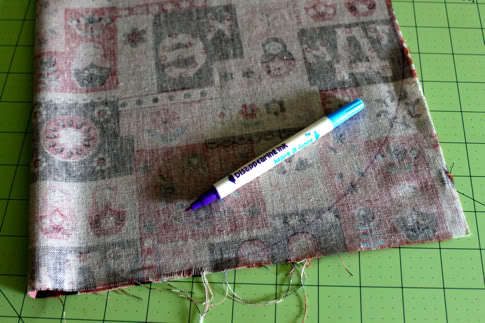
Draw it on with an air erasable marker:
Fold your piece in half and cut the rounded corner along your drawn line:
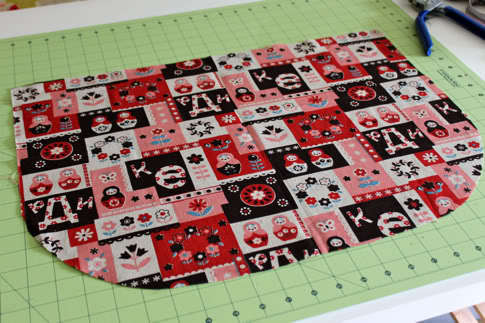
Open it up and it looks like this:
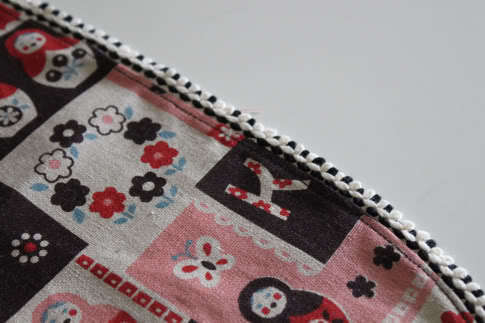
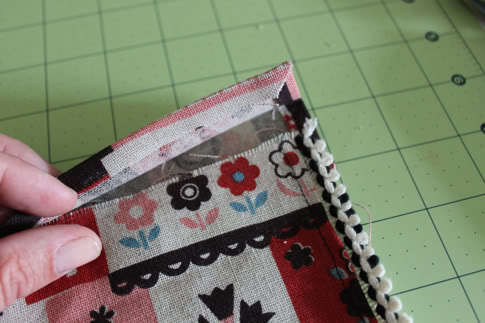
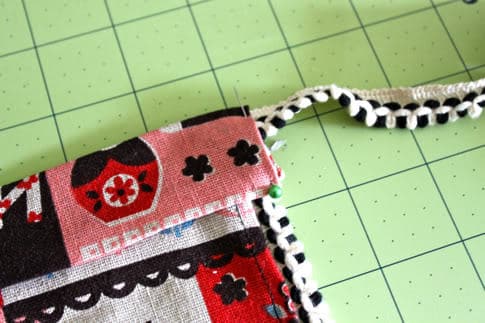
5. Now take your 1.5 yard piece of trim and pin it right sides facing to the whole rounded edge of the apron. You want the pretty part of the trim to the inside, on the apron, face down:
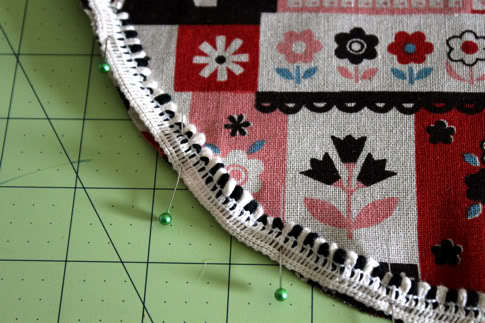
Pin it all the way around:
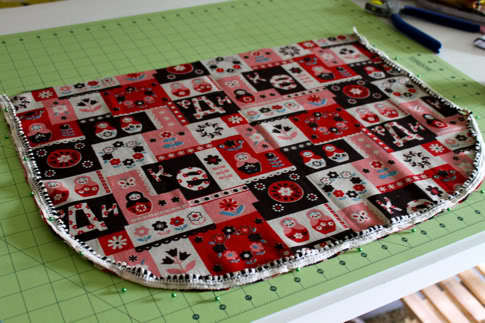
Baste it on. Basting is sewing with a straight stitch set to a wide width, like a 5.
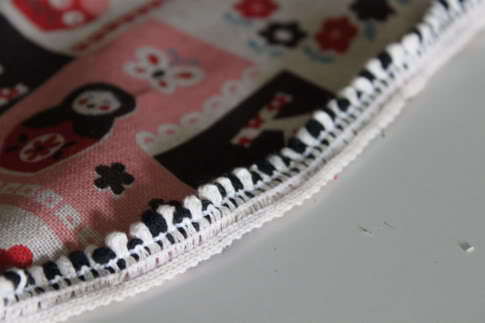
Now flip it over to the back of the apron and iron flat:
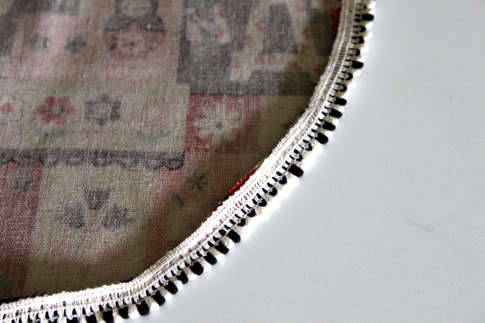
It looks like this from the top:
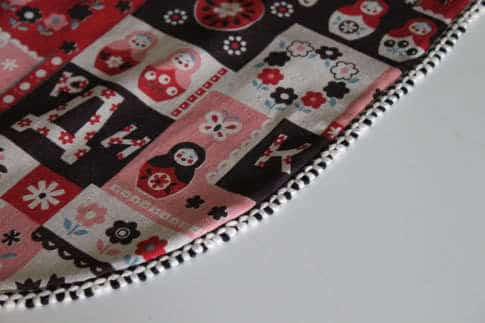
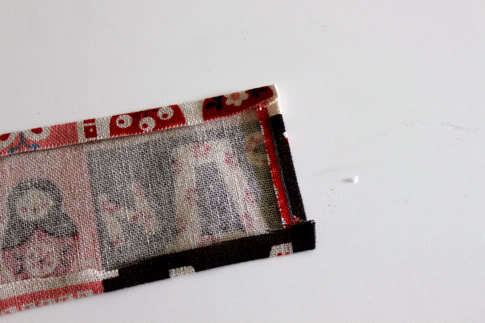
Sew it on with a straight stitch all the way around. Now it looks like this:
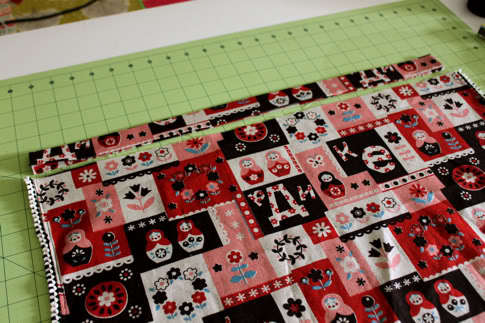
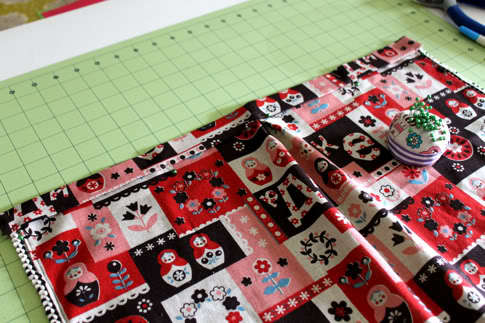
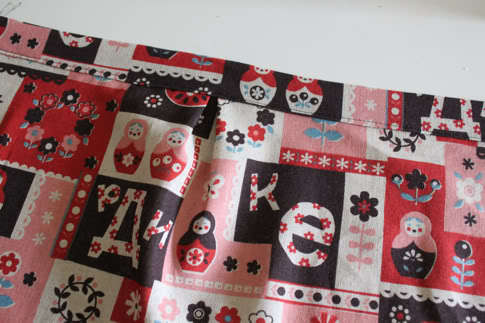
6. Now take your waistand piece we made earlier and lay it out, choosing which side you want to be the front of your apron and putting that side up (pay attention to which way your pattern is facing). Lay your apron under it. Is it the same length? Mine is slightly wider:
So I made a pinch pleat in the center by pinching with my fingers and pinning in place:
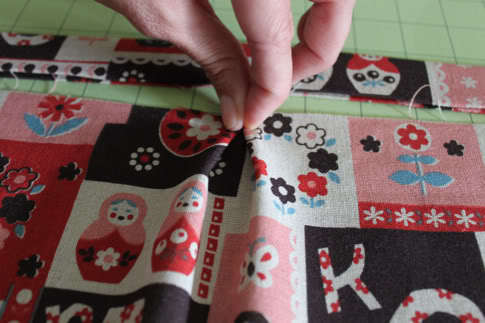
Open up the flap:
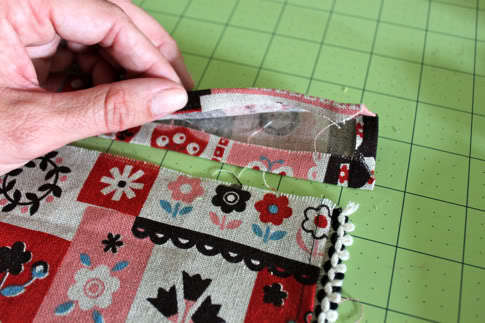
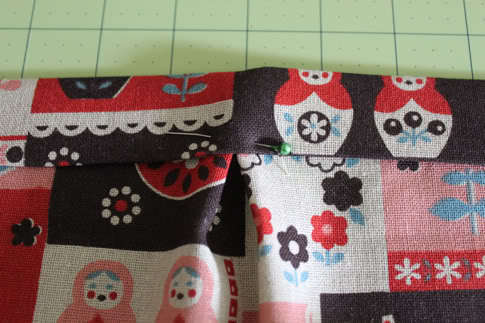
Place one end of the apron inside the flap about 1/2″ down from the top fold:
Pin in place. Repeat on the other side, pin all the way across:
Remove your first pinch pleat pin and replace after you place it inside your waistband:
On each side open the flap and place the end of a 3/4 yard piece of a trim right side up aligned with the top fold:
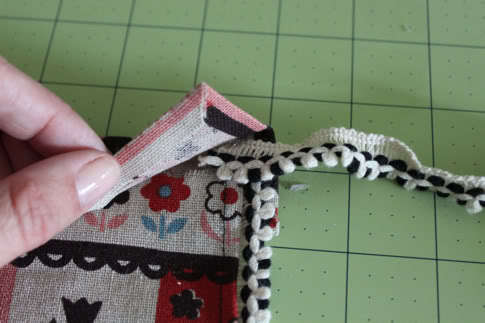
Pin all the layers together:
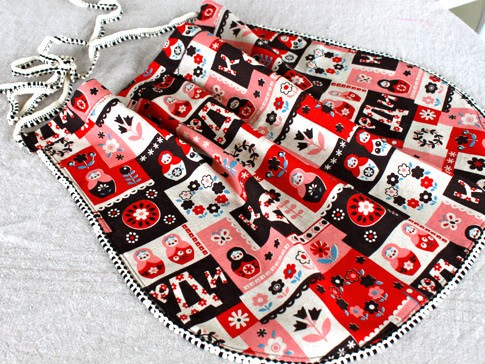
7. Sew down each side and all the way across the bottom of the fold. I did two rows at each side to securely hold the apron ties in place:
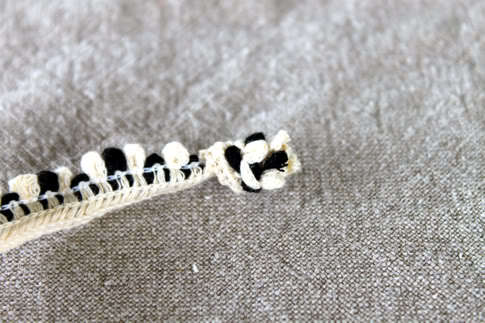
Finish the ends of your trim, I just tied them in a knot:
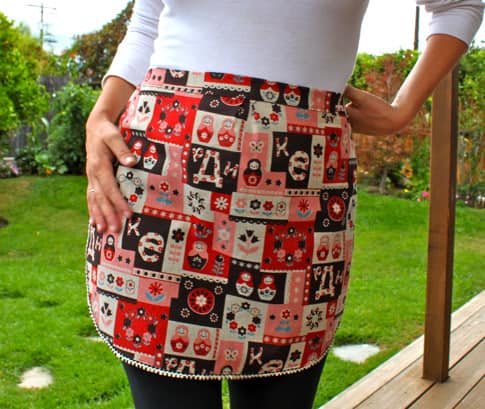
You have made yourself a fat quarter apron! Now try to take a picture of yourself wearing it where you can see the apron, you don’t look fat, your pajamas pants are hidden and the stains on your shirt don’t show. I dare you!
So, got any great fat quarter projects we should know about? Tell us in the comments!
See?!? Didn't I tell you it was perfect for this weeks FRIDAY{SURPRISE}PRIZE?? LOVE THIS PROJECT! It makes a perfect little gift!
If I had such cute fabric prints I would definitely be keeping it for myself. Thanks for another great idea for a fat quarter, can't wait to try this myself, for myself of course!
Um… I'm just going to go ahead and thank you for explaining what a fat quarter is. I'm not NEW new to fabric/sewing but didn't have a clue what a fat quarter was. I wasn't, however, going to be the doof that had to ask… and I am apparently too lazy to do the research and find out on my own.
But now I have been enlightened.
Thanks! 🙂
Sweet and vintage look!
Ok. I already made one before my kids even got up this morning! So much fun! I'll post a pic in a bit.
AWESOME Christmas gifts. Thank you!
Sandi's pretty fabric is calling my name
Make an apron from a fat quarter?
Sure, I'm game!
I'll trim it up with some rick rack maybe
and end up with a beautiful gift
all thanks to Prudent Baby!
My girl has a kid apron that she won't wear when "cooking." I figure it's because I don't wear one because I don't have one, but I think this tutorial is going to fix that issue! Thanks for sharing.
I'm on it like white on rice! I've been on the hunt for a simple little project I can do with 2 wee Irish girls I know, and this looks perfect!
holy fat quarter bat man!!! what a genius idea~ I give you a BOOM and a POW for making my Christmas shopping that much easier!!!!
WOW, how cute!
NO WAY! How adorable!! Can think of a handful of mamas right now who need one! Thanks!
I love this! i am going to be making all of my Christmas gifts this year and i know just who to make this for!!! besides myself 🙂
Super adorable! I'll definitely be making one for myself. I can't cook worth a lick, but at least if I have one of these I can look good while I pretend to.
Super cute!
Drooling over that cute fabric! I assume it's no longer available? Can't wait to make these for a lot of friends with girls.
This is darling…I am thinking Christmas gifts for my sister-in-laws!
its becoming quite clear to me that i need trim.
that is on my teacher gift list now.. thanks so much for the tute.. love that fabric!
definitely will make one.
thanks for tutorial.
Oh, I love it! I have been wanting to whip up an apron for some time now. Thank you for this tute! And thanks for explaining what the heck a Fat Quarter was!
Super cute! I posted a link to this on my blog
mylittlecupcake22.blogspot.com
I have been meaning to make aprons for gifts for all of my friends for the past 2 holiday seasons. Alas, it hasn't happened. I think I will have to try to get this one done. Just a special request- I am a rather messy cook/crafter/gardner and need something in a full length apron for myself… Got a tutorial for one of those?
Thank you, thank you, thank you! I am in a craft swap,I'm 37 weeks pregnant and was having a total lack of creativity. This was perfect! I had everything on hand and whipped it up over the boys nap time. Granted it took me over an hour, I used ric-rac for the first time ever and when it was done I wanted to keep it. Totally making Christmas ones as gifts for all the women and all the little girls in my family 🙂
ohhhh I think I just found some fun (and inexpensive) xmas gifts for girlfriends! Thank you for sharing!! Yours is adorable!
I <3 <3 <3 this! Your fabric is so cute, and adding the adorable trim at least LOOKS easy. Thanks.
This is so cute and you're a great teacher. Even I, a person with no experience sewing in over 15 years completely understood. I feel like this would be a good starter project for me and my new birthday present, a sewing machine!! Just need some fabric and other essentials first so I'll bookmark this until then! Thanks so much for sharing!
I think I will be making one of these for all the women on our Christmas list! Thank you! Love the fabric!
Awesome post!! I have a few questions..do you have alternative instructions if you choose not to use trim? Also, I am so new at this, what is a good website for finding trim? Is trim just ric-rac?
Laura,
I think you could "trim" it with anything you wanted. For example bias tape, lace, ric rac, beading of some sort etc. I would think you would want the beading for the tie part of the apron but could decorate the actual apron part with it. Hope that helps a little…..
Angie
I just made mine while 1 kid napped. i used some Japanese fabric with Chickens on it. I love it! Too bad I made it after I did all my baking for the day. Jen
Everyone at work wants an apron. Now I can make a few. Looks easier than what I am doing now.. Still learning to make my own bias too.
Love the material
These are great and so easy to make! I worked with a Halloween/Fall theme- it would be great for a teacher, especially an art teacher. So cute. Thanks so much for the tutorial!!!!
What an awesome tutorial. Looks like I will be putting off the Halloween costumes for about 20 minutes longer! Thank you!
Love this! I will be featuring it on our blog ziggycrafts.blogspot.com Thanks for sharing. I can't wait to get started on mine!
Ok, so I am BRAND-FREAKIN-NEW to sewing. Like, I got a sewing machine a month ago(literally), and this was my 1st project that did not involve just stitching straight lines….
And while it DID take me more than 20 minutes to make, I finished this in about 2 hours, AND it looks GREAT! Is it perfect? No, but I am so pleased with how it turned out, and rather pleased with my sewing,….which is probably just a fluke, or something to do with the quality of the tutorial.
Anyway, I think I'm actually going to make one for my mom for a stocking stuffer! Thanks for the great idea!
That is absolutely gorgeous 🙂 I was wanting to make myself an apron for Christmas, and then thought my sister-in-law would like one, too. This would make a great gift! I'll have to make two, though, so I can have one as well! And maybe a mini one for my daughters 🙂
And I love the fabric. I have a Russian Doll obsession! I've made a bag with gorgeous Russian Dolls on it, and would LOVE to have an apron with Russian dolls. I'll have to go looking for some cute fabric. Thank you for a great, simple pattern 🙂
Great tutorial! Just made my own and it was very easy. Check it out at http://eyespydiy.blogspot.com/2010/12/super-easy-apron.html
Great tutorial. As a horder of fat quarters, it's always fun finding new patterns to turn a single fat quarter into a BIG project. I'll be linking on Facebook. Thanks 🙂
Very cute!
LOVE LOVE LOVE this tutorial…I am going to Pin-it so I have a copy of it so when I catch up on my UFO's I will be making these….FOR SURE!..grin…
Shannon Margaret
Shannon.Margaret.Brott (at) gmail (Dot) com
Love this project! We don't get too many fab fat quarters in NZ unless imported & paid well for them. This will be my new fat quarter obsession… after making bibs, cuffing baby trousers, and making tiny beds with pillows for friends' daughters' dolls.
Just got some fat quarters on sale for $.99……so glad I found your tutorial! Thanks o much for the easy and CUTE idea for fat qtrs.
Hey there! I featured your apron tutorial on my blog today!
http://theadventuresofroryandjess.blogspot.com/2011/03/apron-tutorial-round-up.html
Thanks for the tutorial and inspiration!
Jess
Hi! I love this tutorial! I made an apron for myself this past weekend and blogged about it here! I hope you like it! And thanks for the great idea!
Kristi @ A Nest in the Making
Woo hoo! I'm new to sewing and I just made this all by myself without a single call to my mom. So stinking proud of myself! Thanks for your super-easy-to-understand directions.
My mom followed this tutorial and made her own additions/subtractions to make this apron for me. 🙂
She used this fabric from fabric worm: Monaluna Metro Cafe. I love it! She also made a purse from it for me!
[…] You probably saw my apron yesterday, but there are lots of others out there, including this cute Fat Quarter Apron from Prudent Baby. […]
Great idea! Love the fabric too.
Love this little apron and am going to use the instructions to make a couple for Craft Hope.
you are awesome girl…AND so talented
I love this fabric it is so cute. The apron is awesome, thank you for the easy to follow tutorial.
I’ve been looking for a beginning sewing project as my 2 granddaughters are coming to see me this summer. This will be perfect. I may use grograin ribbon for the trim and sash. That fabric is so neat. I’ll have to check out what my quilt shop has in stock that gives the same “look”.
Yup. Can surely be accomplished in 20 minutes! Mine too a tad longer and used just a little more than the fat quarter because I didn’t have enough trim. I made a matching trim and ties from more of the same pattern. Wonderful! THANKS
[…] 21-23. Teacher Aprons […]
I just started sewing a week ago and can’t wait to make this. I just got a ton of fat quarters at Michael’s for a quarter a piece.
You said you could use trim if you want to. I didn’t want to. I got to the end and realized, I have no way to tie this on. What a total waste of my time. Bad tutorial.
You should have read the tutorial first which is good. Bad reader.
[…] apron from ONE fat quarter I couldn’t wait to have a go and found this rather super tutorial here from Jaime at Prudent Baby. It was my kind of tutorial – clear, straight forward and easy to […]
Oh, what a lovely idea, on my way to
get my fat quarters and make some birthday gifts.
Thank you
[…] with mint coloured lace, I made the apron using this tutorial. Very simple to sew and I’m totally wearing it next time I make my Vanilla […]
[…] Here’s the apron tutorial if you’d like to make one for yourself. […]
I found this pin a few weeks ago and have been looking for the time to drag my machine out. Well, today is the day! A snow day from school! Can’t wait to make this, my machine does embroidering also, so I think I’ll try and be creative! Thanks for the adorable idea!
Hi Jaime. This is a lovely easy sew project to give as a gift to friends and family. Love the trim on yours. Our readers will love it. We’ve shared your tutorial in our latest craft inspiration roundup. https://craftylikegranny.com/more-creativity/ Cheers Jodie 🙂
I was searching for an apron to make with some fat quarters I have lying around and came across your post. This is the first apron I ever made, and the 2nd sewing project I ever made back in 2010. It’s been 10 years that I’ve been sewing now, so thank you. <3
Love this and am on the way to find some fat quarters!!Thank you