


When we saw that Amy from Little Bean Workshop had created a long sleeve dress variation of our peasant blouse tutorial, we begged her to let us share it here on Prudent Baby. She said yes, yay! I can’t wait to try this, I think my girls would love one, maybe in adorable Ann Kelle or some new Anna Maria?
Get the full tutorial for the Long Sleeve Peasant Dress after the jump…
Take it away Amy!…
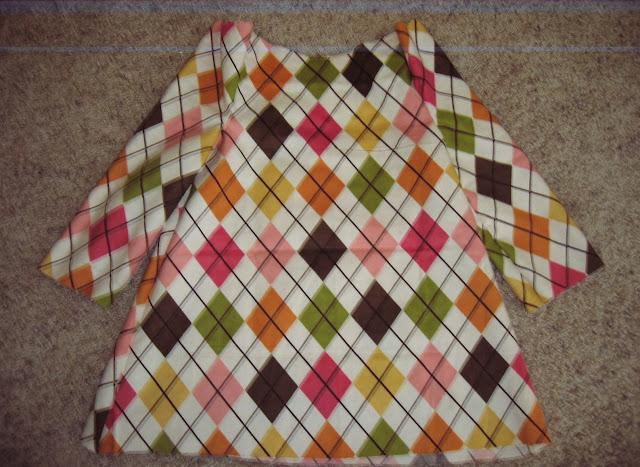
With Winter fast approaching here in the Pacific Northwest, long sleeves and cozy fabrics are a must! So, I played around with the pattern until I came up with this:
Here is what you will need for one toddler dress (size 2T):
• 1 yard of fabric
• 1/4 inch elastic (approximately 26″)
• corresponding thread
• safety pin
• pins (optional)
Step 1: Cut out fabric
Here is the pattern:


(Side note: If you would like 3/4 length sleeves, cut your sleeve pieces to 10″ x 14″)
Once cut, your pieces should look like this:

Note that these are still folded
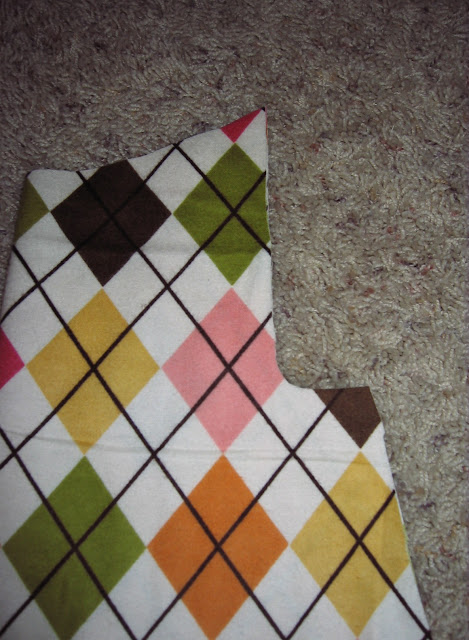
Step 2: Cut out neckline and armhole
On your dress pieces (leaving them folded in half and stacked on top of each other), cut out an armhole 6″ long. I cut a basic J shape.
Cut the neckline as deep as you would like it. You may prefer to cut the front more than the back.
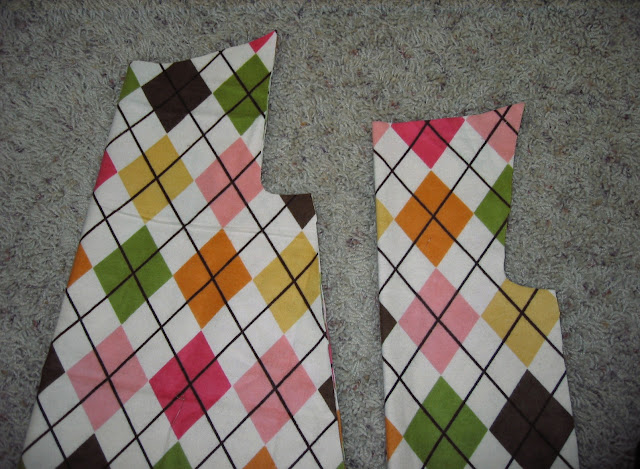
Fold the two rectangles for the sleeves on the long side, so you will have two 5″ x 16″ pieces. Stack them up and place them behind the dress piece with the fold on the inside, like this:

Now cut out the armole and neckline where they overlap the fabric.
Piece together your dress
Unfold all of your pieces. With right sides facing each other, line up the armhole on one side of the dress with the matching cut on the sleeve piece. (You can pin this if you like, but I don’t bother…I only pin things if I absolutely need to.) Like this:
Now sew around 1/4″ in around the edge of the armhole. Go back and do a zig-zag stitch at the edge of the fabric to keep the seam intact.

Repeat this on the other side of the dress piece.

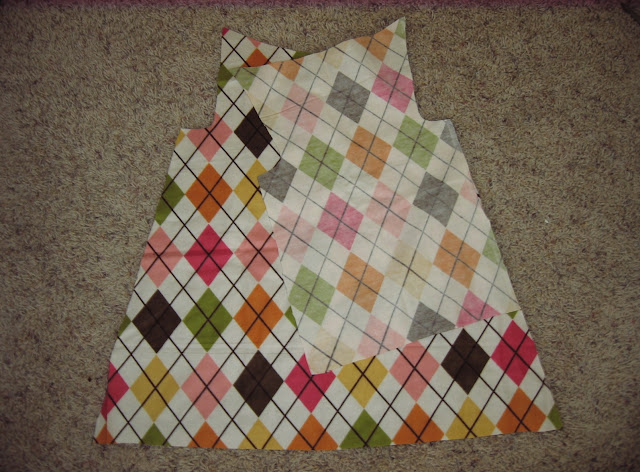
It should look something like this:

Now attach the other side of the dress piece in the same way.
The dress is starting to come together! Next, the side seams need to be sewn. Line up the seams at the armpit and then sew along the arm and the side of the dress all at the same time. Again, secure your seams with a zig zag stitch.
Line up the armpit before you start sewing!
It should look like this:
Step 4: Finishing touches
Lay your dress out so the top is flat. It is likely not perfectly straight.
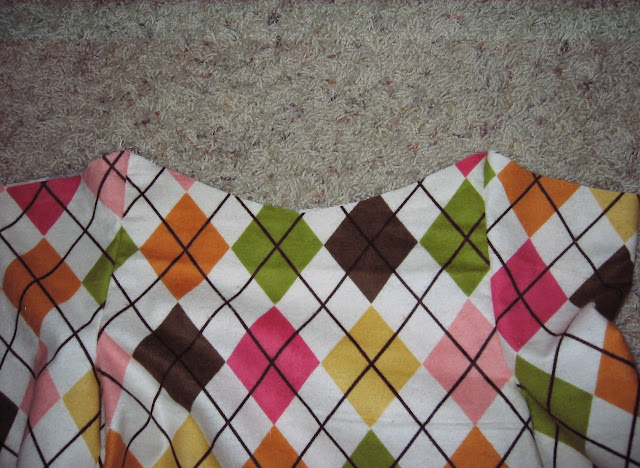
We want it to be straight…so, fold your dress in half vertically…

And cut until you have a straight line across the top…
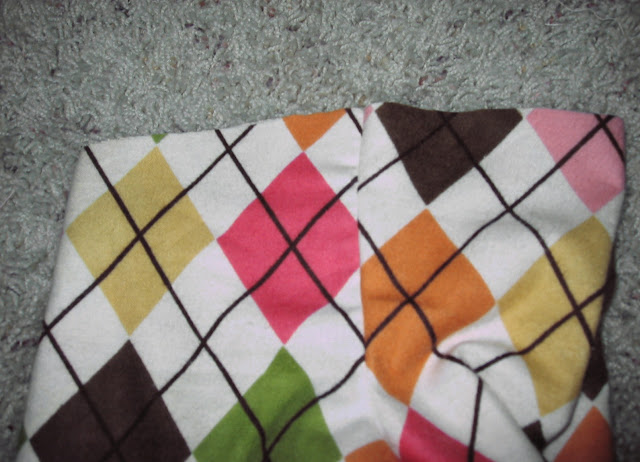

Time to heat up that iron. Fold the top edge over 1/8″ and iron, then fold over again about 3/8″ giving you a nice clean edge. Iron down.

Repeat with the sleeves and the bottom hem (although for the bottom hem, you can fold over to 1/4″ on the second fold since we are not inserting any elastic here).
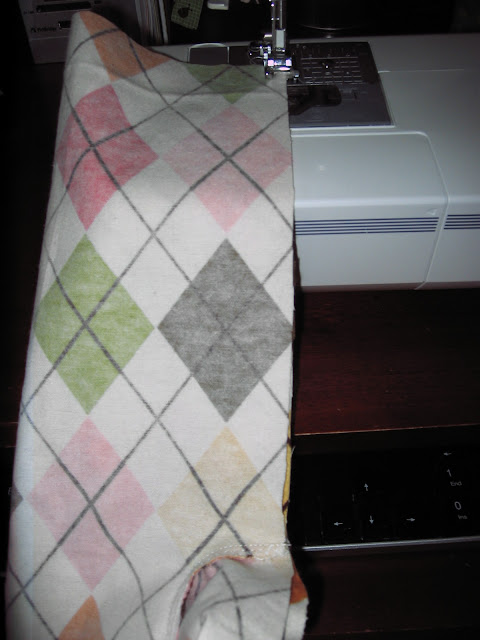
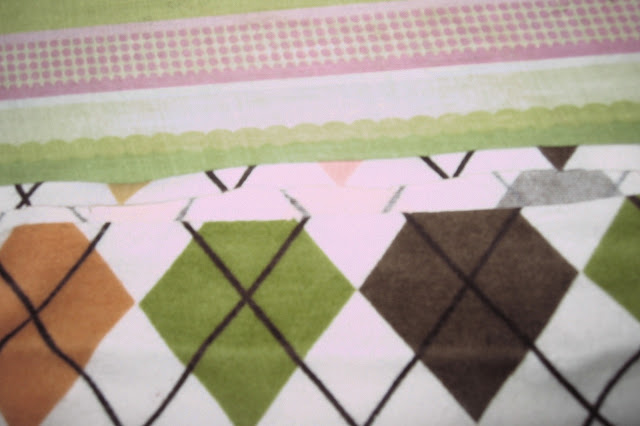
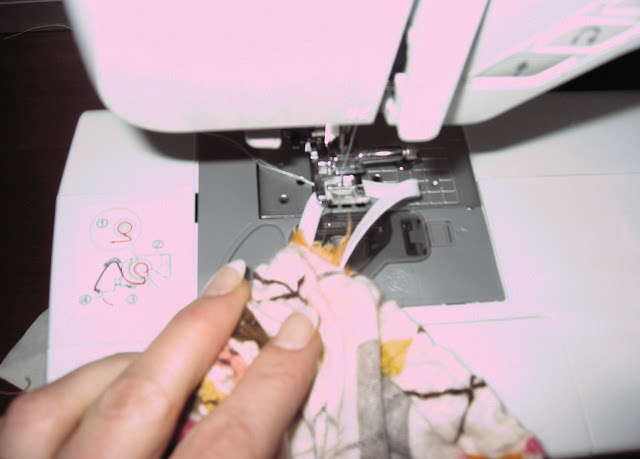
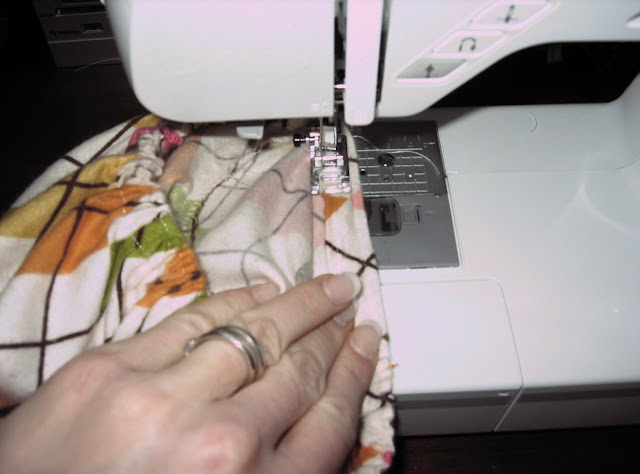
Now sew one line straight across the top of your nicely prepared fold just below the very edge of the neckline. Go all the way around the edge.

Now sew a second line around the bottom of your hem (leaving a minumum of 1/4″ in between your two rows of stitches). Don’t sew all the way around – be sure to leave about 1/2″ gap at the end so that you can feed your elastic through there. Repeat on both sleeves.

You can hem the dress now as well.
It’s time to insert the elastic. Here are the measurements that worked best for Little Bean:
Neckline: 14.5″
Wrists: 5.5″
Forearm (should you want 3/4 length sleeves): 6.5″
Mark the length of your elastic. Do not cut it yet (otherwise it will be much more difficult to stitch up when you are done). Attach a safety pin to one end of your elastic. Insert it through the hole at the neckline and start to feed it all the way through to the other end. Once you are satisfied with the length, then stitch it up with a few zig zags to secure it. Clip off excess.
Sew the 1/2″ hole closed.
Repeat with both sleeves.
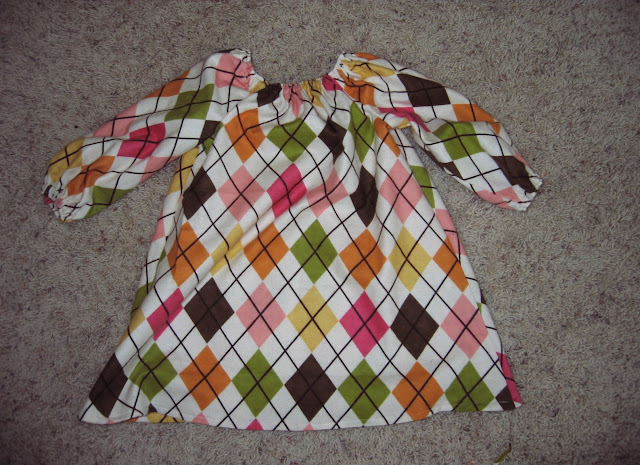
You’re done!
Here is your final product:

Little Bean running away again.

Here’s proof she does have a face!
Enjoy! Leave a comment and you could win a set of bow-tie hardward, just like we used in our Martha Stewart Weddings feature. Let Amy know what you think of her project in the comments!
Aaah… it finally makes sense now! Off to make one!
Thank you for the tutorial and the pattern measurements! I'm definately making one of these this week!! We need long sleeve dresses desperately.
Awesome! I'd done a long sleeved version for my 18 month old this summer but I never got a picture of it. I made it to go under this dress though: http://www.jehc.net/blog/?p=54
I'll definitely be bookmarking this post to follow along for the next one I make!
i have 2 boys.
so poo on this tutorial because it makes me want another baby and hope its a girl, but my body says "stop! i just lost weight, keep it off for awhile, you crazy ball of horomones!"
So cute. If only I had a girl!
Little Bean Workshop is one of my best friend's blogs, and I've made about 5 dresses from this pattern, it's amazing!
Love it! We are just heading into summer over here so I have made loads of Peasant tops to get my little girl through summer. As soon as winter rolls around I will definitley be giving this a go
Ahh, it's too cute! I love it and I finally have a daughter to make it for. *insert happy dance** Granted she's 1 month old and I have yet to find leggings or tights that fit her….do you have a tutorial for teeny-tiny leggings? Either way I'm bookmarking this for future use! Thanks!
Oh I love this- especially the squared off neckline. I have a feeling it'll make all the difference in my ability to sew a decent looking neckline. I'm off to cut up some fabric. Thank you.
This is awesome! Thanks so much for sharing!!
Oh, that's adorable. I, however, am still mortal enemies with the sewing machine. Maybe, with enough cuteness like this, though, we could mend fences.
New place to surf around, THANK YOU!!! Love this dress and so excited to make three, but will need to adjust measurements for a 5 and 4 year olds. So excited!!!!
How much did you add for the 4T size? I have only been sewing for a little while self taught.
So cute! I think I might try to make one for my 10 month old. I've never made sleeves before, but these don't seem *too* hard (she says optimistically).
Cute dress, cute fabric and such a cutie model!
Oh I love this tutorial! I've seen ones on other blogs, but the directions weren't nearly as clear or easy. I love that it needs only a yard of fabric. Do you think this will work with corderoy?
I am always so scared to try to figure out sleeves, but your directions are very clear- thanks! I will have to try this for the next baby shower I go to since my son will not appreciate it…
yes!
I like it!
😀
I love a peasant dress on little girls!! I linked to your tutorial over at Craft Gossip Sewing:
http://sewing.craftgossip.com/tutorial-long-sleeved-peasant-dress-for-toddlers/2010/11/10/
–Anne
Great tut! tks
maomaocrafts.blogspot.com
Oh, yes. THANK YOU!!! Now I need to make one ….. er, three or four. And get some more tights. And make sure she has some bloomers. Yeah, thanks for make my to-do list so much longer!
Okay this is a must make it now project! See ya later gotta get sewing!!!
OH this is wonderful-thank you for sharing!!
Great idea to have long sleeve option.
My grand child will want a ruffle option next,then pockets,etc. always something new.Not even 1 1/2 and loves clothes and shoes.
Love this dress! I will definitely make one (or more!) for my granddaughter.
I love this…wonder if I can adapt for a 3 year old…Thanks so much!
I am going to try this, thank you! I have a 2 year old, am a very beginner seamstress but you provided great directions & pictures so I think it will be good!
Great tutorial!!! Very clear and looks so easy to do! I can't wait! The one thing I noticed is that you hemmed your sleeves after you sewed them together. I usually do that before I sew the sides. Any reason in particular you do it last? Thanks!!
If you hem the sleeves first you will have a seam sticking into the wrist, but if you hem them last the wrist is finished inside all around.
Definitely gonna try this!! Got my material this morning!
super cute! What would i have to do to get this to fit my very tall four year old??
So excited to try this. Finally a peasant dress tutorial that makes perfect sense to me! Thanks! Any ideas on the measurements to make a 4T?
I can't wait to make one! My daughter has been obsessed with dresses of late, so this is perfect timing!
Thanks everyone for your lovely comments!
To Jessica: No reason that you can't hem up your sleeves first…this is just how I do it. To be honest, I've never thought of doing it that way.
To Amy and Sarah, here is a link for sizing a 4T: http://littlebeanworkshop.blogspot.com/2010/11/toddler-dress-sizingmy-best-guess.html
I hope this helps!
Thanks again!
Can you please give me the measurements for a 3T? I have never sewn anything in my life but this looks like something I could do! Thanks!!
Regarding the sleeves: I know I cut down from the neck line 6 inches for size 2T but how many inches do I cut in to form the J shape?
Thanks!
Thank you so much for the how-to, I was wanting to make one for my little miss for a while now! I did make one, and linked back to you at http://balancethebusy.blogspot.com/2010/11/averys-peasant-dress.html
Many thanks again!
oh my! I love this! I think I might make one for my Daughters Birthday dress! I love that fabric!
LOVE LOVE LOVE this tutorial! It was SO easy. I needed it for my 7 month daughter, so I adjusted the measurements. She is currently in a size 12 month. First dress that I made fit her, but I made a few adjustments in the 2nd dress (see picture). If you are interested in the measurements I used, email me at tracit306 at yahoo dot com. Put LS Peasant Dress in subject or else it will probably get deleted.
http://tinypic.com/r/2r7lmds/7
Thank you for the excellent tutorial. I am just beginning to sew and my daughter's dress turned out perfectly! Thanks again!
This tutorial is great!! I LOVE this dress, going to make one for a friend and one for the little girlie soon to be entering my life!! Any tips for resizng patterns like this (would love to make it in a 0-6 & a 12-18)
I'm in love! Making this for sure!!
Finally made this adorable little dress. Took an inch off all measurements for a 1 year old. http://www.amytriedit.com/2011/01/recent-embroidery-projects.html Thank you!
Hello! I just wanted to let you know that I made my own version of this, posted it on my site and linked it back to this tutorial–>thanks for the inspiration! Christina
I made this dress this week & DD wore it to church this morning. I got SO MANY compliments on how cute it is! Thanks for a great pattern and allowing me to make a cute (free) dress!!
Thanks for this pattern. I upcycled to of my shirts and made 2 cute dresses with them from this pattern. nothing like free cute baby clothes. I just don't know what I'm going to do when she out grows this pattern size 🙂
Thanks again.
Thanks for this pattern. I upcycled to of my shirts and made 2 cute dresses with them from this pattern. nothing like free cute baby clothes. I just don't know what I'm going to do when she out grows this pattern size 🙂
Thanks again.
http://a2.sphotos.ak.fbcdn.net/hphotos-ak-ash4/198242_666603514384_33308513_37334228_6853448_n.jpg
http://a4.sphotos.ak.fbcdn.net/hphotos-ak-snc6/189458_666721123694_33308513_37336053_3581546_n.jpg
how can i make size 1 thru to 6 ??
My baby's a boy, so I made one of there for my little neighbor–it came out so lovely, and was wonderfully easy! Thanks for the pattern.
I DID IT! I made the peasant dress, just finished it actually. It's 11pm here and I am actually tempted to wake up the little princess to see how it fits. I'm sure I've got some fine tuning to do but I love it!!!
P.S. Instead of using elastic on the neckline and sleeves, I hemmed using a blind 1/4" and then shirred each piece with my new best friend, elastic thread. Worked like a charm! Thanks again for the tutorial:)
Thank you so much for sharing this tutorial!! I made a dress for my daughter who is 8 from it! You can see how it turned out here: http://tossells.blogspot.com/2011/08/new-dress-for-anna-without-pattern.html
I'm so excited to know that I can make dresses for my little girls anytime, without the purchase of a paper pattern with this basic tutorial. I just have one question, is there a 'basic formula' for increasing the size of the dress for older girls?
Thanks again!
Thank you SO MUCH for this pattern and tutorial. I have featured a link to this on my blog, and I have added a free apron pattern to go with it!!
I lengthened the dress to 25" and the sleeve length to 17".
This is a fine tutorial, and it was easy to make the dress with your instructions!
The apron for the dress: http://ourpioneerhomestead.blogspot.com/
Could someone give me (or suggest) measurements for a newborn or 0-3 months size for this dress. I want to make it for my newborn (6 weeks old) daughter, but I am not sure what measurements to use since I’m new at sewing.
Any measurement help wanted. – Email me at sandragordon85@gmail.com
Thanks.
Sandra,
I looked at few dress patterns for that size for you and it looks like the finished garment measurements (from top back of neck to hem line) for most size 1-3 month dress patterns are about 14-14.5 inches. So if you add 2.5 to 3 inches to that lenghth, it will acount for the material you cut off of the top and the neck and bottom hem. So make your lenghth about 16.5 to 17 inches. As far as the sleeves, I would cut those about 3.5 x 13 in. on fold and when you cut out your “j” shape only use a measurement of about 4.5 inches instead of 6 in. I think you could put it on her and just pull your elastic pieces to the size that looks good and mark it then cut it and sew. This dress is very easy to make (I have made many-takes about 45 min.) and I am guessing at the measurement a bit, so I would try first with some scrappy fabric and then once you get a better idea of the measurements you can alter the pattern for the real thing. I hope this helps. Let me know how it goes!
this is awesome, thanks!
Thanks! I just made this for my 2 1/2 year-old. I checked the sizing against a size 3T dress and it was very similar, just needed to be lengthened a inch.
I also am loving this bustle-back version http://sewingin-nomansland.blogspot.com/2011/01/couture-cutie-tutorial-and-give-way.html Now that I’ve got the basic dress down, next time I’ll add the bustle!
Do you have the measurments to make this for a size 7/8? My little girls loves this pattern but I usually don’t sew w/ a pattern so I don’t know how much to add for each size up. Thanks so much!Robin
It’s a wonderful tutorial, thanks! Could you tell me which fabric is used? I love it.. Thank you!
It looks like a knit fabric to me, but I was also wondering what type was used.
[…] Uzun kollu ve baklava desenli kumaş ile yapılmış. yapımıni ve dikilişini görmek isteyenler şurada […]
This was super simple and looked fantastic!!! It does work in pinwhale cord and cotton, and flannel!! I have made a few dirrerent sizes, add or take about an inch all over!! Would love to be able to post a ic of one I have made!!
I made a dress today using this pattern and tutorial. Very easy! Love the pictures too!
Hi
I started doing a mock up of this dress using some calico as I didn’t want to try it using my new fabric until I knew I had it right. I don’t know what I’ve done wrong but the sleeves don’t seem to sit right. When you layer the sleeve rectangles under the main dress and then cut the neckline and armhole where it overlaps, at what angle are the sleeves supposed to be? They seem to be coming out the wrong shape and when I pin it all together there is a big piece sticking up. No one else seems to have had a problem. I don’t know what I’m doing wrong. Help!!
Well the dress seemed to work out (even though I have just done a very rough sample in calico). I think I was looking at the photos wrong and in actual fact my sleeves looked the same as the picture. I do have a question though. Why is there a need to cut the neckline in the main dress and sleeve if in the later step when it is stitched together you fold the dress vertically and cut it straight across the top? Wouldn’t it be easier to just leave the neckline and top of sleeve straight at the start or would it not sit right if you did this?
I asked this question too…has an answer been posted?
Also regarding the sleeves. I know I cut from the neck line down 6 inches for size 2T but how many inches do I cut in to form the J shape?
I can’t stop making this dress. Thank you soo much for sharing. I have made a few adjustments and I am soooooo happy with the tutorial. I added ruffles to the bottom, a sash to the middle, and shortened the sleeves.
My 3rd make, earily, all from this website! This one worked too! My little one seems to like it. Hitting the fabric store for some pretty fabrics this weekend 😀
Can you tell me how you calculate if you want the dress to be a larger size? I have a 5 and 8 year old and I would LOVE to make this dress for both of them. . .
Need this in a size 5T. Can you tell me how to adjust sizes?
Yes, can you send measurements for bigger sizes? 4T, 5T, etc. or just how much to add on for each additional size?
I made one! http://chachismemories.blogspot.com/2012/09/birthday-suit.html
Thanks for this. I didn’t use the whole tutorial but the instructions for the sleeves helped alot. I was copying a sundress my daughter has and was planning on doing it for the fall so I wanted sleeves. Yours are the easiest and by far the nicest looking of all the ones I found. It took me 10 minutes to finish the dress and now we have a great fall outfit. Thanks again, I will be using more of your ideas :o)
I am not quite understanding how to cut the body pieces. There is an “angle” on the right side of the pattern. How do you cut that? Do you eyeball it?
LOL! Nevermind. Duh!
Love it! I am going to make it for my daughter, with a matching mob cap. Thanks!
I LOVE LOVE LOVE this and have been looking for a good tutorial for a while now. I am self taught in the sewing department and have only been doing it for approximatly 6 months. I have no idea how to adjust the pattern to a different size. could you give me the measurements for a size 6? I would really appreciate it.
Well, I FINALLY have a girl to make dresses for. I knew I was going to come back for this pattern when I did. Thank you so much for posting it!
I actually made a mock-up out of an old skirt of mine, just to see how it went, and it’s totally wearable. This afternoon I made the “real” one. Also, one of the neat things about this pattern is that is *so* simple, it is perfect for cutting down other clothing into a dress. I used dress I’ve “outgrown” and was able to preserve the pintucking in the front and the ties in the back. So awesome!
Could you please tell me how to cut this down to 3 month size? I am fairly new to sewing, but with 3 granddaughters sewing is becoming a necessity. Thanks in advance
[…] ago? It’s going to be worn with this dress. I followed the tutorial for this dress on Prudent Baby. I’ll include my pictures because there were a couple small changes I […]
I never got an answer to my questions about resizing but found help on this other post through Pinterest: http://indietutes.blogspot.com/2007/07/peasant-blouse.html
Hope it helps you guys!!
Can anyone tell me about the sleeves? I know I cut down from the neck line 6 inches for size 2T but how many inches do I cut in to form the J shape?
OMGosh! I followed your instructions this morning and was so pleased with the results. Thank you so much for posting this!!! Here is a link for my final product: http://instagram.com/p/S_OUpjLYZr/.
[…] Long Sleeve Peasant Dress by Prudent Baby […]
[…] (actually Ottobre has them, but I have yet to decide on just one issue to order), I finally found this tutorial from Prudent Baby (ah–I love […]
[…] dress is a slight modification of the dress in the Long Sleeve Peasant Dress Tutorial by Amy of Little Bean Workshop at Prudent […]
I have had this tutorial pinned since I first joined Pinterest ages ago, and I finally made it tonight! I always wanted to make it but could never remember to pick up elastic when I was out shopping for sewing supplies. Well, I finally remembered and I had so much fun making this cute little dress! It is SO easy, and your tutorial makes it even more-so. I was in the mood to zip off an easy but adorable project tonight, one that I didn’t need to print a pattern for, and this fit the bill to the letter! Thanks so much for the clear and simple instructions and pictures. 🙂
I LOVE this pattern and tutorial. I’ve made this dress 2x for all three of my girls (ages 11, 8, and 2). Flannel is soft and comfy…perfect for a winter dress. But…if you make the sleeves short, it makes a cute nightgown for the spring and summer months. I just finished a nightgown for my toddler…can’t wait for her to wear it!
So cute!!! Love the easy shape and absence of buttons 😉
[…] about it and Googled sewing a peasant dress. The perfect dress came up at Prudent Baby found here. It looked easy, so I decided to try it. Here is the finished […]
[…] made a tiny little peasant dress (modified from this) for our newborn daughter to wear home from the birthing center. But best laid plans oft go […]
Hi! I love this tutorial, it was one of my first sewing projects 1 1/2 years ago, and it’s also the dress I made for my daughter’s Church dedication 🙂 Recently I made a variation of this dress as a Cinderella costume, I am wondering if it would be okay to post a link to your tutorial on my blog – and then just explain the modifications I made to it to create the Cinderella Dress? Thank you, I hope you don’t mind…my e-mail address is kraiger5@me.com.
[…] was a peasant dress. When I first learned how to make one, I followed a great tutorial from Pretty Prudent. This Cinderella dress is just a slight variation from this peasant dress. Since most of the […]
[…] was a peasant dress. When I first learned how to make one, I followed a great tutorial from Pretty Prudent. This Cinderella dress is just a slight variation from this peasant dress. Since most of the […]
[…] style dress seemed like an easy thing to start with so I looked up a tutorial online and found this one. Even though it is for a toddler girl size, I figured I would get the basic idea of what to […]
Thanks for providing info about baby long sleeve. This is great job for creating babies dresses.
Can anyone give me ideas of how to measure this for a size 6?
What would the measurements be for an 18m
There are no words, to express you how I thank you from the bottom of my heart. Many blessing to you and your family!
Thanks so much! I just completed this dress! It turned out very well, I will try and put up a picture or link it later 🙂
Love! Your step by step instructions are wonderful! Thank you for sharing!!
I so want to make this for my 8-year-old. Any suggestions for adapting the measurements?
I just found this tutorial. So simple! Just made a friends child a dress out of remnants. Red with a pink stripe down middle since she is obsessed with the show Olivia. This was so simple, I can’t believe it worked out so well. Will even reference sleeves for future projects. Love it thanks for the instructions.
Awesome! We would love to see pics!
I wish that more people would become more aware of the dangers of
carbon monoxide poisoning. Every year over twenty people are killed by this odourless,
colourless gas leaking from faulty boilers together with hundreds more who
suffer serious ill health because of it.
I make this pattern all the time – less than 45 mins once I have my fabric washed and ready to go. I use homemade bias tape to finish the hem and bottom of sleeves and also add a sweet casing around the forearms and/or waist to switch it up. I just open my bias tape and sew right on top of sleeve fabric and use that casing for elastic. So easy and super cute. I got a bias tape machine last summer and became obsessed. Made yards and yards of tape in 8 different patterned fabrics. Now I’ve always got a little tape on hand to add detail to any pattern or project. I even glue it outside the lid of a mason jar and put all kinds of stuff inside (M&Ms with a gift card tucked inside, food mixes, etc) to make adorable teachers gifts. Love me some homemade bias tape!!
[…] was a peasant dress. When I first learned how to make one, I followed a great tutorial from Pretty Prudent. This Cinderella dress is just a slight variation from this peasant dress. Since most of the steps […]
how do you measure for different sizes? I need 4t 5t and 7/8… Any help appreciated! 🙂 love the dress
What type of material would work best for this pattern?