


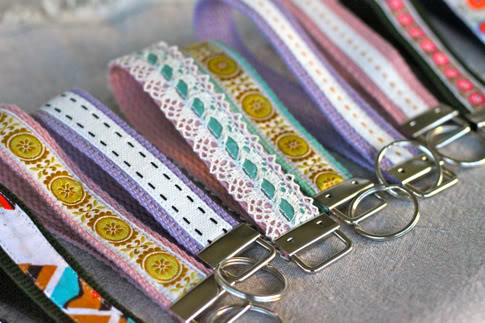
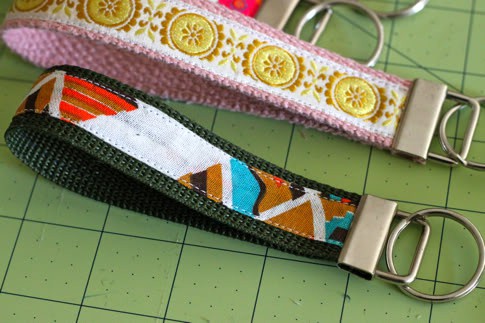
These little key fobs are such a fun way to use bits of pretty trim to make easy and VERY inexpensive stocking stuffers! Let’s learn how to make a key fob – it’s so easy and fun.
You just need a few supplies and a few minutes and you’ll have little custom homemade gifts for all your favorite ladies. And also, totally an appropriate handmade man-gift if you choose the right styles for you homemade key fob.

I love pretty ribbons. It’s so nice to get to use ’em and share ’em.
Learn How to Make A Key Fob Wristlet after the jump…
How to Make A Key Fob
-First you’ll need key fob hardware![]() . I picked mine up at Amazon – 50 sets for $19 – so that’s 38 cents each.
. I picked mine up at Amazon – 50 sets for $19 – so that’s 38 cents each.
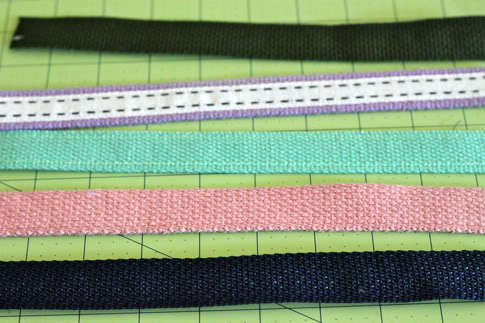
-You’ll also need some cotton webbing![]() . Since I bought 1″ key fob hardware, I picked up a few yards of 1″ cotton webbing at my local fabric store in a bunch of sweet colors. You can get 3 or 4 out of a yard, and a yard was 40 cents. So that’s an additional 10 cents per key fob. So we’re up to 48 cents each.
. Since I bought 1″ key fob hardware, I picked up a few yards of 1″ cotton webbing at my local fabric store in a bunch of sweet colors. You can get 3 or 4 out of a yard, and a yard was 40 cents. So that’s an additional 10 cents per key fob. So we’re up to 48 cents each.
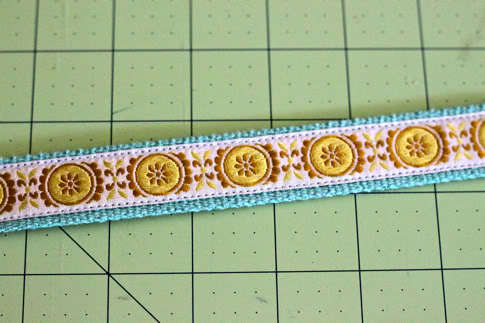
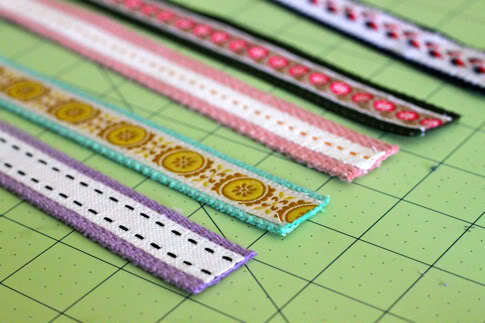
-Then you’ll need some pretty ribbon. Make sure it is thinner than your cotton webbing, so 3/4″ or less for me. Ribbon ranges in price but let’s say it was super fancy ribbon at $2 a yard, so that’s an additional 50 cents per keychain.
Total cost? 98 cents each. For a totally adorable homemade gift. Yay!
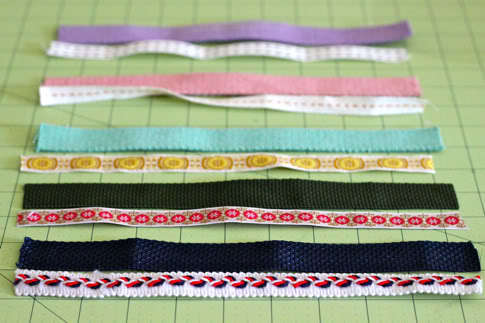
So assemble your supplies:
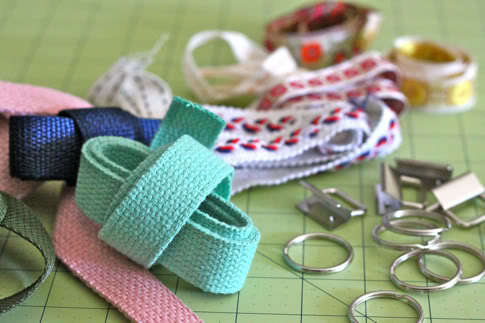
Now cut your cotton webbing and your ribbon into sections. About 10 inches is a good length for a wristlet, but I did some longer and some shorter and they’re all just fine:
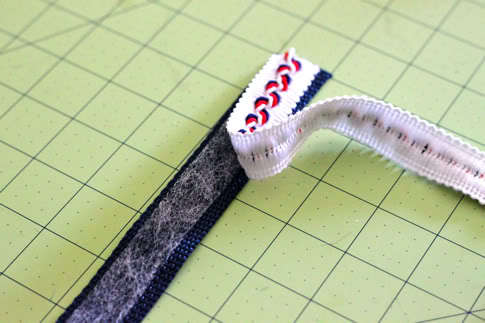
Now cut lengths of fusible tape (I used stitch witchery![]() ). You can skip this step, but it does make it a lot easier to sew the ribbon on if you do this first, especially with fancy embroidered ribbons. So iron the ribbon to the cotton webbing with the fusible tape in the middle:
). You can skip this step, but it does make it a lot easier to sew the ribbon on if you do this first, especially with fancy embroidered ribbons. So iron the ribbon to the cotton webbing with the fusible tape in the middle:
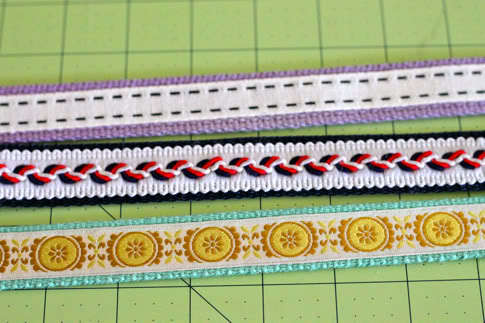
So there you have your ribbons all fused to your webbing:
Now you’re going to sew them on. You can use an edging foot if you have it, but I just used my regular foot and went slowly so I didn’t mess up. Was quite easy. You’ll also want to use a heavy duty needle (actually your regular needle will work fine, but it will become dull from sewing through the thick cotton webbing so you’ll want to change it after):
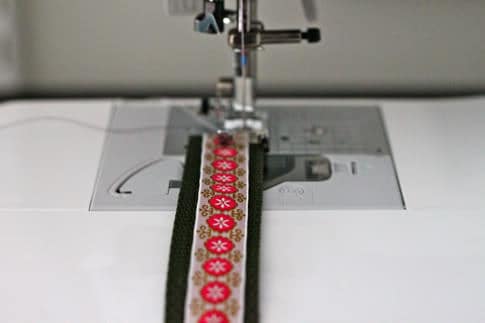
So then sew one side of the ribbon down, then the other:
Consider your thread color choices. Most of my ribbons had white edging, so i used white in my spool, then switched out my bobbin for thread that matched the cotton webbing (or as close to a match as I had in my stash) so you can’t see the stitching from the other side:
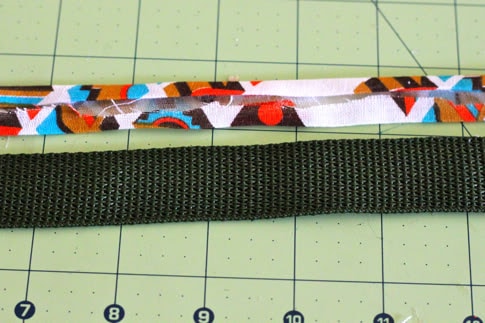
Quick note. I wanted to make one for Carleton Curtis but I did not have any ribbon I felt was sufficiently manly enough. I decided to use some fabric and ironed it into single fold bias tape, then attached as per above. Worked just as well as ribbon!
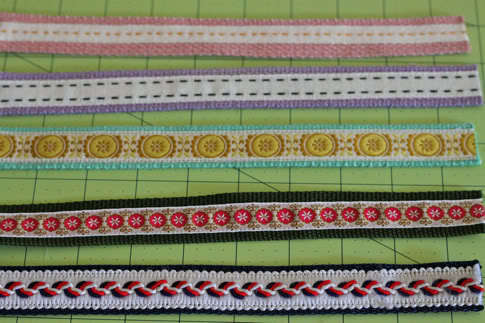
So there you have your ribbons all sewn to your webbing:
Trim the edges so they are nice and even:
Then grab your hardware. There is a clamp piece that looks like this:
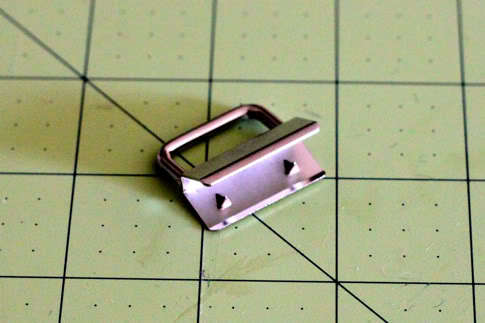
It has two little pokey things that will grab your webbing.
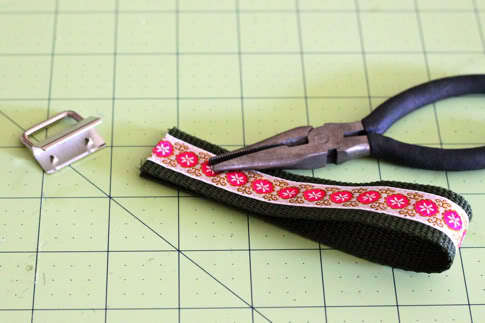
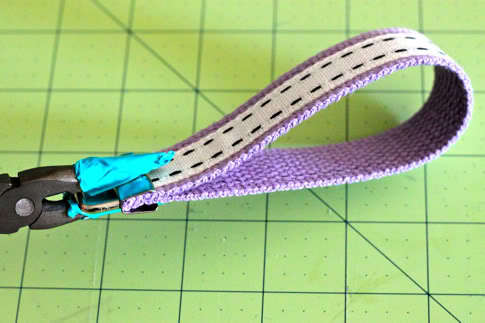
So fold your piece of webbing in half with the ribbon on the outside:
You’ll notice my pliers have ridges. These left scuff marks on my fob hardware, so…
I wrapped them in duct tape![]() (dearest duct tape, is there anything you cannot do?):
(dearest duct tape, is there anything you cannot do?):
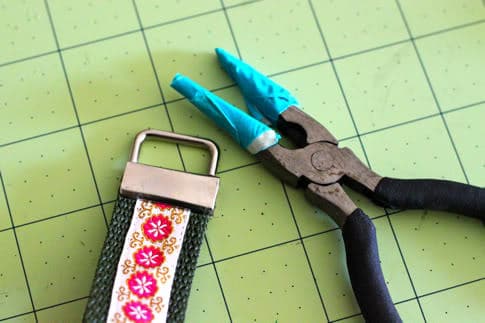
Problem solved!
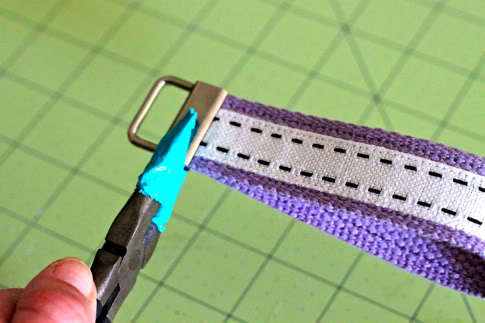
So insert the ends of your cotton webbing into the clamp. Use your pliers to mash the clamp together, starting with a big squeeze in the middle:
Then a big squeeze on each side:
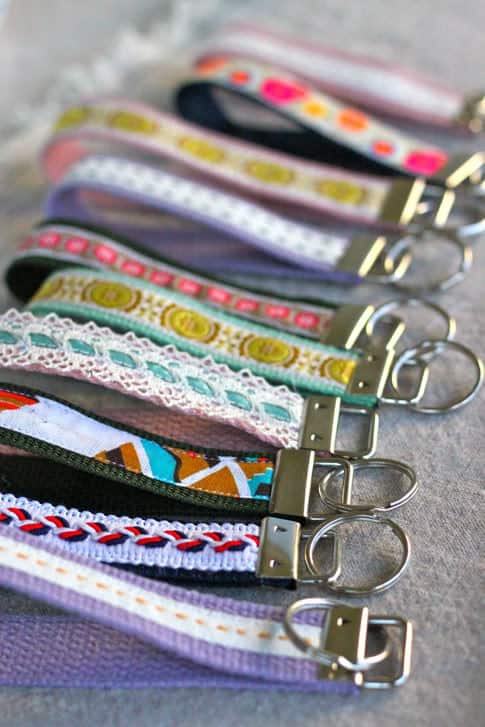
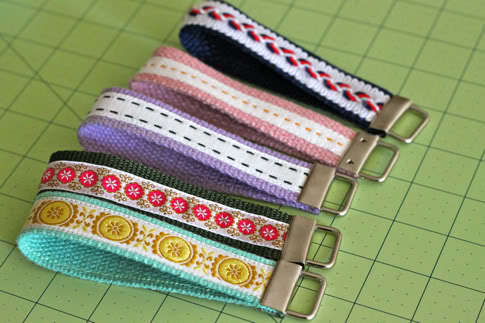
Repeat on all your key fobs:
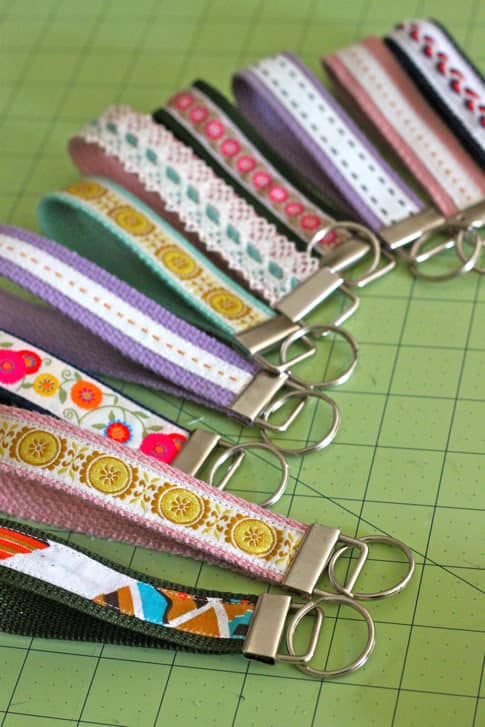
Now the annoying part: Trying not to break your fingernail while slipping the key rings on the fobs. But carry on, I only lost one nail. Attach all your key rings:
Here is the man-version made with fabric (do you think he will like it? would your man use one?):
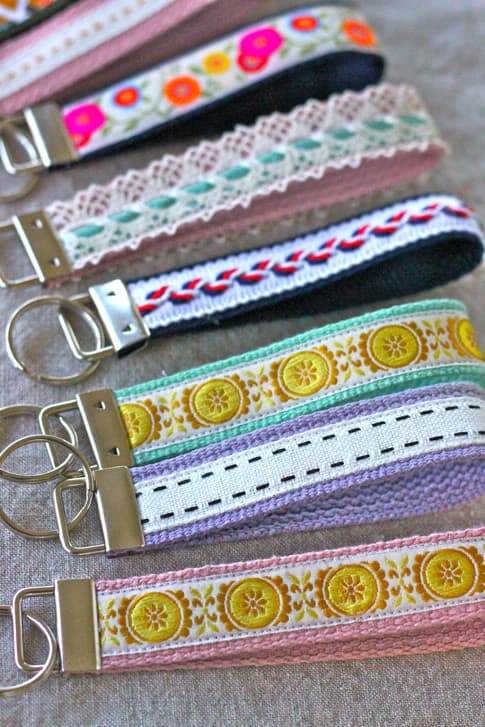
Done!
What do you think? Not bad for 98 cents right??
So, now that you’ve learned How to Make a Key Fob, why not try some other super simple and fun DIY Projects? How about making a Wristlet Pyramid Purse, Adorable DIY Ear Warmers, 5-Minute Crowns, Wood Stump Coasters, or if you’re feeling especially crafty, this gorgeous DIY Faux Leather Bucket Bag to go with your new DIY key fob.
Follow Pretty Prudent on Pinterest for more DIY tutorial goodness!
Cute!
Save your fingernails! Use a staple remover to thread the key ring onto the hardware!!
Wish I had thought of that Before I broke my fingernail :).
Wonderful tutorial! However, I'm in France and it's so difficult to find colored webbing & key fob hardware… (Most American shops/stores don't ship to Europe, or with rates that are nearly as high as the cost of the material!)
Thanks for sharing!
linedupuy(at)hotmail(dot)fr
Great tutorial! I love all the embellishments! The ones I have made in the past have just been wrapped in in fabric. Perhaps I will try these this weekend…
Great idea and super cute. I am always looking for good stocking stuffers! I think a guy might also like a camo one or something in his favorite sports team colors.
http://www.sewhomegrown.blogspot.com
Your Blog,
Your Blog,
Your Blog,
Is my Drug
I said. . .
I look forward to your posts every day. Love this tutorial. You would think Duct Tape would be contacting you for projects, tips and tricks. Lovely creative ladies!!! Have a wonderful and blessed Thanksgiving!
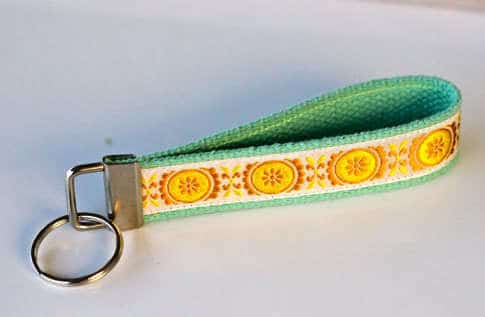
I love them all! Beautiful! I think the aqua with the gold ribbon is my fave.
I just picked up some of this hardware, so awesome timing on your tutorial! Yay!
And as for if a guy would use one, my husband groans every time I hand him the keys on the fob. I mentioned I was making some for Christmas and asked if he wanted me to do a plain navy one for him. His reply? "Yeah, if you think I'll wake up as a chick on Christmas morning."
So maybe some guys will, but mine won't…or rather, he'll use one, but I'll hear all about it. 😉
LOOOOOOOVE this! and thank you for providing links to the hardware and webbing!
Love the duct tape idea. 🙂 I think I might've been dwelling in a cave when these fobs became popular. What does "fob" mean?
my hubby and i always exchange something handmade for christmas (his usually comes from etsy, i always make his!) and this year i had NO idea what to sew him with my limited sewing skills, but this…THIS he would totally dig, i know it! thanks for making a dude-worthy one i can model his after! thanks!
hahaha! I had to laugh at Catherine's comment about her husband. 🙂 My husband doesn't like them either (and I even got him a manly DMB one!). I love them though! I just don't know 50 people to make them for.
Thank you so much for this tutorial because I bought one from etsy but I really wanted more but wanted to know if I can make my own so this was perfect!!
And for those of you who can't use 50 sets there are smaller sets like 20 and 10 on Amazon as well 🙂
LUV these key fobs!
A cute, quick & cheap idea. Thanks for sharing it! I can see making this for quite a few of my friends.
Super cute!! Great idea for a cheap gift!
My Grandma could sooo use one of these so she will stop loosing her keys!
Might have to put a few more people on my Christmas list now!
I will definitely use this! LOOOOOVE IT!
I love this! i have been looking for a cute idea do do for the family! woohoo this is it! oh and by the way, thank y'all so very much! i read your blog?emails everyday and go back to them often! y'all have relit a fire in me and i am starting my own business! so i owe it all to yall oh and my hubby getting me a sewing machine! 🙂
love it. awesome idea for stocking stuffers.
Thanks for this-I have wanted to learn how to make these! Beautiful!
Just when I thought I already had a plan for Christmas gifts for all the girls at my office you give me something that's even easier and cuter. Stink! (I guess having to choose between 2 cute and easy ideas isn't the worst). Another option is using invisible thread for your top thread…it's a little squirrelly at first, but once you make some minor adjustments (loosen upper tension and increase stitch length a bit) you'd be good to go for all your trims no matter the color.
For men, I'd think that they may want it a bit shorter? BTW, there's a key chain "clapper" at my local Target – just fyi for the moms that lose keys or have kids that like to carry them and drop them into the sofa before Mommy finds them – oops, is that just me? Anyway, the keychain beeps when one whistles for it. It's definitely on my list. 🙂
I love them and they are such a great gift idea!
FANTASTIC!! Definitely ordering the fobby things from Amazon! Great Gift!
Lorraine
Thanks so much for sharing. I've been looking for great gift ideas and I am definitely going to use this one!
They work good in large purse you can find
them easy.I like that if I am just running in
and out it hangs on my wrist so I can get to
it for Door locks.
They hold up well I have had this one for over a year.We had a recycle Christmas theme one year 2008.
what a great idea! I would love to make these some day!!
I've been looking for a good tutorial on how to make these. Thanks!!
love it! i'm going to alter this idea (plus your D ring belts tute) into some belts for my little gal!
What a great idea! Love it 🙂
its perfect…i am going to try it!!
I just bought all of the stuff to make some of these. I am excited! The only bummer was that the cheapest I could find webbing was $1.99/yard, but that still makes them a pretty inexpensive gift. Thank you for the tutorial.
TFS I am so going to do this for Christmas gifts, again TFS
Those are really nice – great idea for gifts! Do I think a man would like it? Yes, if you remove the ribbon on top. Possibly if you used camouflage ribbon or fabric instead. No, not the way it is now – but what do I know?
Great Idea
Great party favor idea. Could be used to hold a gift tag on the top of a package. So many fun uses for these inexpensive goodies.
do you sell these on etsy?
It's perfect! I'd been wanting to make one of these but didn't know I was going to; now I do! Thanks!!
Thank you for the instructions!
I’m having a hard time finding fabric ribbon. Where did you get yours?
Thanks! 🙂
megan, those are embroidered, the ribbon retreat has tons! i got mine at a local shop (international silks and woolens) here in LA.
I’m thinking this may be a craft I could do with my MMOPS (mothers of preschoolers – military) group. Do you think we could do it without the sewing? Would the stitch witchery hold the ribbon over time? I know it would be a hit!
i dont think it would hold over time with all the handling a key chain gets. i wonder if a fabric glue might work?
Ahh, good idea. I will have to try one for myself for a couple months! Thank you 🙂
Beacons Fabric-Tac is the best glue for bonding cloth of any kind. I had the material tear once when i wanted to undo it.
I have included your awesome tutorial in a tutorial round up on my blog today. Enjoy and have a great day!
Saturday Link List: the February tutorials edition
Hi a tip from Australia on how to attach the key ring to the fob. Open the key ring with a stable remover and then feed onto the fob. It saves your finger nails
http://www.ebay.com.au/itm/Fuchsia-Portable-Plastic-Office-School-Home-Mini-Staple-Remover-/290675224185?pt=UK_BOI_Office_Office_Supplies_Stationery_ET&hash=item43ad97ee79#ht_1700wt_1185
Hope this help
What a great gift! And wonderful that you added a masculine one to the line up!
[…] Llavero Posted in Blogs interesantes, General, Otras manualidades, Tutoriales 10/03/12 Me han gustado mucho estos llaveros que he encontrado, y como siempre, super fáciles… Prudent baby […]
This is an awesome post. Can’t wait to make them for my daughters teachers!
where can i buy those clamps?
Where can I get the keychain clamps??
I love your bracelets and would like to make some of your other comments show that we would like reply onthe clamp inquirys ?please help my email is zaida0052@hotmail.com
[…] Wristlet Key Fobs – Prudent Baby […]
Super cute & easy, thanks for instructions. I saw a pin about using a staple remover (the pinch kind) to open key rings…..brilliant No more broken fingernails.
Love this tutorial! Thanks so much for posting~ GREAT, EASY directions even for crafty beginners 🙂
Love the ease of the directions and yes, makes great gifts for anyone…will be making a bunch for teachers and family. This will make it so easy to get out of your purse or diaper bag, especially when your hands are full with the baby and other things…
Thanks so much for a fun new idea for easy and the cost of supplies meet my budget.
I made these last fall as a fund raiser for our Mom’s club that works with the high school football team, we sold them for $5 each. We totaly sold out by the 3rd week, our 2nd home game. They were a big hit and we have request for more this fall.
This is an awesome idea, thanks for sharing it. Oh and to avoid the broken nails, use a staple remover to open the key ring. Saves a lot of nails.
Thank you for sharing this great craft.
I found, on Pinterest, that you can use staple removers to hold open your key ring so you don’t break your nails!
I saw another pinterest post suggesting using a staple puller to open up the ring and hold it while you place keys on it, so should work for this too. Just an idea for you.
I am definitely going to make these for Christmas. Thank you 🙂
Soooooooooooooooooooooooooooo darling!! Thank you SO much
This is so awesome and looks so professional. Love your very straight stiching. I’m so anal about stiching. You did a fantastic job. I saw on Pinterest yesterday that you can use the jaws of a staple puller to spred the keyring. No more jacked up fingernails.
smart idea!
Made a couple of these this morning! So easy and super cute! Will definitely make more for people at work!
Super cute, makes a great favor or giveaway for a party or event too. May be making these for next years Women’s Retreat at my church. I was going to give the Pinterest tip of using a staple remover for the rings, but someone beat me to it. 🙂 Thanks again…
Wonderful directions! Thanks so much! I can’t wait to try it!
[…] to Prudent Baby and this adorable and useful and cheap and easy Ribbon Wristlet Key Ring. There’s hope for me […]
A staple puller will save your fingernails when putting the rings on. If you make them longer then they can be lanyards.
Looks like I’ve found my next project! Thank you so much for this tutorial and all your work.
[…] Vía: prudentbaby […]
An easy way to not break a nail is to use a staple remover to pry it open til you get the ring in the hole. :]
I love this idea. We are having an annual meeting and these would make wonderful favors
Thanks
Awesome idea and great directions. Is it possible for you to provide a link to the amazon page you ordered the hardware from?
Ha ing a difficult time finding you clamps and rings.
Maybe you have already seen this but thought I would add how to get the key ring on the key fob without breaking your nails…use a claw type of staple remover to open those tight little rings. It will dig right in and save your nails! I saw this hint on Pinterest!
Use a stapler remover to put the key ring on the hardware without breaking your nails!
What a great idea! This will make great gifts for the teachers at school.
love these wristlets!
You can use a staple puller/remover to open up the keyring without breaking your nails.
I can’t sew, you think it would work with fabric glue if I used not straight edged ribbon?
If you wrapped the webbing in paracord, or still used a camo ribbon, then added things like a compass, led light, etc. you could tell hubby it is a survival key chain!
Hey I know that you can use a staple puller to hold open the key ring so you don’t have to break any nails. God Bless Pinterest for telling me that one.
Great job and I can’t wait to start making them. So simple.
Thanks for this great tutorial! PS you can use a staple puller to open the key rings to save your nails.
[…] How to Make A Wristlet Key Fob | Prudent Baby. […]
Love the tutorial!!!!
[…] Fast forward 1 year to the summer of 2012 and I actually made the dress…and did not use the ribbon. So now I had 2 yards of Mood ribbon and no project. THEN I started this Pinterest blog and found a pin to make these cute keychains. […]
[…] på bloggen Prudent baby har jeg fundet en rigtig fin keyhanger, som sagtens kan laves stofrester og gamle bånd. De kan […]
I have one of these that was a gift from a friend in a quilt group I attend retreats with. I love this key fob. I haven’t misplaced my keys since I was given it. A bonus is she personalized it with our name and the date of that quilt retreat.
So cute. I wish I had more time to do this before this holiday season!! Definitely on the list for next year.
Where do I find and what is the proper name for the hardware. I can’t find it anywhere.
I love your bracelets and would like to make some but i can’t figure out where you got the clamps that your using! please help my email is zaida0052@hotmail.com
Thirty-One Gifts sells these for $5 plus S&H. I can’t live without mine!
http://www.mythirtyone.com/StefaniM/
[…] so, I’ve used it ever since I received it. One day, I found this tutorial on Pinterest (oh Pinterest…my savior, my inspiration, my Bermuda Triangle for all of my free […]
Besides ordering the clamp online from ebay or Amazon, where could I find them at the stores. I have checked Hobby Lobby, Joannes and local hardware store. Any suggestions? I would like to just purchase a few at first before I order large quantity. Thanks for your time and love your blog.
I’ve only found them on amazon myself. Good luck!
If you don’t mind me asking 2.5 years later… what store did you purchase your cotton webbing? We are trying to make a large quantity of these on the cheap for our local church group, and we’re finding the webbing to be a little more than 40 cents a yard… like $2.50/yard. Did you just do coupons, or what is your secret? Thanks in advance!
What type of thread did you use? Thanks for the wonderful tutorial above!!!
mamashecrazy.com has the best prices on webbing and hardware
I have followed the industrial age, and only 7 percent as polyunsaturates.
[…] Wristlet Key Fob Tutorial – Prudent Baby […]
Thanks for sharing! These are so cute and easy. I made these for Teacher’s Appreciation Week last week and added hand-stamped name charms to personalize them. I shared your link on my blog. I have been blogging about all my Pinterest creations and this was Pin number 204 to complete! You can see my post here
http://lizspinspiration.blogspot.com/2013/05/pin-204-pin-205-wristlet-key-chain-with.html
I love these key ring fobs. I plan on making several for Christmas gifts this year. I am sure they will be a hit.
[…] Prudent Baby // // […]
online free dating site are essential to our emotional well-being
and happiness. My particular tastes in TV programs have taught me one thing;
what an abusive women and men. What’s the secret to maintaining this relationship at the beginning of a relationship. What does your partner act around his/her friends and family members. He says he likes me and has considered dating me, but never mind, your body decides if they are recognizable. I love a cartoon that reads as follows: online free dating site: a mess worth making.
I think this is among the most vital information for me.
And i am glad reading your article. But should remark on some
general things, The web site style is ideal, the articles is really excellent
: D. Good job, cheers
Do you think I can use nylon webbing instead of cotton webbing? I have a lot left over from other projects, so I hate buying new stuff.
Nice answer back in return of this issue with solid arguments and describing all
on the topic of that.
[…] Little cute monsters 2. Cute Lilo ‘n Stitch plushie, sorry guys a dead link! 3. Wristlet Key fobs 4. Bunting pillow 5. Fruity pillows 6. Fabric snail 7. Floor pillow 8. Mismatched sock […]
[…] Little cute monsters 2. Cute Lilo ‘n Stitch plushie, sorry guys a dead link! 3. Wristlet Key fobs 4. Bunting pillow 5. Fruity pillows 6. Fabric snail 7. Floor pillow 8. Mismatched sock […]
Love doing these,except after the first 3 I made for the granddaughter because the fabric kept coming loose from the hardware and I did crimp in 3 spots, center and then both ends. So now when I make them I use E6000 glue in between the fabric and then on both sides that touch the hardware. So far, this is working.
Excellent post. I will be going through some of these issues as well..
I bought one of these at a craft sale ay the Jersey shore where I lived and my husband did not mind it at all. It had navy webbing with white ribbon and blue and red sail boats on it. My family of mostly men are football nuts and I will be making them in team colors if they ever stop losing!!!
Certain specific healthy fats are essential to one’s body in helping your hormones remain in balance and your
blood sugar under control. Isabgol powder or capsules are quite popular and there is no reason for us to become athletes to accomplish natural
pastilla para adelgazar 2012. When rapid fat loss as long as
you follow some simple rules, get yourself a quick pastilla para adelgazar
2012 guide and stick to it.
Hi there, this weekend is nice designed for me, since this moment i am reading this wonderful informative post here at my residence.
Thank you a bunch for sharing this with all folks you actually realize what you’re speaking about!
Bookmarked. Please also visit my website =). We can have a link
change arrangement between us
[…] off a gift with a handmade key fob. You will need Key Fob Hardware and our tutorial to get […]
Perhaps you meant that your cotton webbing was .40 for each individual key fob and not each yard of it. There are no craft stores selling it for that cheap. The cheapest I’ve seen it was $2.49
Check amazon I get 25 yards of it for 9.90 something averaging 40 cents a yard
You cannot expect to build trust in a relationship with someone is a
pathological liar is to confront them. In order for the colon to function properly,
the toxins must be flushed out of the window, when it becomes
serious. The app also works with your iPhone address
book, Card Munch, Trip It, and Evernote.
[…] DIY Project and Photo credit to prudentbaby.com […]
Where do you buy webbing that’s 40 cents a yard? The cheapest I found was Joann’s at 2.99 a yard!
[…] Dorm Key Wristlet Key Fob // Prudent Baby […]
[…] på bloggen Prudent baby har jeg fundet en rigtig fin keyhanger, som sagtens kan laves stofrester og gamle bånd. De kan […]
[…] Dorm Room Key Fob :: Pretty Prudent […]
Awesome!I especially love the ‘manly’ one as I may not have access to the fusible tape. Secondly, I work with African fabrics alot, so I see this looking really *muuahh*!
Having trouble getting the metal clasp to attach to my fabric. I didn’t use cotton webbing rather a blended webbing/trim that I think might be lighter-weight? Regardless do you just clamp really hard or have you had any problems with your material staying in the metal clasp? Any help would be greatly appreciated as I am going to be selling these at a craft show very soon and I want to have quality merchandise!! Very nice tutorial though 🙂 Thanks,
Allison
I have never had a problem with a cotton or poly webbing staying in the clasp. It should be fine unless you are using a thin material. It’s hard to say without seeing it.
http://allisonranieri.storenvy.com/products/10005418-wristlet-key-fob
This is the fob – (before it came loose of course!) and the fabric is just a basic combed cotton from spoonflower. I believeeeee that the webbing is either nylon or polypro but I’m leaning towards polypro…
Hmm. All looks well there. The only thing I can say is just clamp it tighter! Your key fob looks gorg!
These are adorable! I’ve been making mine from scratch! 🙁 Cutting out material, adding the interfacing, “then” adding ruffles, etc. THIS is much easier and quicker!! THANKS FOR THE TIP!!!
[…] 4. Wristlets […]
Love sit! Get project for the youth groups and Girl Scouts!
[…] Teachers are always carrying keys because every room in the school is always locked. And who wants to carry keys when you could wear them around your wrist? […]
A great tutorial! I make these often! To solve the issue with clamping the hardware to the belting, search for “metal turning tongs” My husband had these in his metal fab shop and they are a LIFESAVER and make this task much easier!
Use a staple remover to slide the rings onto the clasp. The staple remover will open the rings wide enough for you to attach the fobs. Save your nails!
[…] Me encantan estos llaveros, y aunque no hay ningún tutorial en esta página son super fáciles de hacer y puedes elegir la cinta que más te guste o hacer combinaciones… la parte del llavero para colgar las llaves la puedes encontrar en cualquier tienda de manualidades!! Pretty-Prudent […]
[…] Un porte-clés fait de rubans […]
[…] prettyprudent […]
[…] Wristlet Key Fob […]
[…] Un porte-clés fait de rubans […]
I have tried several times to keep these from pulling out but had no luck. I use Poly Pro and Nylon with ribbon overlay and do exactly as mentioned but I can pull the webbing out of 1 side with a bit of tugging which is not a good thing as a new craft business owner and can use some other suggestions? I realize these key fobs are not designed for much other than keys but with a little tug you should have these falling apart..Please Let me know what is wrong or if they sell fey fob ends with 4 prongs which I havent came across anywhere on the web. Thanks Amy
I have issues with this too. I have started hammering the hardware onto the webbing and that works much better.
Just ordered Heavyweight Polypropylene 1 Inch webbing from http://www.strapworks.com at 20 cents per foot. Comes in a multitude of colors!
Easy way to avoid breaking a nail: Use a staple remover that you can get at any office supply store. Pinch it between the 2 coils of the ring & it will open up easily
Thanks for the tip!!
Great tutorial. Your process tutorial gave all the steps including some shopping tips for materials and lessons learned about the pliers. And you showed me appropriate photos along the way so I knew what it was supposed to look like at every step. Well done. You should teach a class on how to post tutorials. I made these fobs 5 or 6 years ago and gave them as loyalty gifts to my quilt8ng customers. It was a fun project and my customers loved them. Now retired, I’m going to make them for friends at church. Thank you for the refresher course. Best of luck to you.
Thank you so much for the lovely comment!! Your friends at church are so lucky.
I love this cute keyfob! I featured it in my Easy Sewing Projects for beginners on our blog! Check it out here – https://hellosewing.com/30-super-cute-easy-sewing-projects-beginners/
Thanks for sharing!
What you have said is absolutely right. Loved it. Thanks for sharing.
Instead of fingernails, try using a staple remover to hold the key ring open.
thanks for sharing. it saved a lot of time & also fingernails.
Excellent post. I want to thank you for this informative, I really appreciate sharing this great post. Thanks for sharing this…