


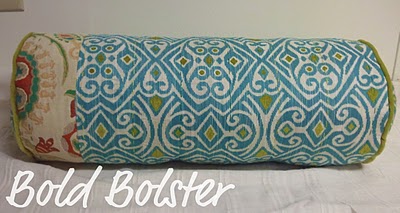
This bolster pillow is just so GORG we had to ask Jessica of Sew Homegrown to share the whole Beautiful Bolster Pillow Tutorial with you! Take it away Jessica…
Thanks Prudent Baby girls for having me on – and good luck to 3rd time baby mama – Jacinda! So I am trying to complete our master bedroom look. I bought several accessories with my Christmas spending money, and then it was on to the pillow making! 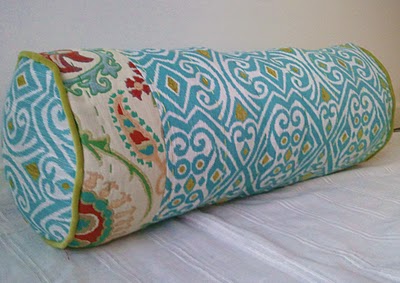
Anthro is selling like 10 bolsters right now, so I thought it would be nice to make one for our bed, and show you how. Get the full Beautiful Bolster Pillow Tutorial after the jump…
Beautiful Bolster Pillow
Here is the Inspiration:
(pic from Anthropologie)
I made the “small” size 23″x9″. I couldn’t find the price for that one, but the large sized bolster is $148.00. So let’s guess and say the small one was maybe $112.00? Even if it took you 10 hrs (it won’t) it would be like someone paying you $10 an hour. That’s how I like to look at things: if I went to work, I would have to work 10 hrs to be able to afford this pillow. Instead, I can stay at home with my little girl and make this pillow in about 3 1/2 hrs while wearing my pjs. Hello – best of both worlds. Of course, if you prefer to work and buy it, more power to you. SO on to the bolster tutorial.
Here are two important tips for this pillow:
1. Go slowly
2. Clip around the curves
Those should help a lot. AND Bonus – there is also a tutorial for making your own custom cording – NOT hard. Don’t be intimidated.
Here is what you will need:
- 2 bags of Polyfil or a 23×9 bolster pillow form(you would probably have to order it)
- A yard of colorful fabric (fabric A)
- 3/4 yard of contrasting fabric (fabric B)
- 3/4 of solid fabric for cording (fabric C) – you could possibly use fabric A remnants
- 2 1/2 yards of cable cord (don’t be afraid of this, they sell it everywhere. It costs around .29 a yard)
- Perle Cotton Embroidery Floss
- Sewing Machine/thread
- Scissors
- Water Soluble pen
- Pins
- Fearless attitude
Step 1: Once you have assembled your materials, you need to cut four pieces.
*one rectangle 29″x20″ of fabric A
*one rectangle 29″ x 4 1/4″ out of fabric B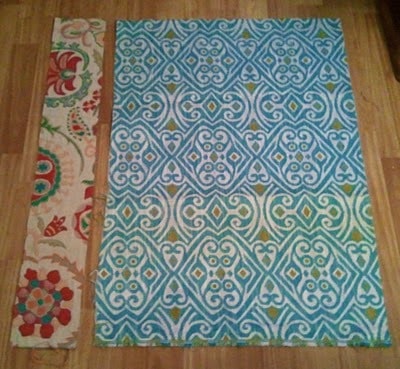
*two 10″ circles out of fabric A
(you can draw your own or print out my pattern here)
It’s nice if you make the fabric pattern match.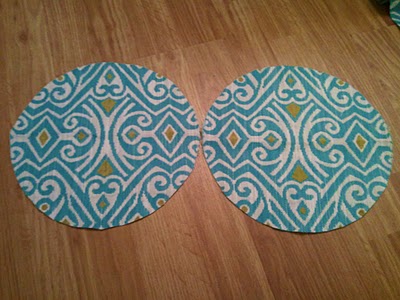
Step 2: Lay the 4 1/2″ strip on top of the rectangle, edge to edge, right sides together.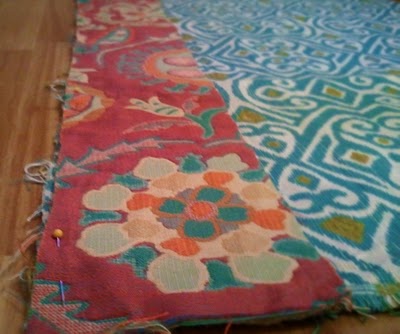
Pin together and sew using a 1/4″ seam.
Open and press flat.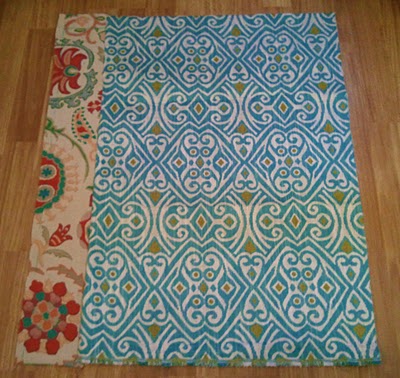
Step 3: Time to add the detail. The Anthro bolsters have pick-stitching detail.
I decided to mimic that look with a simple large quilting stitch.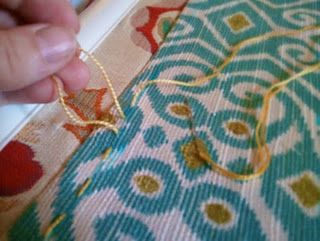
Draw lines across the fabric, 2-3 inches apart (mine are 3″), using the water soluble pen. 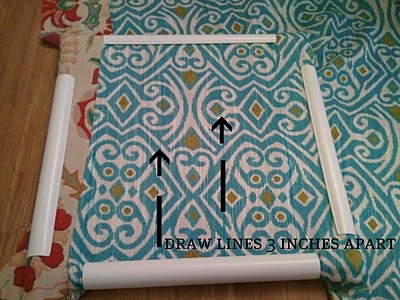
I alternated embroidery floss colors every two rows (the Anthro ones alternate every three).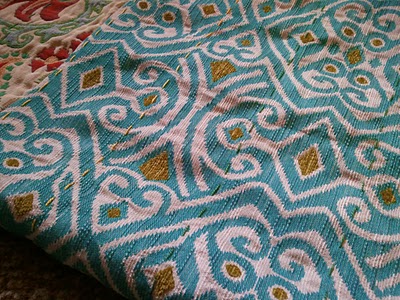
You can skip this stitching detail step but that’s what makes things special – detail.
Step 4: Cording Tutorial:
DON’T BE SCARED!! You can do this.
Lay your fabric out like this – selvage is on the right side of the pic:
Fold the bottom right corner of the selvage edge up to the top left corner of the cut edge:
I usually split that fold with my scissors:
Then measure along that diagonal edge you just split 1 1/2″.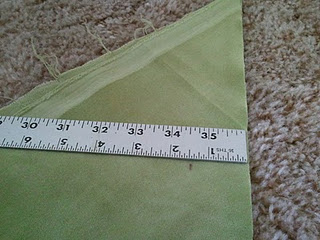
Cut both layers, resulting in two bias strips 1 1/2″ x 31″.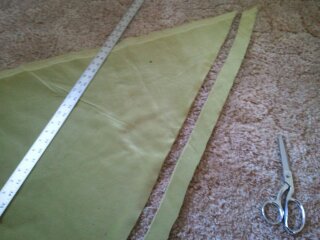
Now, fold one strip in half and place the cording in the crease.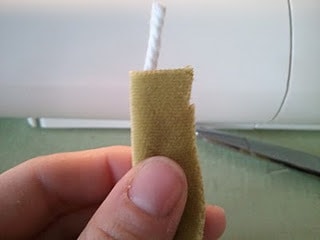
You will probably need to put the zipper foot on. It looks like this:
Topstitch along the fabric right next to the cording.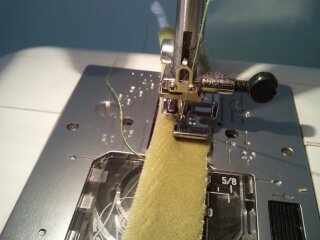
Finished cording looks like this: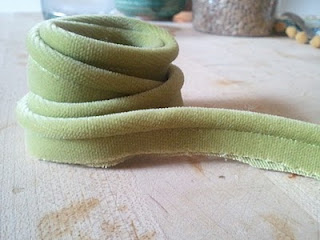
Pretty, right?
Step 5: Once you have finished both pieces of cording, snip 1/4″ into the lip – this will make it fit around the circle gracefully.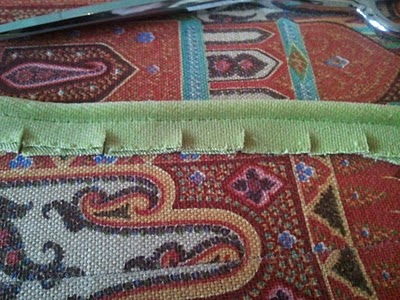
Pin the cording lip to the right side of the circle. Match the raw edges of the circle and the cording.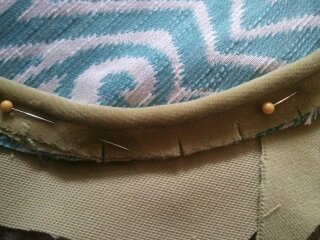
When you make it all the way around the circle, this is how you join the two ends of cording.
Open one end (you may need to rip the seam just a little) and fold the raw edge back.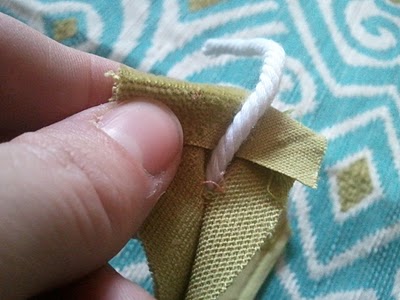
Pull that cording out of the way, and lay the other end of cording in it’s place.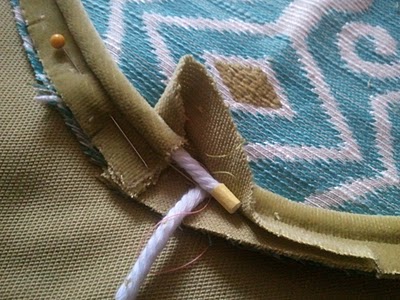
Close the fabric over the cord.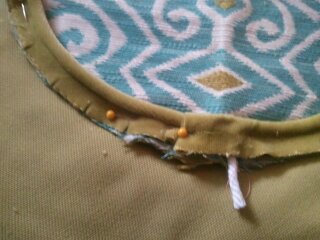
Topstitch it on like this: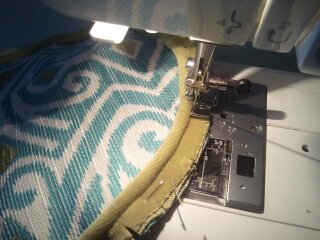
Ooooo what a pretty circle 🙂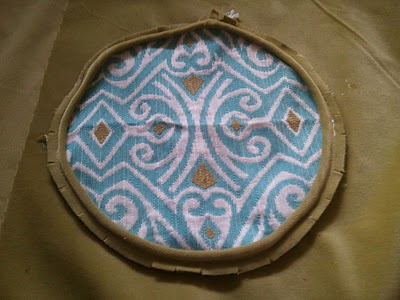
Step 6: Okay you’re doing great.
Right sides together, pin the 29″ edge of the rectangle around the circle.
You will need to clip the edge of the rectangle just like you clipped the cording lip. 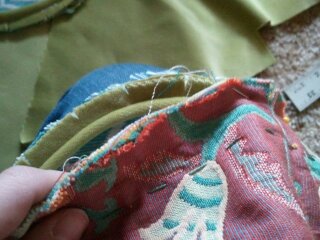
Sew in place (still feeling for the cording – you don’t want to sew over it).
{You basically sew right next to the cording three times – once while making the cording, once around the circle, and once around the rectangle.} Repeat with the other side or the rectangle.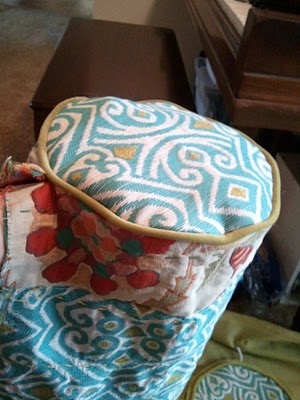
Flip it right side out to make certain it looks pretty.Then flip it inside out and sew along the 24″ side of the pillow – leave about a 6″ opening for stuffing (if you are using a pillow form you will need to leave a larger opening).
Step 7: Flip the pillow right side out and stuff well with polyfil. Pin the closing.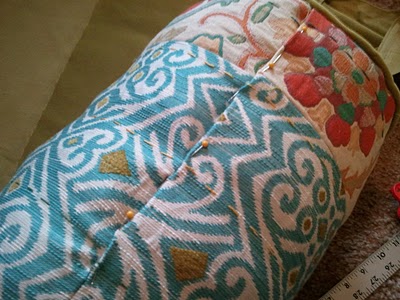
Step 8: Whipstitch or blindstitch the opening closed.
Now stare in AMAZEMENT at your success.
happy homemaking,
jessica
Visit Jessica at her amazing site Sew Homegrown for more great tutorials!
Just love it! I am going to have to make one or two, thanks for sharing!
FAB U LOUS! I love this bollster. I love pillow and this one is adorable. Great Tutorial.
OMG! My grandma had a bolster on her bed that she used forever. It was the width of her bed and she would use it more as purpose piece and less of a decorational piece. She would tuck it at the head of the bed with the bed spread neatly over and tucked under. Sniff Sniff. What a great memory. I can't wait to try this. Thank you for the tutorial.
great job, your bed looks gorgeous!
This is so awesome, and is exactly what I need to go with the new bedding I am making for spring… thank you!
I've been looking for a good bolster tutorial! but Jessica is right, I am intimidated!!
Stashing this away for when I can get that fearless attitude for this project 🙂
I was just in Anthropology and can someone do a tutorial on that amazing comforter that has all the layers and feels like an old T-shirt?? I think that might take a year to make! Thanks for the bolster tutorial!
http://www.anthropologie.com/anthro/catalog/productdetail.jsp?subCategoryId=HOME-BEDDING-QUILTS&id;=093529&catId;=HOME-BEDDING&pushId;=HOME-BEDDING&popId;=HOME&sortProperties;=&navCount;=35&navAction;=top&fromCategoryPage;=true&selectedProductSize;=&selectedProductSize1;=&color;=012&isSubcategory;=true&isProduct;=true&isBigImage;=&templateType;=hybrid
thorough tutorial with great pictures. thank u!
Wow… this is beautiful. Thanks for sharing the tutorial.
I just finished my own bolster and I am so excited. The tutorial was great! I am such a beginner sewer and I was able to make this pillow. I skipped the cord b/c I don't have the foot for it. Next time!
Thank you so much for sharing!
Ever since I saw this post I've been wanting to make one. Last night I actually got around to doing a quick and simple drawstring version out of pajama pants. http://sleepingorsewing.blogspot.com/2011/02/pajama-pant-drawstring-bolster-pillow.html
Thanks for sharing! Excellent instructions and photos! I was just contracted to make 6 bolster pillows and had not made this particular type of pillow so decided to see if i could find instructions on the Internet. I feel confident I have found what I need! Maliha Taylor Inspired (named after my daughter and granddaughter. Thanks again!
This is the best sewing tutorial for a bolster pillow on the net! And you're right, they look like they're $100 plus. I think I'm going to make several for Christmas gifts. Awesome! Thank you so much for taking the time to post this.
What an amazing tutorial! Like one of the other commenters,( is that a word?)
I got hired to make a cover for a huge bolster form but needed instructions.
Yours are very clear, the photos are gorge, and I love how you encourage people to just go for it. Good work!
My only question is how to make a closure so that the cover is removable.I think I will try sewing in a long bit of velcro, as she is using it for her kids…. wish me luck!
FYI, the pattern for the 10″ circle is actually a 12″ circle. the 5″ measurement is actually a 6″ line. oops my bolster is now quite large.
oh well. better luck next time
[…] Lump or Two Lamp from Vintage Revival/ Beautiful Bolster Pillow from Prudent Baby/ Ranunculous Swirl Shade from Mama says Sew/Tree of Life Wall Art from A Crummy […]
I was looking for a tutorial for making bolster pillows because I had leftover material from replacing my couch pillows. I made them from different pillow patterns. I wanted to use more than one pattern in a bolster pillow. It would include all of the patterns that I currently have on my couc.. Your tutorial gave me great ideas and the tuturial was itself excellent. The pictures are great. How did you do that?
Thank you! Love the extra detail! Now to make it before Christmas!
[…] not good with sewing instructions so I’ll refer you to the tutorial I used and show you the materials I used instead plus the few changes I […]
Thanks for posting this tutorial. Great pictures and instructions. Was a super easy and fast project and I am no means an expert sewer. So happy with my pillow. Inspired to make more! Thanks again.
Thanks for all your hard work in putting together this awesome tute. Before I buy the fabric I have Q’s. We’re only using 4.5″ of Fabric B but we’re buying 3/4 yd, am I missing something? I want to make longer bolsters, about 40″ in length. Since the tute calls for 1 yd to make a 23″, I just add that extra 17″ to fabric A, right ? so I’d buy 1 yd plus 17″, right? And I’d buy 3 polyfil bags.
Thanks again!
In case right now there will not be a new raise(increase inside your large
window blind risk you’ve got by now paid) next simply check(it costs anyone nothing at all as well as you can observe future card regarding free). Pertaining to a lot of money benefits it has to be your lottery.
Hi there, just read your instructions and photos etc. So helpful, I have some experience sewing but always get “bogged down” and make many mistakes. This is so helpful.
Three of a straight flush, including at the very
least two high credit cards, and �spread out over a group of five consecutive volumes.
Just be sure you thoroughly review your cards, with each and every hand.
A mistake a lot of inexperienced participants create would be to engage in a lesser number of cash,
pondering this will retain these individuals from the sport longer.
� I used a number of the additional video game
titles above the next day or two as well as got by means
of our participate in by way of specifications whilst still being maintained to get a
substantive sum inside my pants pocket.
Taking into consideration the rigid National legal guidelines about gambling, the particular online grand parker business possesses mainly produced from Asian kitchenware and also European countries,
as well as the Carribbean Is nations. With previously days the absence of such answers seemed
to be handicapping their particular improvement.
Because brokers in the go back business regularly pay out little rates, even
on losing investments, it can be clear that this
investment automobile is legitimate. When it can go
up within importance, your individual gets the directly to buy the go back, nevertheless is just not required
to take action. Numerous type markets, together with fairness markets, are influenced by facts
with regards to these monetary components and the condition of those property simply because they
relate especially to the all round economy. Because brokerages within the go back business continually compensate modest proportions, also
on losing trades, it’s obvious that will this sort of purchase car or truck is actually genuine.
Getting a great bistro in your neighborhood is usually a great
substitute for shelling out yet another trip carrying out the same principle when you are inside area after which it in the Onbling and also returning certainly not making this
Onbling inside a whole several weeks moment. He / she called that a part
of Monaco, what is the best the actual Onbling was created, Monte Carlo, right after
his identify.
If the pegs with the punters go beyond just how much
pertaining to, time becoming within the financial institution, this bank
just isn’t to blame for the amount of such excess. This is the bet that if your dealer has a twenty card, and ends up obtaining a blackjack, the participant will mislay their preliminary bet, nevertheless if they produced the actual insurance policies choice they will gain that will guess.
The online slots knowledge is best for people who is able to do this
with small amounts. Furthermore, the Azure Water Holiday resort in addition to
online slots for the Co Lake with Parker, Arizona ( az ), presents blackjack and online slots, along
with slots, bingo, along with keno.
Computed with the PEOPLE Census Agency, these types of numbers indicate many different
fiscal elements like projected month-to-month GDP (gross every day product) as well as consumer investing and brand-new household product sales.
Quite a few broker agents tend to be taking
advantage of this kind of fresh in addition to innovative method of trading,
a thing that can be performed due to global interconnectivity with the personal markets worldwide.
The good thing is, caused by brand new oversight that will started in ’08, this really is an rare trouble on greatest.
One of the very successful solutions to deal most of these binary options
risks is actually to see ongoing developments.
Nonetheless, while occasion passes, the worth of the choice
alone reduces throughout price, whether or not the marketplace will
not go by any means. The end result is you will by no means drop over an individual devote, of course, if the marketplace goes in the suitable
path, you may gain 70% of your initial purchase. Likewise, if an trader ordered a new placed
choice, an investment where the investor believes your binary options
risks can truly tumble within benefit, in the event
that it can, the particular broker is once again “in this money” because, bidirectionally,
the choice would because trader predicted. We produce charts for many our binary options riskss, displaying the advance along with movement in their charges throughout the last hours to aid customers the crooks to create their
selection.
Our own all day and hour aid assures that you receive as often
aid along with help you have to become a good investor.
Retail store revenue make reference to retail store merchandise, or perhaps items which are
purchased like home equipment, outfits, in addition to just about anything you should buy at large string shops for instance Targeted or perhaps Wal-Mart.
To progress it is best to determine if property while currencies,
everything along with stocks, increase or perhaps reduce.
More painful, your profitable commission is actually gonna become below your dropping deals.
responsible trading possesses preferred within
the nearly all unstable along with lucrative property so as to ensure that you’ll be able to income.
To begin with he has been incredibly fortuitous, however he
lost a whole lot. Several basketball (soccer to our National friends) selects and also ideas sites present just one or two picks/tips every week, several only one, with a lot of asking for large sums with the privilege.
online casinos, for instance, has been online with regard to many years and it is lure is usually straightforward.
Throughout the best sport the luxury of online casinos helps
make just about 2%.
However, by simply next recent developments, and acquiring start postures along with binary options broker reviews
on the way to the actual development, the actual possibility connected with experiencing significant gains is
probably in your favor. There isn’t any liquidity for you to this kind of expenditure since you certainly not really unique a great fundamental tool. You could also enter in the Foreign exchange market, also known as the foreign currency exchange industry, since it will be available around the clock around the world. In particular, if a binary options broker reviews during the night, keep in mind that a number of market segments such as S& P 500 or maybe the particular NASDAQ usually are not in business, consequently, you’ve got to
make certain your current deal is in an industry that may be at the moment up and running.
In this article, most of us will probably examine exactly what binary options broker reviews tend to be, simply how much anyone stay for
you to get as well as get rid of, and also the
good in addition to negative aspects of binary options broker reviews trading
compared to classic investment decision cars.
It’s found just under the snowman around the paytable present. In European countries players older than eighteen are permitted to gamble on the net however the regulation is somewhat distinct in the us thus almost all internet sites won’t
enable US people in order to gamble, they could however nonetheless enjoy are living roulette just for fun.
It’s quite possible that will just about any e mail junk e-mail you receive concerning online online slots reviews will probably result from over-zealous affiliate marketers which have not learned the policies however, instead of your online slots reviews independently. They also was composing new books, had been starring on TELEVISION SET, was writing completely new articles, was developing new counting programs.
Hmm it appears like your blog aate mmy first comment (it was super long) so I guess
I’ll just sum it up what I wrote and say, I’m thoroughly enjoying your blog.
I as well amm an aspiring blog blogger but
I’m still new to everything. Do you have any points for
novice blog writers? I’d really appreciaate it.
Thanks for the nice tutorial….so annoying though all the pop up ads.
Hey! Someone in my Myspace group shared this site with us so I came to look it over.
I’m definitely loving the information. I’m bookmarking and will be tweeting this to my followers!
Outstanding bkog and outstanding design.