


It is National Embroidery Month, don’t you know? So we asked Cornflower Blue’s Rachel Hunnicut, a talented knitter, crocheter and embroider-er-errrrr, to create a beginner embroidery tutorial for Prudent Baby. And look at the little beauty she came up with! Ahhhh, crafting in bed at it’s finest.
Take it away Rachel!
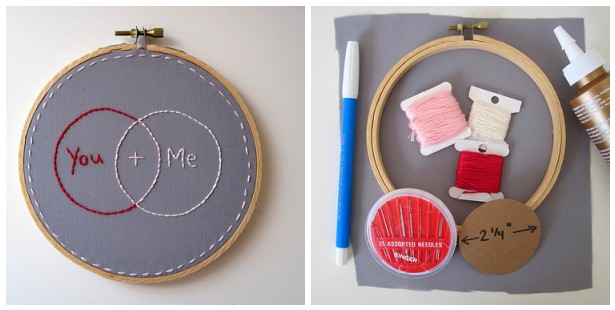
Embroidery is a beautiful, versatile craft that requires just a few basic supplies. I have created this simple project with step-by-step instructions perfect for beginners or embroidery aficionados! It’s a cute little piece made using two basic stitch techniques and hung in a wooden hoop. It’s perfect on your wall or as a gift!
You will need to gather a few supplies:
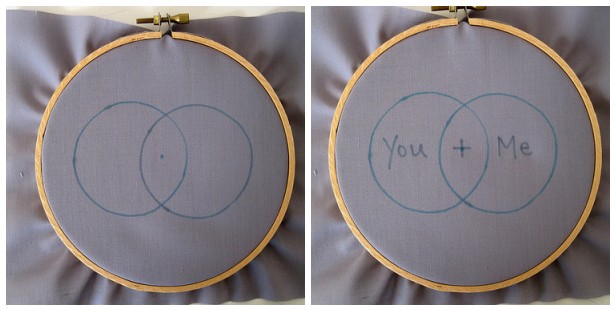
First, place your fabric in the embroidery hoop and tighten the closure. Use your fabric marker to make a small dot in the center of the hoop. Line up the edge of your circle template with the dot. Now, slide the template over so that about 1/4 of the circle is overlapping the center mark. Trace the circle with your fabric marker. Repeat this process on the other side of the fabric to create two overlapping circles.
Next, use your fabric marker to write the text “You + Me” in the circles (refer to the photo for placement). Use your best handwriting! : )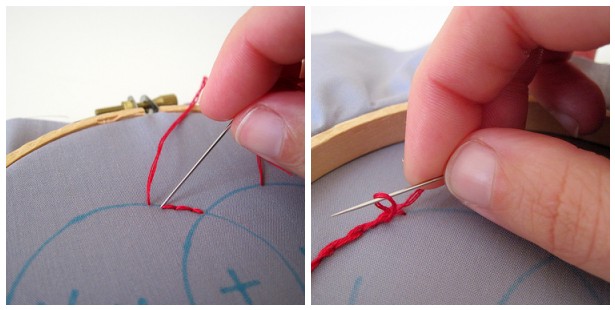
Then, thread your needle with three strands of red embroidery floss and tie a knot at the end. You will trace the line for the first circle using back stitch.
Here is the recipe for back stitching: Make a single, straight stitch. Continuing along your line, come up one space ahead and bring your needle back down into the same hole at the end of the stitch you just made. You are taking your stitch back to the end of the one you just made… that’s back stitching! (See the photo above right for a visual.)
When you reach the end of the arc for the first circle, knot off your thread by passing your needle under your last stitch and leaving a small loop. Pass your needle through this loop and pull tight. (See the photo above left for a visual.) You can also secure your thread by weaving it through several stitches on the back side of your work.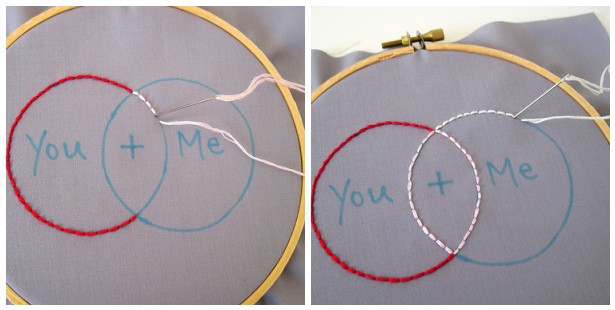
Continue using back stitch to trace the center shape created by the overlapping circles. I used pink for this part.
Next, you guessed it, use back stitch to trace the second circle with your white thread. Red and white make pink!
Now it’s time to go back with each color and back stitch the text. In keeping with my theme, I used red inside the red circle, pink in pink, and white in white. 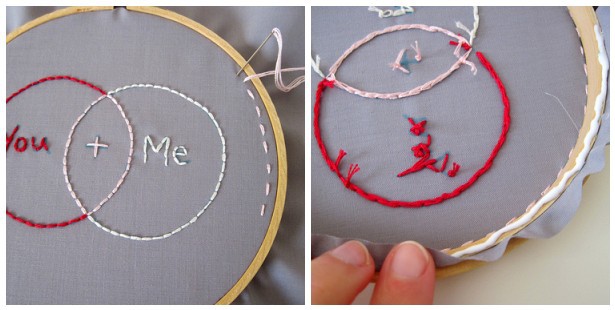
I wanted to add a little detail to frame the piece, so I used pink to embroider a running stitch just inside my hoop all the way around. Come up through the fabric, make one straight stitch, leave a little space, and come back up. It’s the easiest of all the stitches!
When you have finished the embroidery it’s time to glue your fabric to the hoop. Using your scissors, trim your fabric neatly around the hoop leaving just enough to fold over the edge. Place a line of glue all the way around the top edge of the hoop and press the fabric into it. Flip the piece over and let it dry.
Now your little embroidery is ready to hang or give as a gift!
Don’t forget to visit Cornflower Blue for a wealth of gorgeous DIYs and photos. And be sure to leave a comment! You could win a YARD of Dan Stiles Fabric from Fabricworm!
Oh I love that! A great first project and a lovely wall-worthy result. I just taught my 4 yo girl to embroider in a similar way a few months ago – it's such a satisfying activity!
This is a beautiful and sweet project for a beginner like me. Thanks for posting the tutorial! More please…
Thanks for the intro to such a great blog! I hated cross-stitch as a kid but I've really been wanting to embroider lately, and so much more fun to embroider my own drawings… I have some burlap ready to go to start teaching my kids simple embroidery, but they opted to paint instead yesterday afternoon.
I have never embroidered, but 2 nights ago I had a dream about an embroidered pillow. I have been trying to figure out how to recreate it! Thank you for the start!!!
Thanks! I've been wanting to learn how to embroider!
I *just* finished my first embroidery project. Nowhere on the internet could I find directions on how to start the thread. All that I'd ever heard were NO KNOTS for embroidery, so it seemed like tat would include the first stitch. I'm SO SO glad that you said "tie a knot". *whew*
This is great! I've been wanting to embroider little messages or names on my baby quilt gifts but never had the confidence. Looks easy-peasy!! Thanks- I'm definitely going to check out more on that website…
I used to love to embroidery. Off to check out Cornflower Blue.
I love embroidery and this is a great project to give a significant other as a gift!
Great tutorial — now I might just give this a try! Thanks!
I love this! My hubby and I just did a bedroom makeover. I am going to make one to hang next to our Marriage Lic. I can't wait.
I've just gotten back into embroidery again, it's such a portable craft! I've been working on Penguine & Fish's entire animal alphabet set that I hope to make into a quilt after I have the squares with letters stitched. So fun 🙂
Very easy tutorial! Thanks so much for sharing!
~Jen @ http://pinstripestopearls.blogspot.com/
I love embroidery. Happy embroidery month to you guys!
Someone is a little dyslexic with the back-stitching photos…but that's ok! It's a great tutorial!
Love that it is Embroidery month. Reminded me of this gift that I received for my kids. Check it out.
http://erinscreative.blogspot.com/2011/01/what-beautiful-gift.html
Embroidery is so cathartic. I love to sew, but it's a lot of work sometimes. There is just something so simple about sitting down and making those chain stitches. I also LOVE to cross stitch.
I love this! I'm totally making it.
[…] little extra time and supplies? {maybe a boss who isn’t looking that closely?} how about this nerdy embroidered fabulousness from prudent baby? there’s a great tutorial, so even if you’ve never crossed a stitch […]
I just love this project. I fell in love with embroidery thread this year. I’m not sure I’m doing any techniques properly but I’m loving how it looks! 🙂
[…] I had an old school embroidery book that I picked up at a thrift shop to learn two basic stitches the Back Stitch and the Chain Stitch. Once you’ve mastered those two you can write any message you want! […]
Hi everyone, it’s my first pay a visit at this website, and piece of writing is genuinely fruitful in support of me, keep up posting these types of articles or reviews.
I’m extremely impressed along with your writing abilities and also with the format to your blog. Is this a paid topic or did you customize it your self? Anyway stay up the nice high quality writing, it’s rare to see a nice blog like this
one nowadays..
[…] Start Stitching – Beginner Embroidery Tutorial – love embroidery tutorial for beginners. Even if you don’t plan to get into embroidery, this tutorial offers basic stitches that hand sewing students need to know. […]
I’ve learn several good stuff here. Definitely worth bookmarking for revisiting. I surprise how a lot attempt you put to create such a great informative website.
[…] you’re new to embroidery, you may want to get started on our You + Me Beginner Embroidery Tutorial and then the Embroidered Clock. When you’re all done you can hang it using our Preparing a […]
No matter if some one searches for his vital thing, therefore
he/she wishes to be available that in detail,
therefore that thing is maintained over here.
This website certainly has all the info I needed about this subject and
didn’t know who to ask.
[…] Start Stitching! A Beginner's Embroidery Tutorial [Pretty Prudent] Pretty Prudent is another wonderful online embroidery website. The site’s tutorial shows you how to sketch a simple design onto your embroidery hoop and fabric, and then how to properly stitch and execute the design. It also provides links to DIY embroidery ideas for other designs. […]
[…] Start Stitching! A Beginner's Embroidery Tutorial [Pretty Prudent] Pretty Prudent is another wonderful online embroidery website. The site’s tutorial shows you how to sketch a simple design onto your embroidery hoop and fabric, and then how to properly stitch and execute the design. It also provides links to DIY embroidery ideas for other designs. […]
[…] Start Stitching! A Beginner's Embroidery Tutorial [Pretty Prudent] Pretty Prudent is another wonderful online embroidery website. The site’s tutorial shows you how to sketch a simple design onto your embroidery hoop and fabric, and then how to properly stitch and execute the design. It also provides links to DIY embroidery ideas for other designs. […]
[…] Start Stitching! A Beginner's Embroidery Tutorial [Pretty Prudent] Pretty Prudent is another wonderful online embroidery website. The site’s tutorial shows you how to sketch a simple design onto your embroidery hoop and fabric, and then how to properly stitch and execute the design. It also provides links to DIY embroidery ideas for other designs. […]
[…] Start Stitching! A Beginner's Embroidery Tutorial [Pretty Prudent] Pretty Prudent is another wonderful online embroidery website. The site’s tutorial shows you how to sketch a simple design onto your embroidery hoop and fabric, and then how to properly stitch and execute the design. It also provides links to DIY embroidery ideas for other designs. […]