


Now is the perfect time to learn How to Build a Pallet Daybed!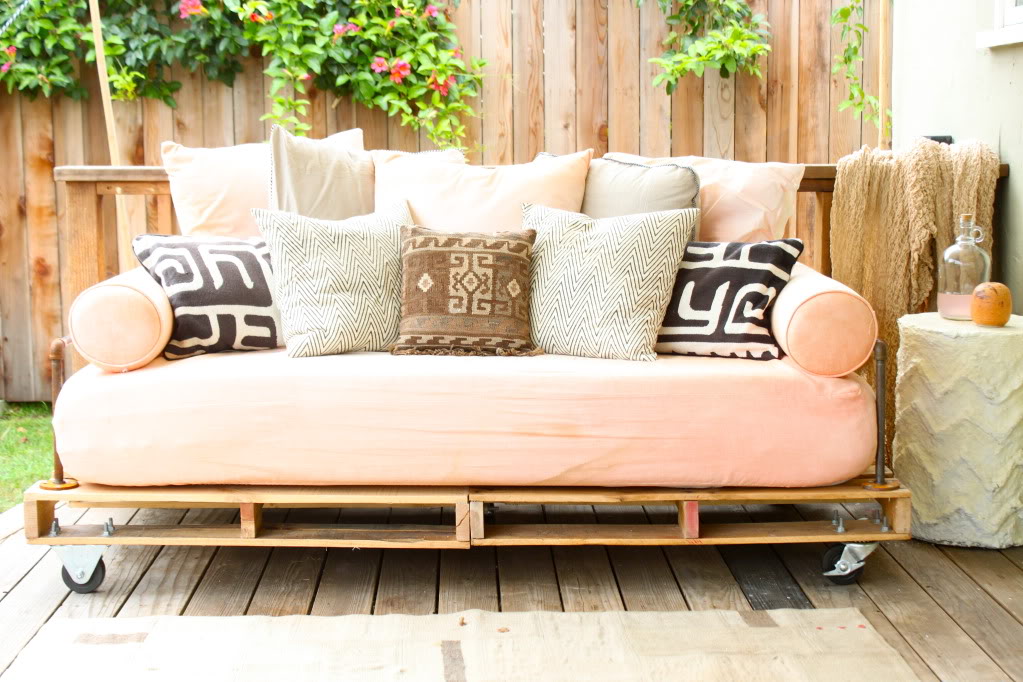
The highlight of My New Backyard patio redecorating scheme has most definitely been this pallet daybed. I really wanted a place to sleep outside with my daughter, and a comfy couch to relax on with friends. I didn’t have the funds to invest in a fancy piece of outdoor furniture, and I knew that with the weather as it is in Los Angeles, I could leave this outside pretty much all summer. I also knew that I would, at some point, need to move it under the awning to keep it dry, so I put it on wheels. And finally, I knew I would need arms, because I’m just not comfy on a couch without arms. So here is the DIY Pallet Daybed I came up with.
I built this myself, with no help at all, in just a few days. I’m a crafty person and comfortable with tools, but I’m not an advanced woodworker by any stretch of the imagination, and this project was simple enough for me, so I know you can do it if you want to. Let me show you how to make your own DIY Pallet Daybed after the jump.
How to Build a Pallet Daybed
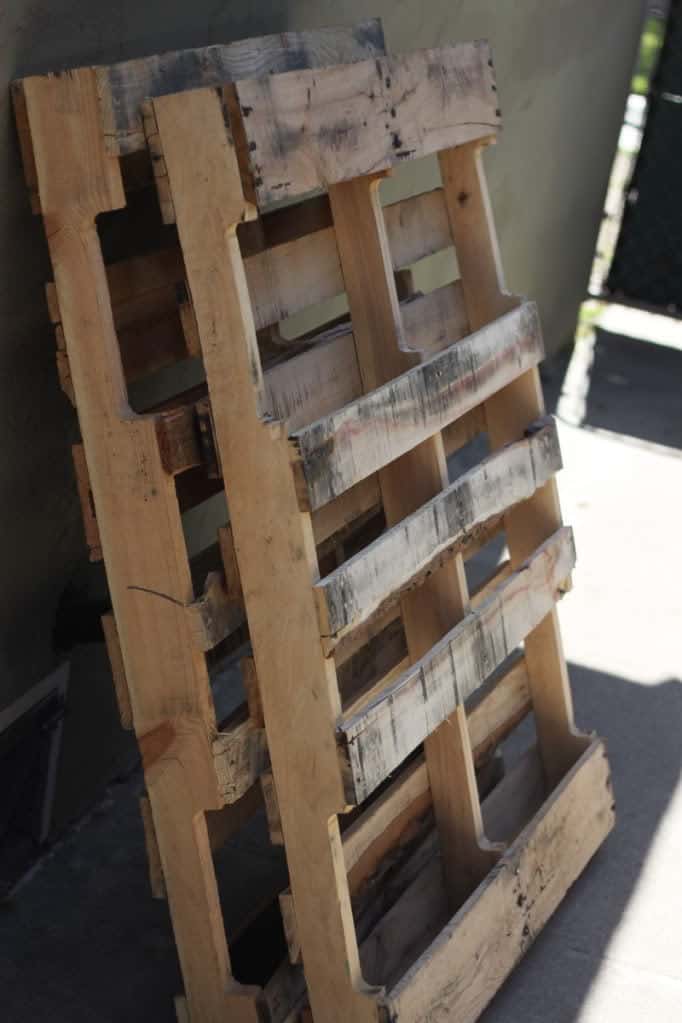
First let’s talk dimensions. A standard twin mattress is 39″ X 75″, but there’s a few inches difference between most mattresses, so pick your mattress first, then your pallets. Pallets come in many sizes, I used 48″X40″ which is fairly standard. I just went downtown to an area I like to call the “pallet district” where there’s tons of spots that sell pallets to any takers who drive up. If you google your city and pallets or look in the yellow pages, you will find the pallet distributors in your area. Most will only deliver large amounts, but are happy to have you drive in and purchase a few. Ask for the nicest, newest, least chemically-est pallets they have. These were the finest pallets I could come by, and they were $3 each.
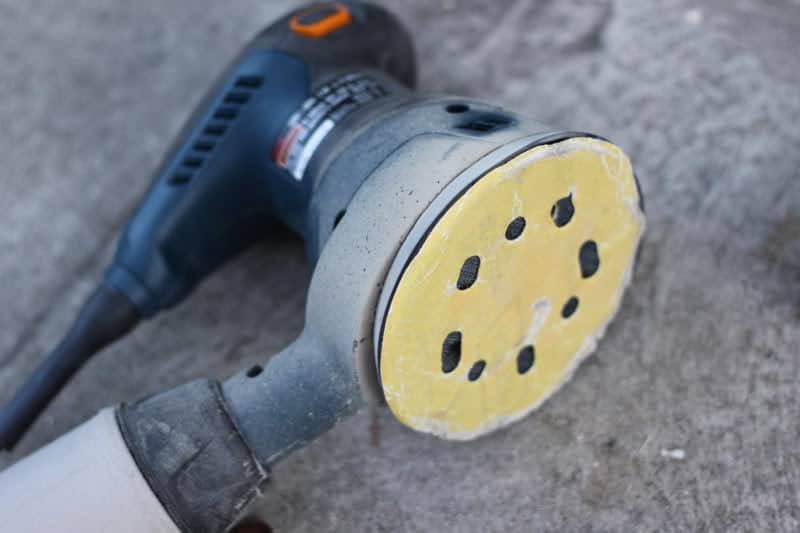
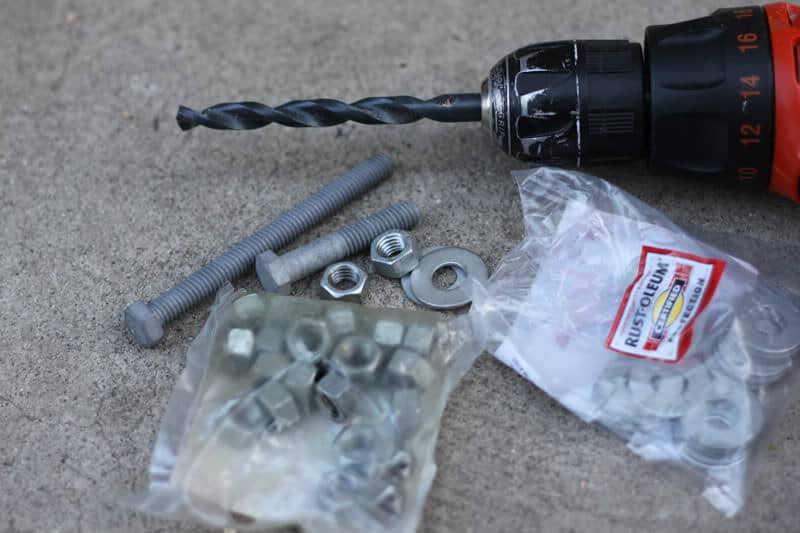
Next I stocked up on supplies. I used my Membership Rewards points to get a gift card to home depot, which I then used to buy 5 large (4″) casters (2 that don’t move at all, and three that swiveled with locks), some outdoor polyurethane and a brush, and sanding discs in 60, 180, and 220< grits.

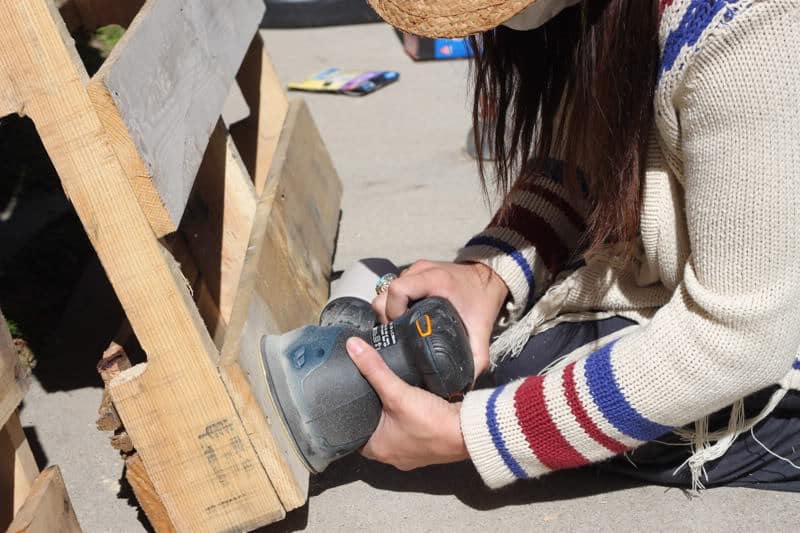
I also got myself a new orbital sander because I somehow managed to lose my first one. Sanding your pallets is really the most important part of this project, because no one wants to get splinters from their furniture. I don’t recommend doing this by hand, unless you realllllllllyyyyy love sanding.
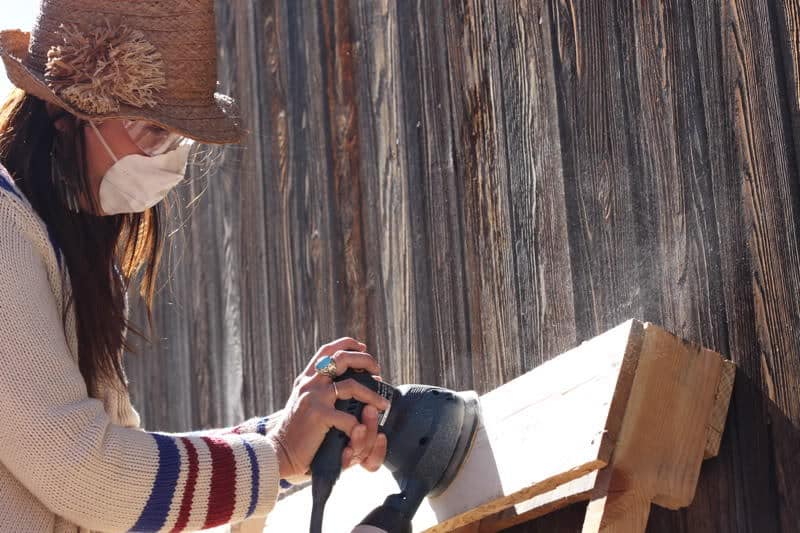
First things first, sand those pallets down. Start with the lowest grit (60) and move up. Make sure you wear eye protection and a mask to keep all that nasty dust and chemical treatments out of your lungs and eyes.
Keep sanding for a long time, until you have a nice, smooth, splinter-free pallet.
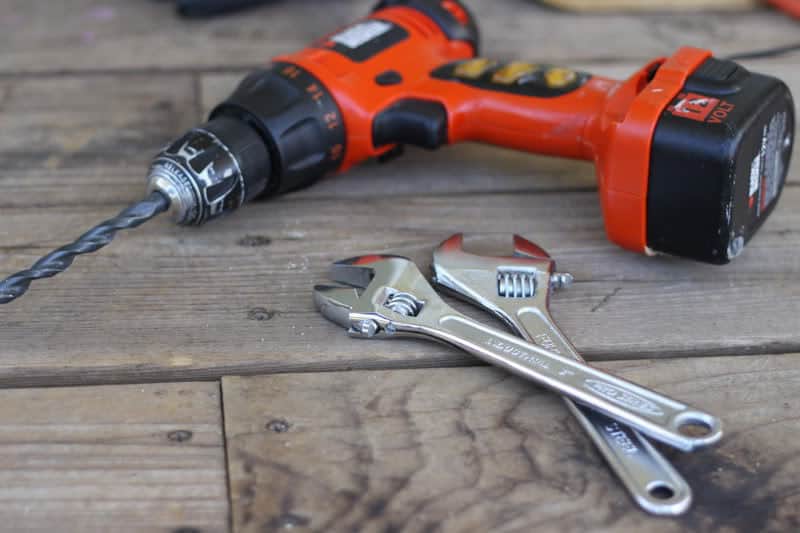
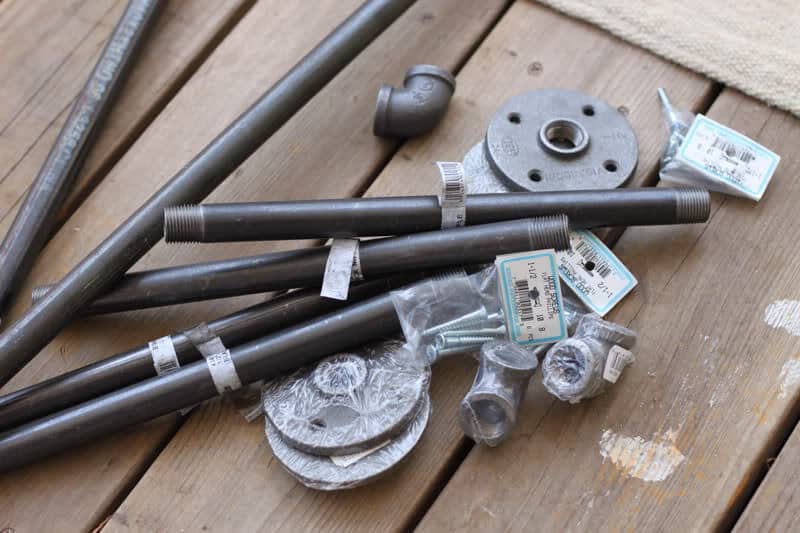
I also picked up a 3/4″ drill bit, and lots of 3/4″ bolts and nuts, and a pile of 3/4″ washers. I got three 3/4″ X 3″ bolts for attaching the two pallets together, and 20 3/4″ X 2″ bolts for attaching the casters to the pallets, and enough washers (23 minimum) and nuts to secure them all and account for any I might drop while working (no one wants to go back to the hardware store for one washer, so get extras).
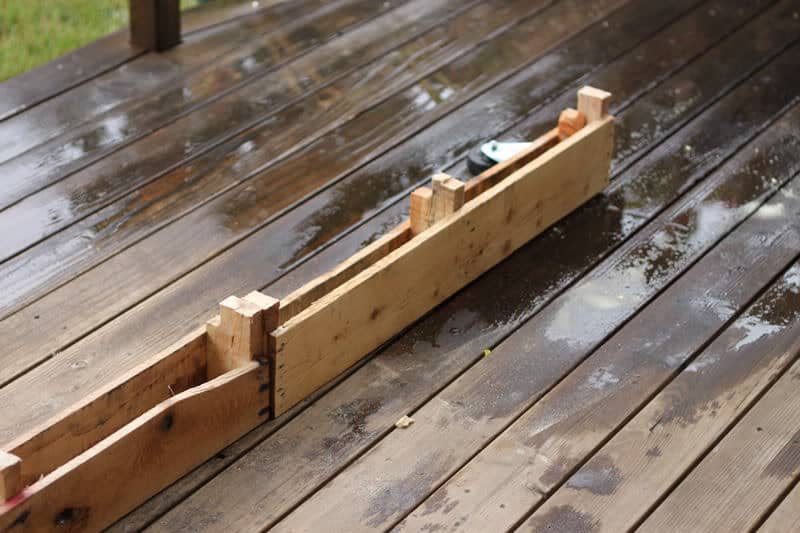
Now, originally I had planned to leave the pallets their current size and make a back for the couch out of a third pallet. So I didn’t cut the base pallets down to size at this point. But once I had it all assembled I realized that with a back it would be too deep for my deck, so then I had to go back, cut it down, and reattach the casters. So I advise you cut your pallets to size first. You’ll be attaching the sides with the wood frame, which on these (and most) pallets is the 48″ side. So you would have a base that is 48″ deep and 80″ long. So you would want to cut the 48″ side down to about 40″ to accommodate your twin size mattress, for a final bed base that is 40″X80″ (for a 39″X75″ twin mattress and room for the arms we will add later). But you’ll see that I did that backwards.
So, now it is time to drill holes to attach the two pallets together. Carefully measure and mark three holes on each pallet, one close to the front, one close to the back, and one in the center. Drill the holes with your 3/4″ drill bit.
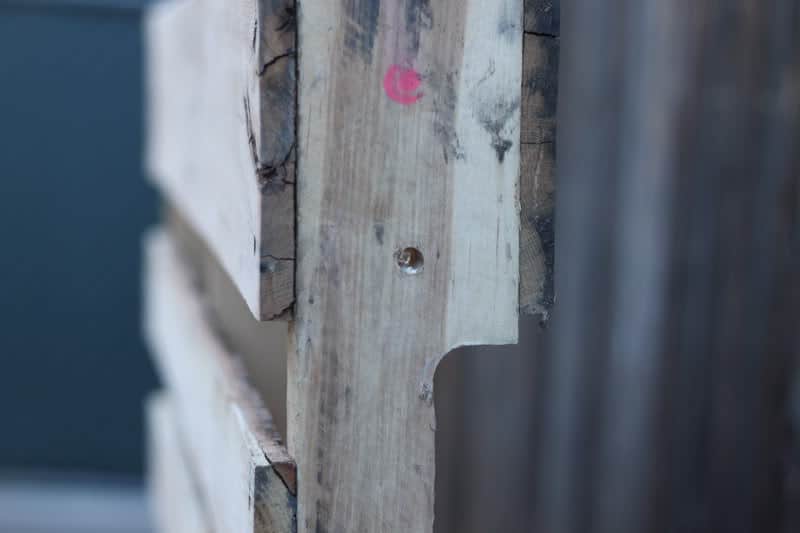
Bring the two pallets together and insert the 3/4″ bolts.
Secure with a washer and nut,
and tighten with wrenches.
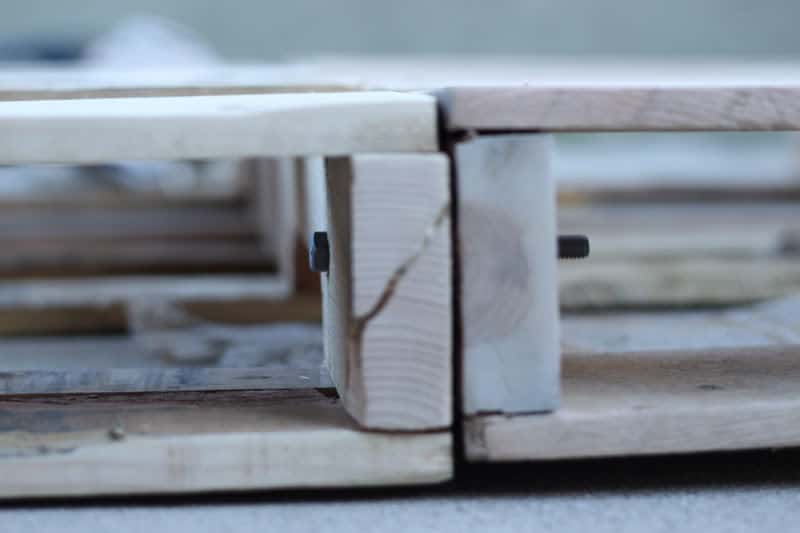
Now your pallets are attached to each other right down the center.

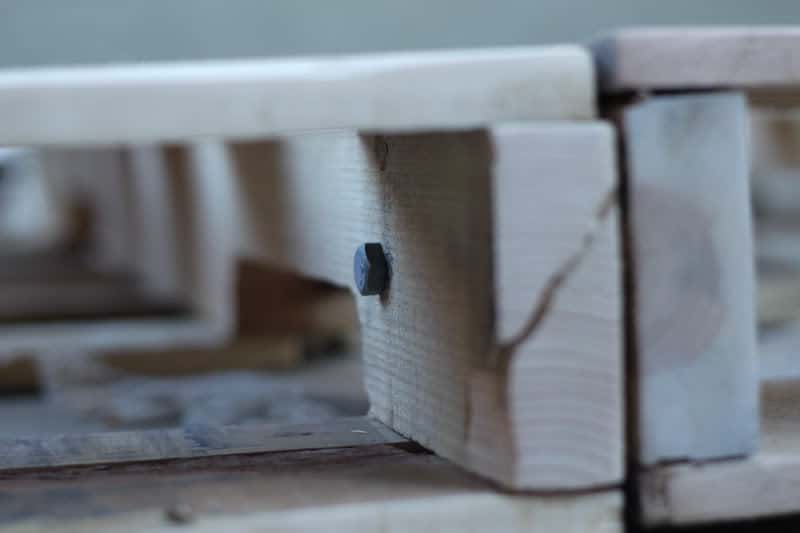
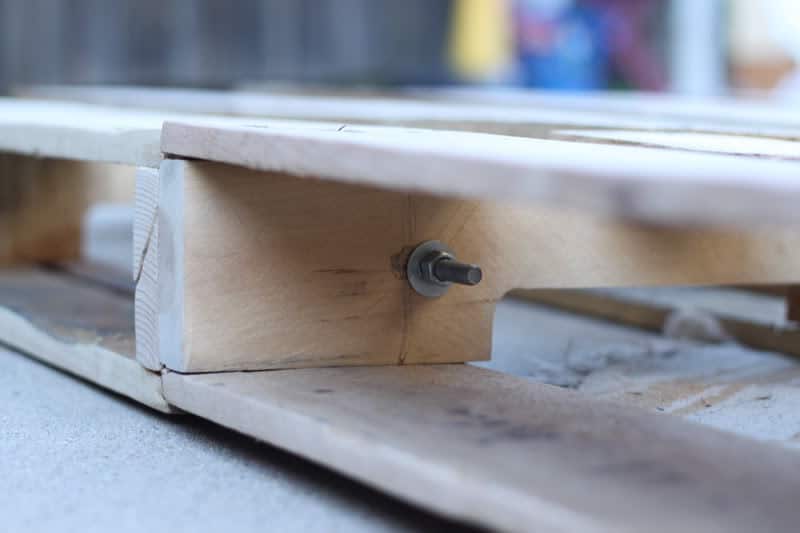
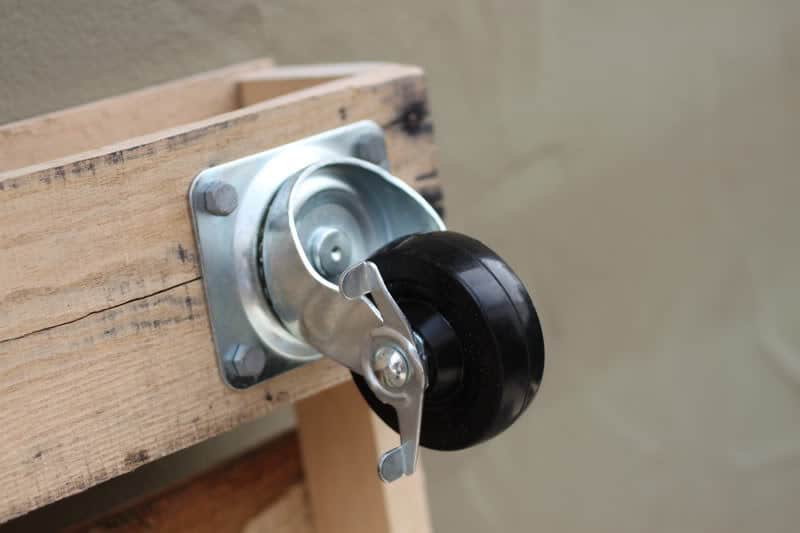
Now it’s time to attach our casters, so keep that 3/4″ drill bit out.
Place your casters on each corner. I used two static casters on one end, and swivels on the other, which makes it easier to move the bed around. Mark the holes carefully, and drill.
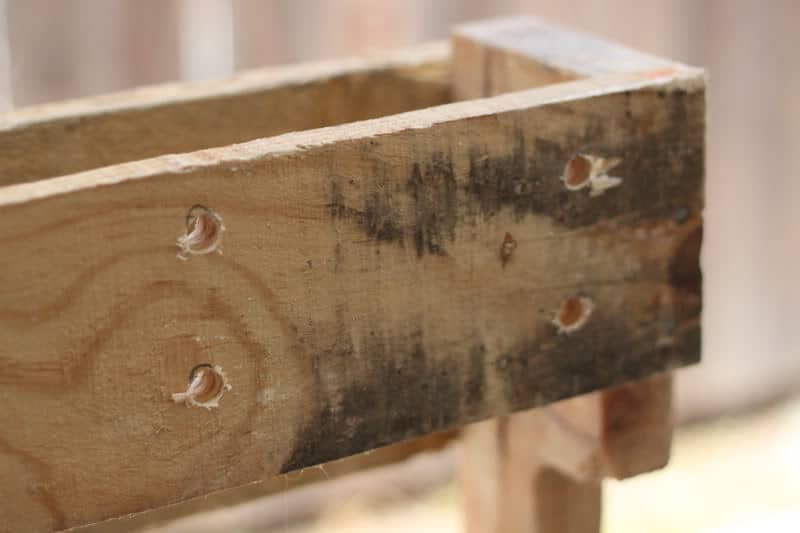
Attach your casters with the 3/4″ X 2″ bolts.
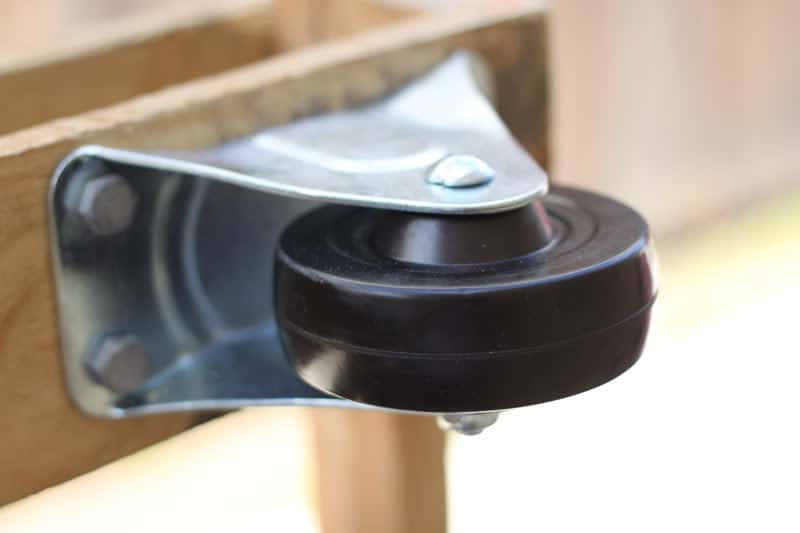
Secure each bolt with a 3/4″ washer and 3/4″ nut. Tighten with your wrenches.
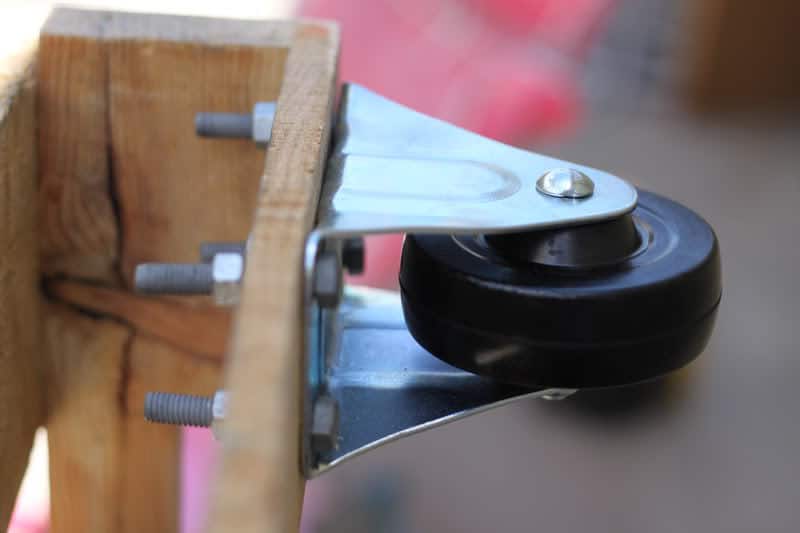
Repeat on all four corners, and put one in the dead center of your bed.
Now you have the base of your bed. You’ll want to treat it for outdoors so it doesn’t rot on you. You actually should probably do this before you attach the casters, but I did it after and it was fine. I coated it in several coats of polyurethane, letting it dry between coats. But as I said before, I realized this was too wide for my patio, so….

I had to use a circular saw to chop it down to size, remove the two back casters, and reattach them. I also had to remove the center caster and reattach, so the bed would stay balanced. This also required adding some wood to the base of the pallets in the right spot to attach the casters too. Kind of a pain, which is why I suggested doing this first. Measure twice, cut once, right? Ah well.
Now I wanted arms on my daybed. Originally I had thought I would use garden trellis and then place a pot of bougainvillea and have it grow to cover. But no matter how I braced or rigged it, it wasn’t sturdy enough. And also it just looked weird, I realized I probably wouldn’t want to sleep with bougainvillea in my ears and such. So I took that off and went to plan B.
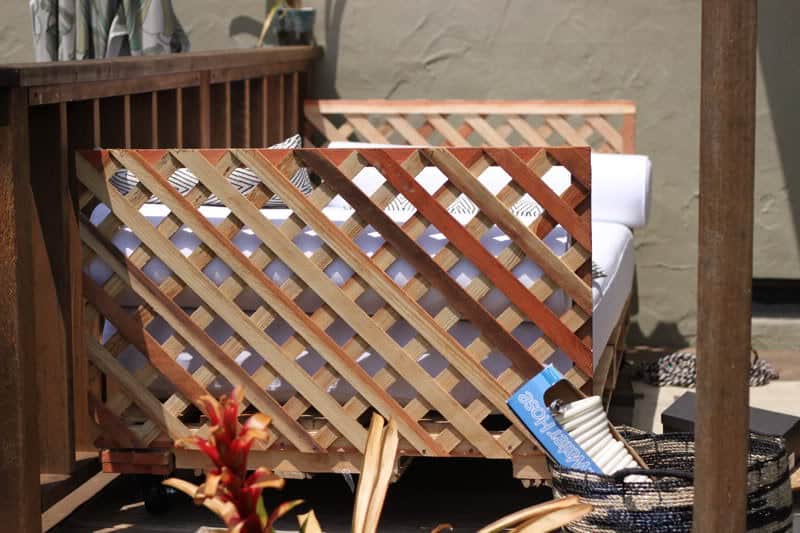
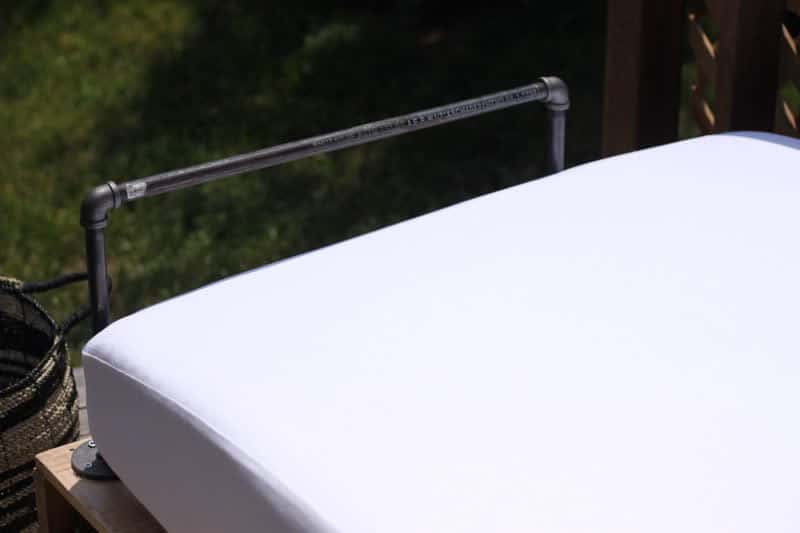
Pipe and flange! This worked out perfectly. One thing to consider when deciding what lengths of pipe to purchase is the thickness of your mattress. I went with a thick mattress (10″) so the final height of the bed base would be 18″, a standard seating height (4″ casters + 4″ for the thickness of the pallet + 10″ for the mattress thickness). Then I knew I would add bolsters at the sides, so I went with 12″ pipes for the sides of the arms to support the bolsters. For the cross piece, you’ll need to look at your pallet and where the wood hits. With the placement of the wood slats on my pallet, 22″ pipes worked best for the cross pieces. So I purchased four 12″ pipes, two 22″ pipes, 4 flanges, and four corner pieces, making sure all of the female/male connecters would fit properly. I also purchased 16 wood screws to attach the flange to the pallets.
Firs things first, I cleaned the pipe with a good grease-cutting cleaner (dawn dish soap works like a charm to cut grease). Then I went ahead and assembled each arm by attaching the two 12″ pipes to the flange, attaching the corner pieces, then screwing the 22″ pipe across. Then I simply screwed them into the pallets on each 40″ side.
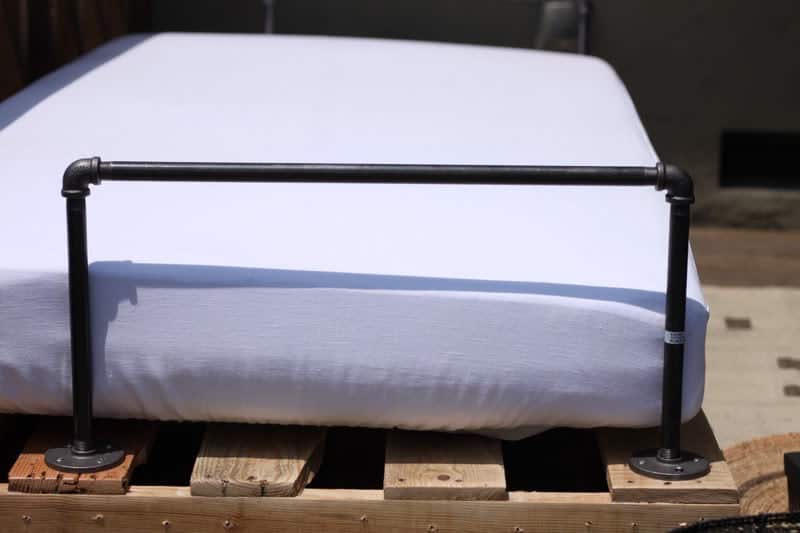
This worked out perfectly.
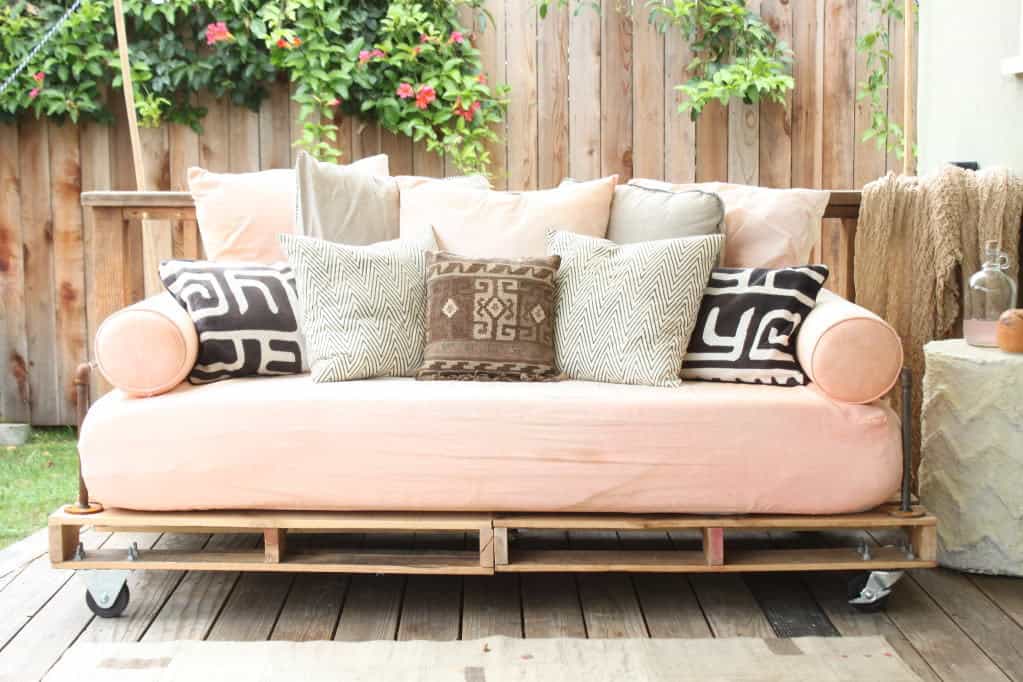
The bolsters are supported by the arms, and now my kid and I have a comfy place to lay our heads. And now you’ve learned how to build a pallet daybed.
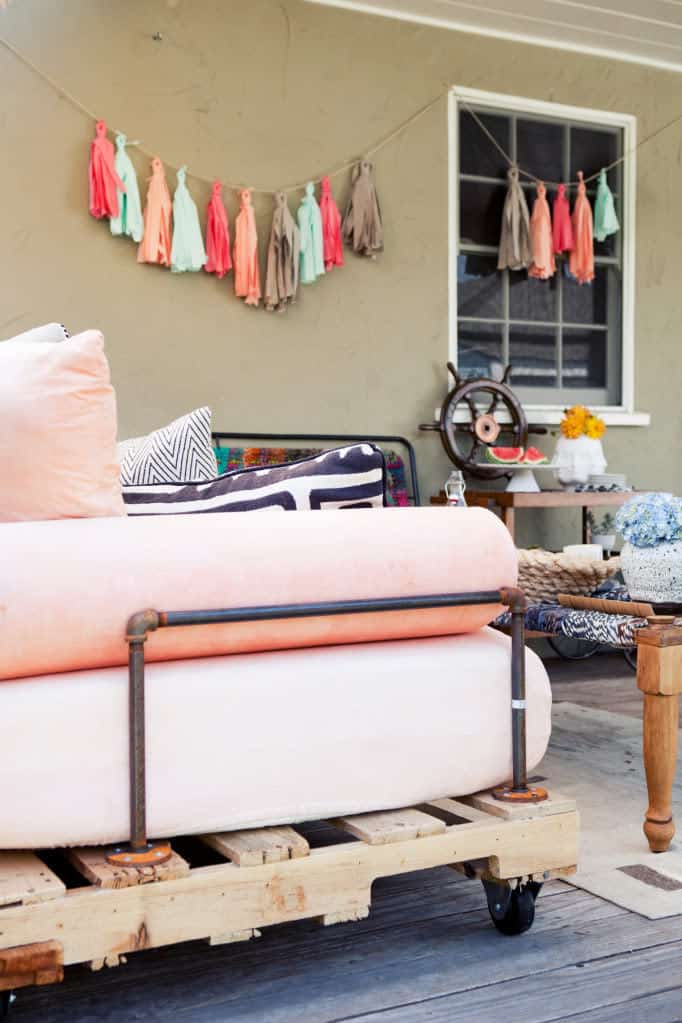
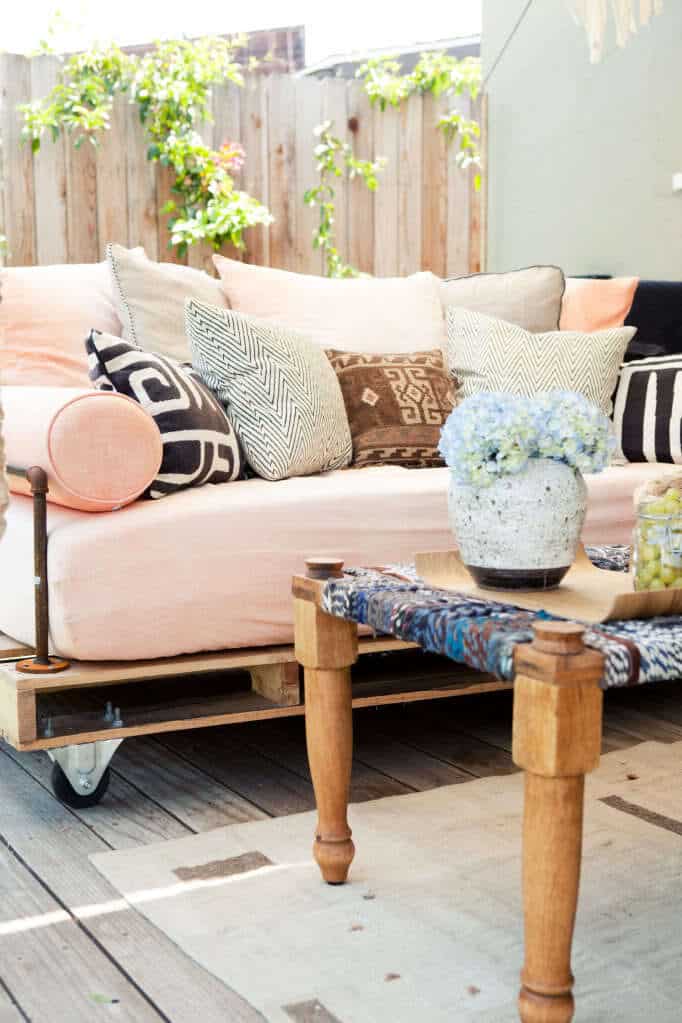
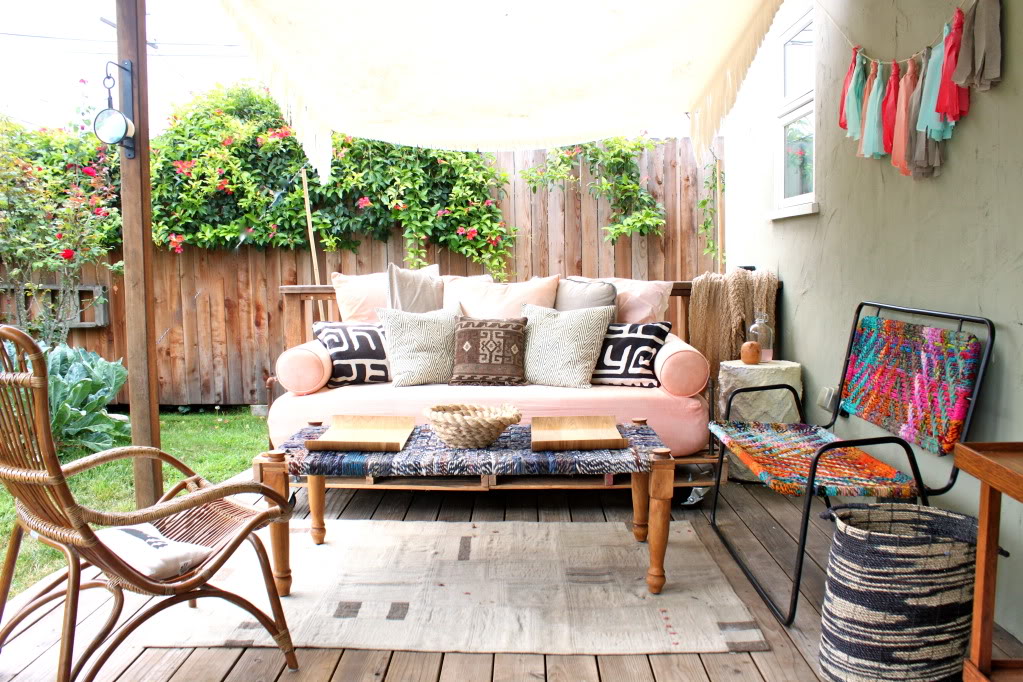
The key to a comfy daybed isn’t a fancy frame, in my opinion, it’s pillows. Lots of ’em.
And some shade. Learn How to Make A Simple Canvas Awning here.
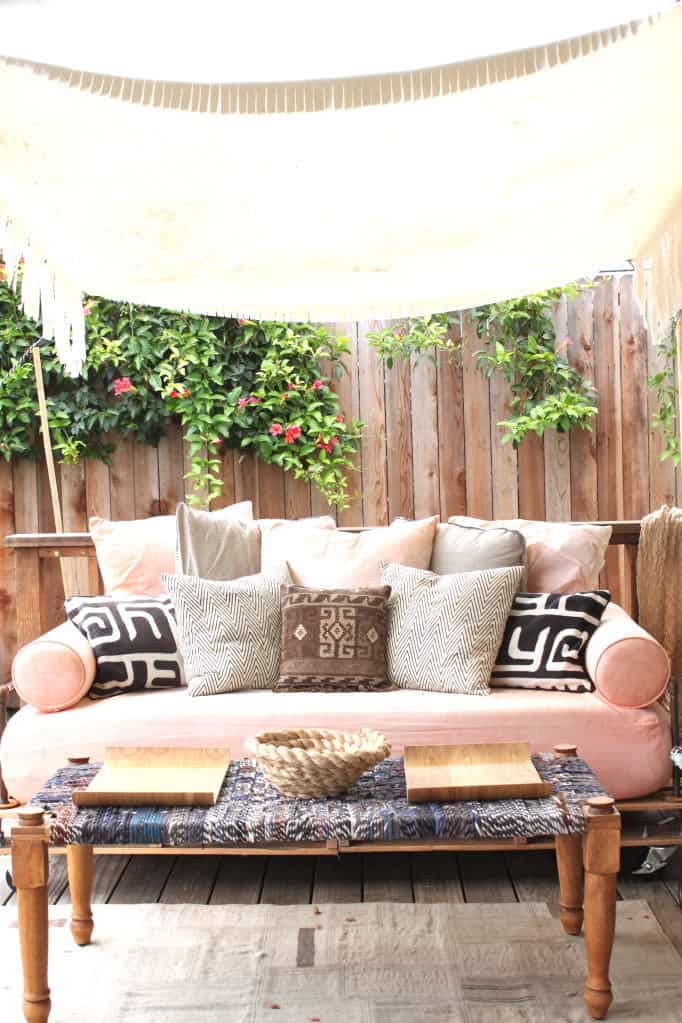
So all in all, the pallet base cost $56 (for pallets and casters), and the arms another $30. So here is my $86 DIY pallet daybed frame. I also purchased this memory foam mattress and a waterproof bedbug-protecting cover for it to keep it nice and clean. I used my Membership Rewards points for a gift card to West Elm, where I purchased linen bolsters and a daybed cover in white, then dyed them. I topped it off with some purchased pillows and some hand sewn pillows. And that’s that.
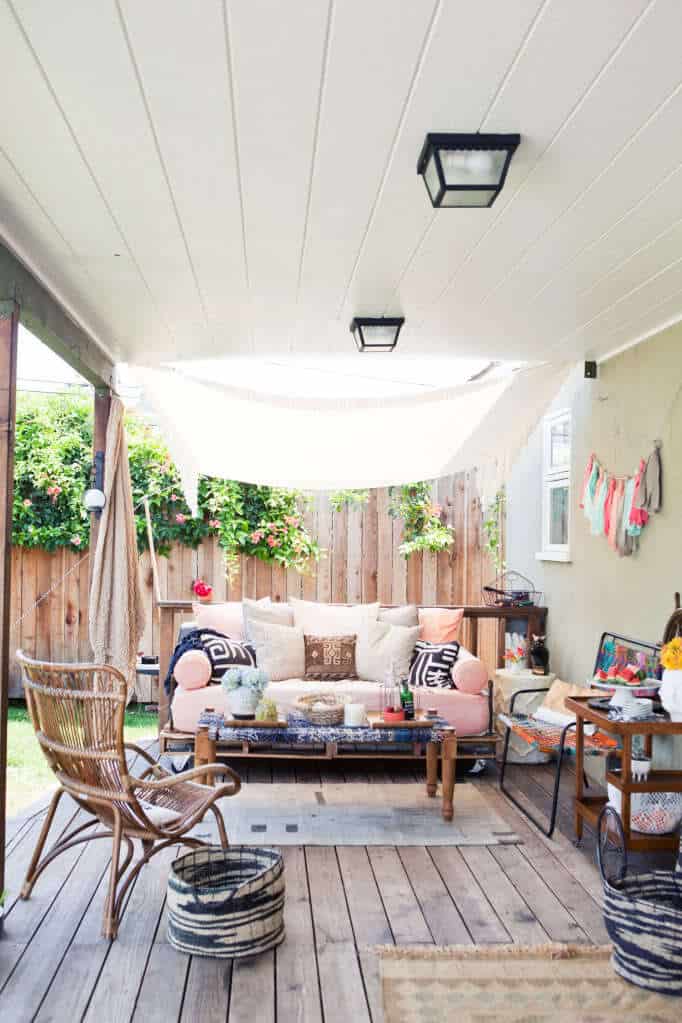
I can’t even tell you how much joy having an outdoor bed has brought to our family this summer. We entertain friends on it as a couch, and we take naps with our kid outside. If you have the inkling to try learning How To Build a Pallet Daybed, I say go for it. It was a very simple project that even a non-woodworking expert like me breezed right through. If you do try it, send us a picture!
Originally posted July 25. 2011, Updated April 20, 2020
Awesome tutorial, I think even I could handle that. I love the fact that you can nap on it, with your kids, that would be a dream come true for me. Here in Minnesota, you'd likely wake up with mosquito bites from head to toe to show for it, but maybe in a screened in porch?
Best part for me was that you dyed your mattress and bolster covers. DUH! I would have never thought of that, would have had to search forever to find the right color. Genius!
I love the pipe arms with the pallet frame. What a great idea.
very nice! Do you think using pipes along the back would work to support pillows as well? Our porch railing isn't the sturdiest thing in the world and I try to avoid leaning on it whenever possible.
Thank ufor showing how to connect the pallets with bolts on the INSIDE! Everyone else was using ugly metal braces on the outside! Uh.
I love this so so much! I would like to take a nap now please.
It would also make a really nice, huge furniture dolly. 😀
that looks amazing! and I know a place to get free pallets….
Color me impressed! I bow down to your crafty-majesty.
Yay, I've been on pins and needles waiting for the instructions to be posted!!! Loved seeing your video on Design Sponge, and I'd love to give this project a try! It would be perfect in our family room for when guests come to stay. Xo, Katie
What a great Idea for a day bed! your porch looks great!
Love this idea. Great photo presentation too. Awesome step by step tutorial and easy to follow.
Pleasure to browse all the wonderful posts here.
What a wonderful idea! This looks like one I don't need to bug the hubby for– I can do it myself! Thanks for the awesome tutorial!
Hettie, CelticMommy
That’s exactly what I thought! It’s a fabulous tutorial as soon as I saw it I wanted to make one!
Thankyou so much for a superb tutorial Pretty Prudent I love it and I’m now following you
Amazing!! I can't wait to hear more about your DIY backyard… I love the window decorations and shade ideas. Perfect for an Arizona gal like myself.
Lovely.
love this patio makeover! especially love the bedding color- the perfect peach! what brand and color did you use to dye it?
This is amazing! I'm going to try to do this on my own, even though I've never tried something like this before. Question: if you *had* had room to put that third pallet on the back, how would you have gone about doing that? Thanks!
Merci beaucoup pour vos efforts
awesome tutorial! one question, since you didn't put a back on the sofa and its got wheels, do you have any problems with it sliding forward (despite the brakes) if you lean back on it?
Thanks so much for the informations
that looks so amazing! what a lovely spot for the family
This looks amazing! I am definitely going to try this out for a love seat in my living room! If I wanted to add something for back support, do you think it would be best to do it with another pallet, or with some more piping? The place I want it for in the living room doesn't have a wall behind it. Anyways, thanks for all the instructions! You're space looks lovely and your family is very lucky!
This is amazing! You are quite resourceful!
Hi,
Just found a pick of your pallet day bed on Pinterest and followed the link here and read through your tutorial for this awesome project and I love, love, love it!!!!! It looks incredible comfy and cozy…perfect for my deck. :o) Going to try this wonderful idea of yours. Thanks so much for sharing.
Eileen
thanks! send us a pic if you make one!
[…] Garden Light by Your Cozy Home 2. Laundry Room Drying Rack by Centsational Girl 3. Pallet Daybed by Prudent Baby 4. Planter Box Centerpiece by Shanty 2 Chic 5. Colander Floral Arrangement by […]
Hi, I love this day bed. Very creative use of pallets & pipes. I would like to know more about the coffee table. Did you revamp it?
Thanks!
Cherica
snagged it on clearance from anthropologie last summer 🙂
Hello. LOVE this project. You mentioned that you were going to attach a back to this bed but did not due to space. How were you going to do so? I would love to make this but would need a back. I would attach one myself but likely the thing would fall off!
Thanks,
Erin
I would also like to know about a back…
I love this idea!! And admire your creativity and your consideration to share with others. I too am concerned about putting a back on the daybed. How would you recommend doing so? Another asked if you would consider using pipes for the back as well? I appreciate your advice.
It’s so beautiful…
I happy too read
just found this genius tutorial through pinterest!! love easy to follow directions and ideas! looking forward to reading more of your DIY projects and following through with some i just adore!, thank you!
Thanks so much fantastic article
What a great idea! This is great. I’m not sure if I am this talented though it might be worth a try 🙂
Merci beaucoup pour vos efforts
Hi I love your pallet idea but I noticed the table and bench that were redesigned with yarn/rope? do you have a post that desribs that or can you? I love it!
LOVE LOVE LOVE!! Started looking into making this, even going as far as posting in my local swap group looking for Pallets, until my mother-in-law called laughing because their family bussiness has hundreds.. Dork moment. But got the ball rolling!!
I am also intrigued about a back, and if locking the wheels does the trick to not push away from the wall.
But my other question is the little bits you had to buy (bolts/nuts/ect) How much about did they cost? I cant go to the store often, and trying to price how much it would be online, but the only bits I have seen are EXPENSIVE ($20/6 bolts) Where and about how much where yours? Thank you! Kasey
[…] on the pillows. For a more budget friendly option you can build your own seating; use ready-made palates as a base or build a custom size frame from scratch. Add a couple of carved dark wood outdoor […]
This is amazing. Great job.
This is such a great idea! I LOVE re-purposed furniture!
I just have one question… in the instructions and supplies needed you mention a 3/4″ drill bit, bolts, nuts and washers… I’m in the hardware business and in the photos they look like a 1/4″ bit, bolts, nuts, and washers… I think that if you used a 3/4″ it would split the wood, is that right?
[…] almofadas em forma de rolinho dão uma cara de sofá de verdade. Aqui tem o […]
[…] slightly obsessed with this pallet daybed from Prudent […]
I love this! It’s beautiful and inexpensive–a great combo!
do you know how to make the table that you have shown?
Oi boa noite achei muito bonito e ecologicamente correto o aproveitamento dos paletis no sofá.E gostaria de te dá os parabéns pela criatividade e por ter compartilhado com todos sua criatividade.
great idea…but the pipe arms seem to be rusting away in the outside weather in your pictures..any idea to stop it from rusting?
yes. i did not think far enough in advance with that one. but it’s easy enough to avoid, just buy rust-proof pipe. they sell it in every hardware store. sigh.
To make it even easier, I would just spray paint the pipes with a rustoleum paint. Should be easy enough. Not sure what rust proof pipes would cost but, spray painting them was the first thing that came to mind.
I purchased same size just galvanized
I suggest a coat of rustoleum spray paint
are you worried about the mattress getting wet outside ? what did you use for the fabric? regular sheets?
Prolinemax have a line of daybed covers that I bought for mine
[…] i’m dreaming of the day when i have a backyard that i can make nice + cozy just like jaime from prudent baby with her crafty pallet daybed. […]
[…] Above (L): Remove any errant nails and sand smooth the rough or splintery edges. Image via Vettieg; above (R): Attach pallet to wall with wood screws. Image via Prudent Baby. […]
Love your project!!!
I would use PVC pipe in place of the metal pipe. Then you wouldn’t have to worry about rust.
[…] […]
Hello i am attempting this wonderful idea. However im stumped now when trying to find a mattress that ships to where i live. Can you please let me know about how big the box that the memory foam mattress twin arrives in. Thank you
[…] complement said beautiful backyards, I’m envious and irritated. Even so, I had to share this DIY pallet daybed because it seems pretty simple (for a DIY that involves power tools) and because it’s […]
[…] Check out this incredible DIY pallet bed from Prudent Baby. I can’t believe some of the resourceful recycled DIYs that people come up […]
Something you could do to get the rust off of you mattress is whip the pipe with 1/4 in close line rope. This is such a wonderful project for our day room. Might I suggest that you take a sanded 1×6 an use it to face the front of the pallett. you can then paint or varnish it and make a better presentation in the front. this will also stick up above the top of the pallett about an inch which will keep the mattress from moving. This is a georgous project and you have made it very easy to reproduce. Thank you for letting us in on it.
[…] ακολουθεί και η κατασκευή του εδώ . Share this:EmailFacebookPinterestStumbleUponGoogle +1Like this:LikeBe the first to like […]
It’s been a year and a half since you made this and I was wondering if your bed has withstood the test of time? I am planning on making this for my room as a bed frame, and I hope that it’s durable.
Thank you for this amazing design. I built the same bed myself from your directions and linked back to your site! http://theother128hours.blogspot.com/2013/01/build-your-own-pallet-bed.html
We just moved to our new place in the Chilean countryside are into constructing and building our home with recycled materials (totally in love with pallet designs and fruits boxes) and this tutorial is spot on and uncomplicated and the outcome absolutely beautiful!!! Thanks a lot!!
[…] and I’m excited about sharing the project with everyone! Via Under the Sycamore Via Prudent Baby Via Inhabitat I’ll keep you updated on this (hopefully) upcoming project and will post a […]
[…] Via Prudent Baby […]
[…] How to Build a Pallet Daybed, via Prudent Baby […]
[…] How to Build a Pallet Daybed | Prudent Baby […]
[…] I love the setting of this daybed, colorful cushions on pastel color cushions sets a relaxing tone. Table is refurnished with a old colorful rug, if you want you can use old t-shirts to make a colorful table cover. Follow the link to make this beautiful daybed. Link […]
Thanks , I have just been looking for information approximately this subject for a while and yours
is the best I’ve came upon till now. However, what in regards to the bottom line? Are you sure concerning the source?
Hi there, just wanted to mention, I liked this blog post.
It was practical. Keep on posting!
[…] Pallet Daybed >> […]
This is exactly what I’ve been wanting to do! Thank you for documenting the process. It looks gorgeous! Well done. 🙂
Thank you for the good writeup. It if truth be told was
once a enjoyment account it. Look complicated to far introduced
agreeable from you! By the way, how could we keep up a correspondence?
[…] Con un par de palés y ruedas. Puedes leer las instrucciones aquí. […]
I have discovered this project through another website and I am so happy I run into it. Sometimes it is so amazing what we can do out of ordinary things, such as pallets. I usually use pallets to build firewood sheds, but this daybed it is just a piece of art.
[…] link […]
Thanks for the inspiration! I ran into your photos of this daybed on Google and I just finished building my own… It’s a bit different but I love it and I’m so happy I can now have guests over for sleeping.
http://i39.tinypic.com/ohip2e.jpg
[…] Images via Far Out Flora (clockwise from top left), Pretty Prudent, 1001 Pallets, Lottas Himmelrom, Bridgman and Ana […]
[…] via Far Out Flora (clockwise from top left), Pretty Prudent, 1001 Pallets, Lottas Himmelrom, Bridgman and Ana […]
thanks for sharing this pallet daybed.
Wow, this is beautiful! I love it and am pinning to my “what to do with a pallet” pin board! I may have to make one of these for my basement family room!
Tania
[…] Lolita, Prudent Baby, Life on the balcony, Dekorella Tweet (function(d, s, id) { var js, fjs = d.getElementsByTagName(s)[0]; if (d.getElementById(id)) {return;} js = d.createElement(s); js.id = id; js.src = "//connect.facebook.net/en_US/all.js#xfbml=1"; fjs.parentNode.insertBefore(js, fjs); }(document, "script", "facebook-jssdk")); […]
[…] 10.HOW TO BUILD A PALLET DAYBED […]
All you need to do is search for a site that matches your business profile or needs,
and thereafter submits your blogs under the relevant headings.
Image ALT Tags – Alt image tags are associated with images on a website.
He has to deal with traffic getting back to his office.
[…] outdoor pallet bed ideas I was seeing on Pinterest, until I found the holy grail of pallet beds. http://prudentbaby.com/2011/07/prudent-home/how-to-build-a-pallet-daybed-2/ I am not joking when I say I was so obsessed with starting this project that I read the […]
[…] think of creating the perfect outdoor sitting area using pallets? I didn’t either, but after seeing this project and reading the tutorial, I am really tempted to try and create a couch like […]
[…] DIY […]
[…] to the tutorial: Pallet Outdoor Daybed via Pretty Prudent craft ideas craft tutorial daybed diy handmade handmade craft how to […]
[…] DIY Project and Photo Credit via prudentbaby.com […]
[…] {found on prudentbaby} […]
[…] think of creating the perfect outdoor sitting area using pallets? I didn’t either, but after seeing this project and reading the tutorial, I am really tempted to try and create a couch like this. This table is just lovely and […]
How do you put a back on it to hold pillows if you are in he middle of a room or only have a screen behind you?
This looks like a wonderful idea, but please remember that pallets are not built as furniture. They are made with rough-finished planks that aren’t smooth and sanded, and may have splinters and rusted nails. They’re often thrown or dropped, thus may have broken pieces. In addition, pallets are used and re-used until they’re too broken up to be used again. And you never know what those pallets have transported – it might have been reams of clean printer paper, but could just as well have been drums of toxic chemicals.
For the amount of work required to choose and prep the pallets, it might be easier just to build a base from new, clean lumber!
[…] Als tuinbouwmeisje ben ik (bij wijze van spreken) opgegroeid tussen de pallets. Pallets staan ook geweldig thuis! Eettafels, bijzettafels, kasten, banken enzovoort enzovoort. Er zijn al heel wat variaties voorbij gekomen. Mijn absolute favoriet is de loungebank met prachtige roze kussens, industriële wielen en stoere metalen buizen als armsteunen. Het is echt wel even een werkje, maar nu valt het nog mee met de kou. Zie je jezelf al zitten met een grote mok chocolademelk en marshmallows op een stokje bij een vuurkorf? Foto credit: Pretty Prudent […]
[…] vía: Mango&Tomato, Scraphacker, Artistic Icing y Prudent Baby. Tags:Bricolaje, Decoración industrial, Decoración rústica Tweet Pin It […]
For example, you can get a lot of content in search engines; all you need to do is
type in a word or phase on what you are writing
on, and then click on some link to get free information and ideas to add
to your product. It is Consumer to consumer
Internet Marketing by word of mouth. Your keyword list can
be used to build webpages around those targeted phrases.
[…] More Details Here […]
I’d been looking all over the internet for instructions to build a day bed out of some pallets that my son brought home, and this is definitely the best tutorial. . . We managed to get it built over the weekend and have found that the wheels have been so helpful, thanks for putting together such clear instructions, we love our new patio bed!
[…] which is probably taking dust in your basement. Here is a project with instructions for making pallet daybed that will embellish your garden, that’s for […]
[…] Wood Pallet Day Bed – A couple of wood pallets become the base for cozy outdoor […]
[…] old pallets can be very useful and practical. Now, it’s the same, because you can build a comfortable furniture for sleeping outside, which is called a daybed, by using some old pallet that is taking dust in your […]
[…] | Bright cushions and drapes | Covered area with floor cushions | Covered area with leaves | Pallet Day Bed | Lift-up storage | White panelled seating Bed with throw | Lantern and […]
[…] Voor de volledige uitleg (sorry, zo technisch ben ik helaas niet aangelegd..!), verwijs ik je naar Prudent Baby. Ik ben om! Ik wil nu ook een daybed van […]
[…] på bloggen Prudent baby faldt jeg over en rigtig fin sofa der er bygget op af paller. Jeg synes der er nogle rigtig fine […]
This is really incredible work. I love finding amazing DIYs all across the web, but this seriously just takes the cake. So glad to have come across your blog. I really want to do some DIY with pallets myself, but it will have to wait until I have my own home, or move into a bigger flat!
rae of lovefromberlin
[…] Read a book and rest after DIYing all of these on your comfy pallet daybed via Prudent […]
Hello everyone, it’s my first pay a visit at
this website, and article is actually fruitful designed for me, keep up posting these content.
[…] source […]
I’m in the process of gathering supplies right now! So in love with this idea 🙂 2 questions: Where does the 5th caster go? And those look smaller than the 3/4″ bolts that I bought. Are they 3/4″ and will it split the wood? Thank you!!!
Just re-read this like 4 times and saw where I put the 5th caster. Sorry, I was somehow missing that! But still want to know about the bolt size before I start the drilling 🙂
honestly i do not remember! as long as you drill the right size for your bolts you should be fine. i think they were 1/2″ by 4″
i don’t think 3/4″ will split the wood. they should work well.
I built this using 1/2″ bolts and they worked perfectly.
I’d love to see a picture!
[…] proceso completito está acá, por si lo quieres ver. Feliz lunes […]
[…] 5. Disfruta cómodamente de los rayos del sol. La llegada del buen tiempo es momento para disfrutar del calor y las horas de sol. Los afortunados que tengan un patio en sus casas pueden fabricar este súper sillón low cost para el que solo hacen falta un par de palets y ruedas. Me ha encantado el detalle de las viejas tuberías incluidas a los dos extremos. Sin lugar a dudas se trata de una idea DIY para la que podemos reutilizar casi todo, ¡incluso antiguas telas que tengamos para hacer los cojines!. (Vía: Prudent Baby) […]
[…] DIYsSPRING DETOX SMOOTHIE.| EGG PLANTERS.| PALLET DAYBED.| SWEET ORANGE LAVENDER SCRUB. LACE BRA.| PRINTABLE EASTER EGG SEWING […]
[…] tutorial via prudentbaby.com […]
[…] shamelessly in love with this DIY pallet daybed – as in, I need one in my life right now. This whole space is so fun & […]
Hi! Love this idea, but I’m wondering if you have had any issues with the daybed covers from West Elm not being outdoor fabric? Did you treat them with any kind of product to protect from the elements?
Thanks!
I just washed them for a while – my patio is covered and I live in LA where it rarely rains. However, I dyed the cover and the colors did fade. I ended up, after a couple years, sewing a new cover and set of pillows out of weatherproof canvas tarp and that has been great!
How many yards of canvas fabric did you need for your mattress?
[…] Outdoor Day Bed – A daybed is great place to relax reading a book or listening to music and is one of the most desirable pieces of furniture to have in the outdoor area of their home. There isn’t much construction required and you can add a mattress, pillows or cushions for better comfort. Details… […]
Stunning Pallet Daybed Ideas. Nice Work Thanks For Shared
[…] sofá para el jardín digno de una revista de decoración, esto es lo que hicieron las chicas de Pretty Prudent con un par de palés y mucho gusto. No os perdáis el tutorial […]
[…] Prudent Baby, donde puedes ver el tutorial […]
[…] Letar ni som jag efter den perfekta utemöbeln? Här kommer ett tips från fina bloggen Prudent baby på hur du gör din egna dagbädd med lastpallar och lite fantasi. En dagbädd är perfekt om man vill ta en liten tupplur mitt på dagen eller när man har vänner på besök. Genom att ha hjul under så kör du lätt in den under tak om regnet skulle komma Steg för steg tutorial! […]
[…] Foto vía Prudent Baby. […]
[…] If you prefer something different, then maybe you’d enjoy more having a daybed. Such a piece can also be built using pallets. Use them to make s sturdy base, add some metal pipes to make the side portions of the frame and you can also install casters to make the daybed more flexible.{found on prudentbaby}. […]
[…] If you prefer something different, then maybe you’d enjoy more having a daybed. Such a piece can also be built using pallets. Use them to make s sturdy base, add some metal pipes to make the side portions of the frame and you can also install casters to make the daybed more flexible.{found on prudentbaby}. […]
[…] Via Vintage Revivals 7. Via The Apprentice Extrovert 8. Via Found Vintage Rentals 9. Via Prudent Baby 10. Via Misty […]
[…] (via, via, via, via, via, via, via, via, via, via, via) […]
[…] Source: www.prudentbaby.com […]
[…] how about this DIY shipping pallet daybed? Perfect for an outdoor […]
[…] 1 | 2 | 3 | 4 | 5 | 6 Here we go! New house. New blank slate. New decor dreams. New bigger bank account. If this were a game, I would call it 3 truths and a lie. And at the end of the game I would tell you that the bigger bank account is a lie. So, I may not have $1 Million to spend on our new digs. But, I still have big dreams. And they are starting in the back yard. Why, you ask? Well, first off, you sound like Burley. Secondly, it’s June, friends! If I don’t get the back yard started now, then I won’t be able to say “Come over for a summer cookout at the Richardson’s, y’all!” or “Hey guys, It’s summer time, let’s stay cool while firing up the hot grill!” …. What? I don’t know. Maybe i’m not cut out for this and I don’t have any friends to invite over. Or maybe I do. You decide. **tricky** Either way, I am starting with the backyard, dangit! […]
[…] source […]
[…] source […]
[…] How to build a pallet daybed | pretty prudent […]
[…] chill out que tienes y que deseas darle un nuevo aire. El increíble tutorial puedes encontrarlo aquí y es de Prudent Baby, te explican paso a paso como llegó a obtener este fabuloso […]
[…] How to build a pallet daybed | pretty prudent […]
[…] While you have your pallets out, you can also make Jaime’s pretty Pallet Daybed. […]
[…] How to build a pallet daybed | pretty prudent […]
[…] How to build a pallet daybed | pretty prudent […]
[…] How to build a pallet daybed | pretty prudent […]
This is such a gorgeous idea, and a very helpful tutorial! I’m planning on making this for the living room in my apartment. Can anyone say frugal uni student? I just have one question–would casters any smaller than 4″ work for this project?
Casters smaller than 4″ would leave the couch at an unusual height that may not be comfortable for sitting – then they only other thing to consider is your particular pallets and if the caster base will fit on the available planks. Good luck!
[…] Image credit: prettyprudent […]
[…] Photo from Pretty Prudent […]
[…] los más atrevidos y con ganas del bricolaje… a no perderse la propuesta de las chicas de Prettyprudent.com. Pueden hacer un bonito sofá con ruedas para la galería, el balcón o la […]
[…] via Pretty Prudent […]
I see this post is from 2011. It’s the best tutorial I have seen for making a pallet daybed. Good job! 🙂 Anyway, did you use special outdoor fabric to cover the mattress? I live in Charlotte, NC. It is pretty damp here at night during the Summer so I need something mildew resistant. Thanks for your help!
Thank you! yes, we made the first one 🙂 I have since recovered my pallet daybed in fireproof canvas tarp, which you can find on amazon or other online retailers. it is water resistant (it’s used on boats for storage) but less comfy to actually sit on, and a little tougher to sew, but it has been worth it to make it last. the covers in this tutorial were all cotton and they were great, but the color faded in our california sun. the fireproof tarps have been wonderfula nd we don’t have to move anything when it rains.
[…] BUILD A PALLET DAY BED – PRUDENT BABY […]
This can be this type of beautiful strategy, along with a incredibly practical tutorial! I am arranging on producing this for the residing space
[…] Pretty Prudent, Pierre Vedel, Pallet Furniture […]
nice post to Build a Pallet Daybed
[…] Fuente: Pretty Prudent […]
[…] Source: Pretty Prudent […]
[…] Ако смятате, че можете да се справите с нещо по-завъртяно, вижте варианта по-горе. Инструкции на prettyprudent.com. […]
[…] Ако смятате, че можете да се справите с нещо по-завъртяно, вижте варианта по-горе. Инструкции на prettyprudent.com. […]
[…] I have been wanting comfy patio furniture on my porch for a while now and just couldn’t find any that fit that criteria…. that also fit in my budget. So I find a very simple project that even a non-woodworking expertand it turned out Awesome! See tutorial at prettyprudent.com […]
[…] furniture is all the rage right now and can supply seating for many for just a few pennies. From daybeds to table sets to decks built entirely from pallets, your options are as vast as your imagination. […]
Hi i would really like to make this.. looks like a great idea!! would you be able to post a list of all the items you use and how many because i am a bit confused. thx
[…] Fotos vía: prettyprudent.com, bricolaje.facilisimo.com, etsy.com, ilovepalets.com […]
[…] Fuente: Pretty Prudent […]
[…] Tutorial via pretty prudent […]
[…] image 6 […]
[…] Image: source […]
[…] Ten meble – kanapa na kółkach wygląda niesamowicie. Zdjęcia i instrukcje znajdziecie na prettyprudent.com. […]
This is elegant, practical and resourceful. Love it. One question – you have not built a back on your day bed. Is that a fence behind it in the photo? I would like to build one but don’t have a fence to lean back on.
[…] The initial thing you recognize once you examine this bed is just how cozy it appears to be – but then yet again, should you pay out a lot more interest on the bottom on the bed, you’ll realize that it truly is created largely from tough, cost-effective and versatile wooden pallets! These wooden pallets actually serve as being a sturdy support program for your bed, plus they can withstand a incredible quantity of fat, therefore the day bed can safely be used by two or perhaps three people. Apart from being super puffy and comfy, this day bed also includes several rollers that permit you to effortlessly move it throughout the patio! Irrespective of if you’d like to soak inside the sun, to reposition your day bed so you can view your preferred cooking display or simply to escape the sun and also to “retreat inside the shade” during the sizzling summer days, this is a very versatile and move-able piece of furniture that’s excellent to have all around!Supply and DIY tutorial – prettyprudent […]
[…] DIY Details […]
[…] for years in DIY home furnishings. Case in point: Jaime, one of the talented ladies behind the Pretty Prudent blog, lay two pieces of this hardworking material flat to create the base of an indoor-outdoor […]
[…] DIY Details Here […]
I LOVE IT !! I wonder if this work out for a bed in the bedroom?
I like your table too.
Thank you again.
Hey, thanks for the influence. I followed the instructions mostly except I nailed down a thin sheet of plywood on top, screwed up 1×6 boards on front and back for better support, and since I was using this as a replacement for my sofa, I stained it espresso, and I didn’t cut the pallets to size, but left it long which made something like 9″ of extra space on each side. It basically looks like a 98″ x 40″ wooden platform with a mattress on top. Yet, I am not quite finished. I might put a wooden back supported by the same pipes used here, and maybe later add two small book cases on each side to square in the mattress. But right now it fits my needs, and it much cheaper with than a sofa or a factory-made daybed, and it quite gives my living room a look of masculine ingenuity and design. Thanks again.
That sounds awesome! I would love to see a picture!
[…] Fuente: Pretty Prudent […]
Dear Jaime – LOVE your pallet bed. Am going to make one for my soon to be bohemian “Florida room” (glassed-in patio). I was purchasing parts yesterday and the 3/4″ bolts & drill bit can’t be right…? That’s as big around as my thumb! In the picture, yours look to be maybe 3/8″ or even 1/4″ – judging by the size of the bit in the drill. Could you please clarify? Thanks a bunch!
I was thinking the same thing..they look like 3/8 to me…would you please confirm, Jaime? Very excited to get this project underway!
Oh my goodness. It’s been so many years since I made this, but yes I think 3/8 is correct.
Thank you! An update to the blog post would be so helpful to people like me (as if it wasn’t so super helpful already!) How has your daybed held up? I hope you’re keeping cool under your canvas awning in this heat wave! I live in Venice and can’t even imagine what it must be like inland!
One of the most adorable ideas i have seen in a long time! i did want to know how do you keep the mattress/couch from getting ruined from the weather? do you just have a waterproof cover on them? if so is it one from http://www.protectabed.com/content/mattress_protectors.asp i have read great things about them. I just dont want to attempt this to have a storm hit and destroy it. Thanks
[…] Source : prettyprudent.com […]
[…] Photo via: prettyprudent.com […]
[…] DIY pallet daybed from Pretty Prudent. […]
Do you have a tutorial for the coffee table in these pics? Your entire outdoor area looks amazing! Once I have a backyard/patio area, this will be at the top of my DIY list!
[…] Pretty Prudent […]
[…] Pretty Prudent […]
[…] Pretty Prudent […]
[…] Pretty Prudent […]
[…] Pretty Prudent […]
[…] Pretty Prudent […]
[…] Pretty Prudent […]
[…] Pretty Prudent […]
[…] Pretty Prudent […]
[…] Pretty Prudent […]
[…] Pretty Prudent […]
[…] Pretty Prudent […]
[…] Pretty Prudent […]
[…] Pretty Prudent […]
[…] DIY Instructions at Pretty Prudent […]
[…] Pretty Prudent […]
I made this daybed for my outdoor patio and really love it! After a few tweaks, here are a few tips that I have:
1. Make sure to weather/rust proof the pipes as well as the pallets before putting it together. I accidently left it uncovered during a weekend of rain and the pipes all rusted.
2. Use outdoor fabrics/pillows if possible. They are more expensive, but don’t fade in the sun. Also, I had some foam pillows that literally disintegrated after a few weeks of sun exposure.
3. I would suggest building something for the back or using bolsters because just using a ton of pillows didn’t offer enough support and my guests kept falling backwards.
4. I ended up using a thinner mattress and smaller diameter bolster, so I needed to adjust the height of the pipes for the arms. I would suggest picking a mattress and bolsters first and then choosing an appropriate pipe length.
I built this a year ago, so the total cost of the materials was significantly higher than 2011 prices. I bought the pallets from downtown LA and I think they were about $12/ea. The cost of the rest of the materials was somewhere around $160 at Home Depot. The mattress and cover was another $130 and the bolsters were about $20 on Amazon. The bolster covers were difficult to find in the large size (forget trying to find outdoor fabric for those) but I found some on Amazon for about $10. (Note: there are large bolsters and covers on West Elm currently, but they are not outdoor pillows, and each bolster + cover will run about $90). All in all, the total cost still came in under $400 and it’s a great homemade, unique piece. I am very happy with how mine turned out.
Thank you for the tips! I would love to see a picture!
super idea’s really its a great blog thanks for sharing
This is such a nice project! I want to do it, but I have one question: did you use any type of fortification in the junction between the two pallets? I’m afraid that simply attaching them with bolts and wrenches wont’t be enough to handle the weight of one big man laying on it.
It might give in I guess. I’m thinking about attaching extra battens just in case, but don’t wanna do it if it isn’t necessary. Did yours showed any signs of giving in or is it still sturdy?
Thanks!
After abut 4 years it did start to sag – there was also a caster in the middle – so I did reinforce it then. Couldn’t hurt to do it first!
nice post
I’ve never made anything like your outdoor day bed before but I’d love to try it. I’m on a hunt for back porch ideas and I have to say that yours is absolutely beautiful.
Hi, the post seems quite resourceful and I must thank you for the efforts. However, I’m wondering if you could offer some details about the Bathroom of the article, you could explain it more. I would love to get it as I intend to introduce a new hub of information to our website toiletsguide. Thanks!
building pallet isn’t easy but the tricks you did is cool it looks easy.
I like your style. Thank you for giving me more ideas. Commercial Roofing Sarasota
Very likely I’m going to bookmark your blog . You absolutely have wonderful stories. nicotine e liquid
Good Stuff
Nice, keep it up
Wow! This is such a great idea! Thank you for sharing this tutorial – we are going to save a ton of money!
This is the coolest project!!!
This is so amazing!
Oh my god that’s lot of worlk needed but results is great. Appreciating your efforts
this is the best post for how to build a pallet daybed!
Its really good and helpful article thanks for sharing
I’ve always wanted my husband to build me creations out of pallets. Maybe this will inspire him. Thanks for sharing.
thanks for sharing this is really helpful information with us, this is really helpful for me and also for my upcoming project as well so i hope you to add some more information like this in future as well
This is gorgeous!! Would you be willing to share where you got that amazing table!?
Thanks Jodie! I believe it was from Anthro but its quite old.
Thanks for sharing this precious information.
Okay so we decided to use some of this article for inspiration for our own makeover project. We’ve found it incredibly hard to implement pallets into our interior. It just looks kinda weird. What do you suggest doing to prevent pallets from influencing our interior too much? Interested in your reply. I hope you can help us out here.
Thanks for this article!
This sounds great. Thanks for letting us know
This is amazing!
That is a really nice bed! I like to build this for my daughter and I really appreciated the ideas. Thank you for sharing.
Hey, guys if you ever want free pallets just rock up to the building site and ask.
Builders are always forced to break them up with their hammer and put them in the bin it’s always best to recycle!
Hey! Commend for creating such a great idea. I would like to try this kind of recycle and very efficient stuff. Thank you for sharing this!
you are defining step-by-step instructions for a beautiful, comfortable Pallet Daybed. I would like to try to make my furniture designer this kind of Pallet Daybed at home. Thanks for sharing.
Love these amazing outdoor ideas! It would have been perfect this summer! We will add one before next hot season!
I almost feel like spreading your thoughts on What is Sling and why have multiple scripts among our fellows whose habits include visiting our website tissuetoilet once in a while. Thanks to you
Your shared articles, it is very detailed and meticulous, hope that next time you will have more good articles to share with readers. If you have more time, please visit:
Hey! Commend for creating such a great idea. I would like to try this kind of recycle and very efficient stuff. Thank you for sharing this!
ThankYou For Your Post about the Pallet Daybed Love to See this
Nice Post
This is amazing
That is an excellent post for all who want to learn how to build a pallet daybed thorught woodworking tools
Thanks for sharing this great and useful post.
These are great tips! I like the idea of making a space for happiness!
Merci beaucoup pour ce sujet
Thanks so much for the post.
merci pour vos efforts
Very interesting post. This is my first time visit here. I found so many interesting stuff in your blog especially its discussion. Thanks for the post!
Your posts are very instructive, which I later learned a lot from. It was great I hope you get more new posts! I am one of your Permanent Visitors
good sharing many thanks
wow amazing post, this is a very interesting and informative article. Really I love these all designs. the pallet daybed is so amazing and especially the tires feature is wonderful. great work
thanks I read the post
thank you for the information
Thank you very much.
Your article is very useful
Very good combination of information, thank you
Great and an informative article! this wonderful post………….//
Thanks you for your power.
Respect ……../
This article is very informative. Nice work! Thanks so much for sharing this article.
thank you
great artical
great artical
Thank you the shared information love to read this whole article.
I am so excited to bring this to life for myself this weekend! Thank you for being so thorough!
Excellent blog post……….. I certainly appreciate this website.
Keep writing!
Thanks for the great article, is very helpful……//
Merci beaucoup pour cet article très complet ….. . . //
Nice and helpful post for me. Thank you so much for sharing.
Excellent
Much thanks again.
Merci pour ces document très bien faits.
Thank you very much.
I am so glad to visit your sit
Great Blog! Thanks for sharing this awesome knowledge with us.
This is Very Helpful Post,Thank you for sharing this information……………
Wow, that’s what I was searching for, what a stuff!
I really like your writing style, fantastic information,
very nice post.
very nice post. I definitely love this site. Keep it up!
very informative post, i love your DIY projects and appreciate it. also, your building tips for daybed is gorgeous. Thanks for sharing your thought with us. keep up the good work
Its really helpfull and informative , Amazing work.
Its really helpfull and informative ,
Its really helpfull and informative ,
Merci pour ce travail magnifique et très complet!!
very good thanks
thanks so much for published ..
Excellent post.
It was excellent and good. Thank you for your extremely useful and intelligent information, dear reader. Good luck
We are really grateful for your blog post.
It is a good article and gives us good information. Good luck.
I like the valuable info you provide in your articles.
good sharing;;;; many thanks
.0
good sharing;;;; ..
this amazing post There is content that I have been very helpful.
……
I think you will keep updating and changing these information time to time if there is need to change
this is perfect, thanks!
This is very interesting, You’re a very skilled blogger.
Merci pour ce partage ce travail
great poste..
bonne continuation…
Merci pour ce partage et ce travail.
Merci pour cet article très complet
Great post ! Thanks.
thank you for the information
Thank You For Sharing the Post
Great post thanks
Hey very cool web site!! Guy .. Beautiful .. Superb ..
This post is very simple to read and appreciate without leaving any details out. Great work!
Thanks for sharing this amazing website
This is Very Helpful Post,Thank you for sharing this information.
It was excellent and good,
How is this working now?
This is the ELementor and you know
Are you playing online Games like Fortnite at School competitions? then, I recommended you can read one article about Games unblocked. It hides the current IP and guides you on how to access blocked Fortnite. Visit here, it is free to use.
Pretty good post, I got too much interesting stuff on your blog. Want to know how to get the premium features of Android apps? If yes, then I prefer to read the site about AppYeet. Appyeet is nothing but the medium where you can get numerous premium applications freely available. For more info, you can check the blog about Appyeet.
Wonderful article. keep conveying with us. If you are a TV serials lover and want to see it on Hotstar for free? If yes, then I offer you a blog that is OGzilla, in this blog mentioned about OGzilla Apk, which helps you to get the cracked version of Hotstar and unlock paid features of it for free, and it is worth it for you. For more details, you should read a blog about the OGzilla.
Great blog.Amazing article.Very interesting post for me.
Thanks for sharing.
Thank you for sharing excellent information.
Thank you for sharing excellent information.
This is wonderful For the article I read, thank you very much
Great post, adding workflows and checklists to our customer onboarding process and business configurations are helping us reduce our setup time. Thanks, great article!
Great round up! Like you, Skyscanner is usually the first site I check and I also like Adioso.
Thanks for the yummy information
Clearly the best way to present the topic.. Appreciated. Thank you
Your posts are very instructive, which I later learned a lot from. It was great I hope you get more new posts!
A very good article. Congratulations.
Your posts are very instructive, which I later learned a lot from. It was great I hope you get more new posts!thank you
Great Ideas for learn how to build a DIY daybed our of pallets with our original
thank you very nice website article. nice topic
Your posts are very instructive, which I later learned a lot from. It was great I hope you get more new posts! beautiful article
Nous avions tout ce que nous voulions en tant que famille, sauf une bonne santé.
It is a very heart toughing poem as it is referring to those little children who don’t have anywhere to go and are unable
It is a very heart toughing poem as it is referring to those little children who don’t have anywhere to go and are unable to eat because of their shabby circumstances. thank you
I can’t imagine focusing long enough to research; much less write this kind of article. You’ve outdone yourself with this material. This is great content.
Good day.i am doing research right now and your blog really helped me
Thanks for your valuable post, Really nice and very informative . good
Nice post
Nice post
I’m really enjoying this website.
Really nice and informative post . thank you
Nice and helpful post for me. Thanks
cool vlog nice
Thanks for sharing informationi really like it . keep it up bro
Thanks for sharing this Great article
I appreciate the valuable time you have used to share this.
Verry good Content For Reading , thanks for sharing with us
Thank you so much , I really appreciate your site .
the good blog, the Leave a Legacy is not going away forever.
good work, the article written is very useful for its readers, it contains complete information
Horrible instructions! Messy random photos, ridiculously inadequate photos. Pathetic rambling monologue, just get to a point step by step you nitwit
goooooooooood
Nice and helpful post for me. Thanks so much for the post.
.
i realy like it very much keep up sir
wow, amazing, and I like that you really show all the things that you use and great photo also…
You are outlining the precise steps needed to construct a lovely and cozy pallet daybed. I want to attempt creating this style of Pallet Daybed at home with my furniture designer. I appreciate you sharing.